Options Implementing
The Workbench is where construction administrators set up and manage the catalog of available options for each project. This guide covers how to create, organize, and maintain your options library.
In this guide, we will cover:
- Accessing the options management area
- Creating new Sales Options
- Importing options from other projects
- Managing and editing existing options
How We Got Here
You have a project ready for sales and need to define what upgrades and extras are available to purchasers. Before sales staff can add options to deals, administrators must configure the option catalog in the Workbench.
Accessing the Options Management Area
1. Navigate to the Workbench
Open the Sales App and click on Workbench in the side navigation menu. Select the community and project you want to configure options for. The Workbench provides administrative access to project configuration and setup.
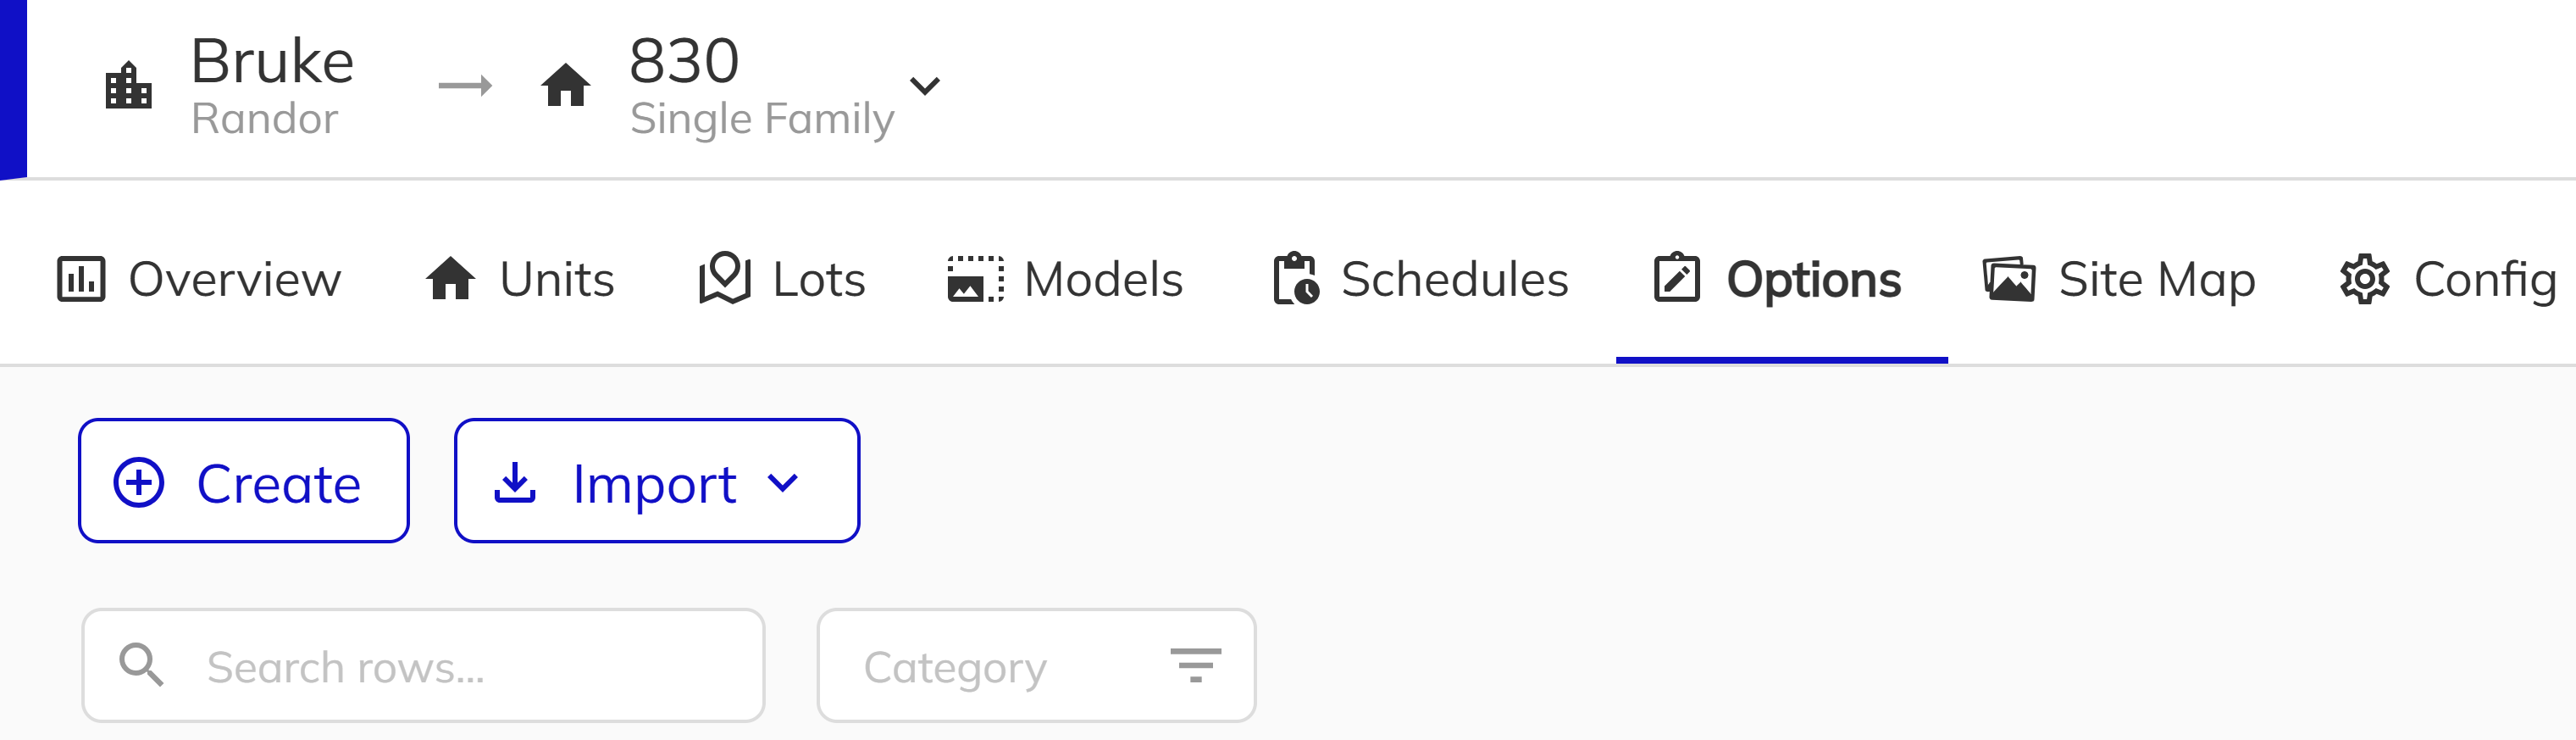
2. Open the Options Tab
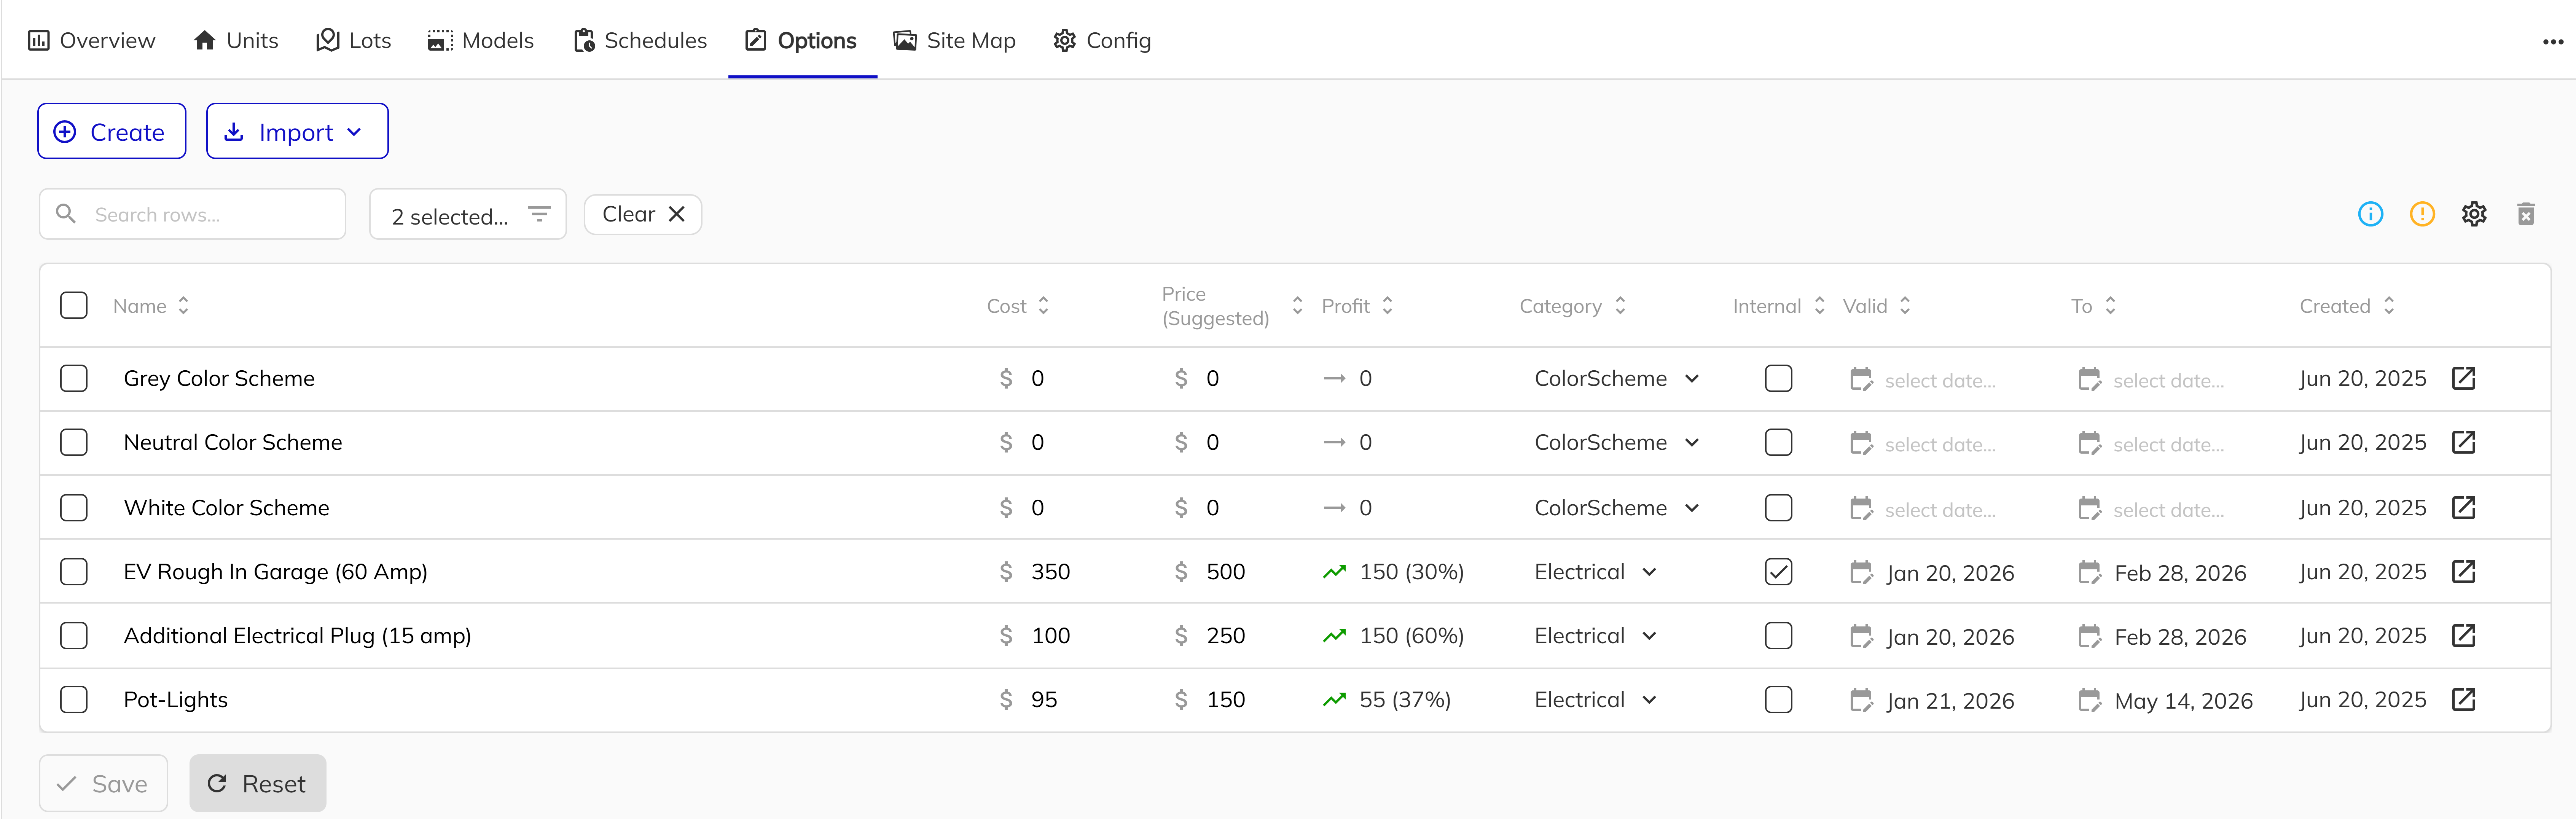
Within the project view, click on the Options tab to access the Sales Options management area. Here you'll see all existing options for the selected project, organized by category. The list displays option names, categories, suggested prices, and validity status.
Creating New Sales Options
1. Launch the Create Option Workflow
Click the Create button to open the option creation dialog. This workflow guides you through defining all the details for your new option in a side panel.

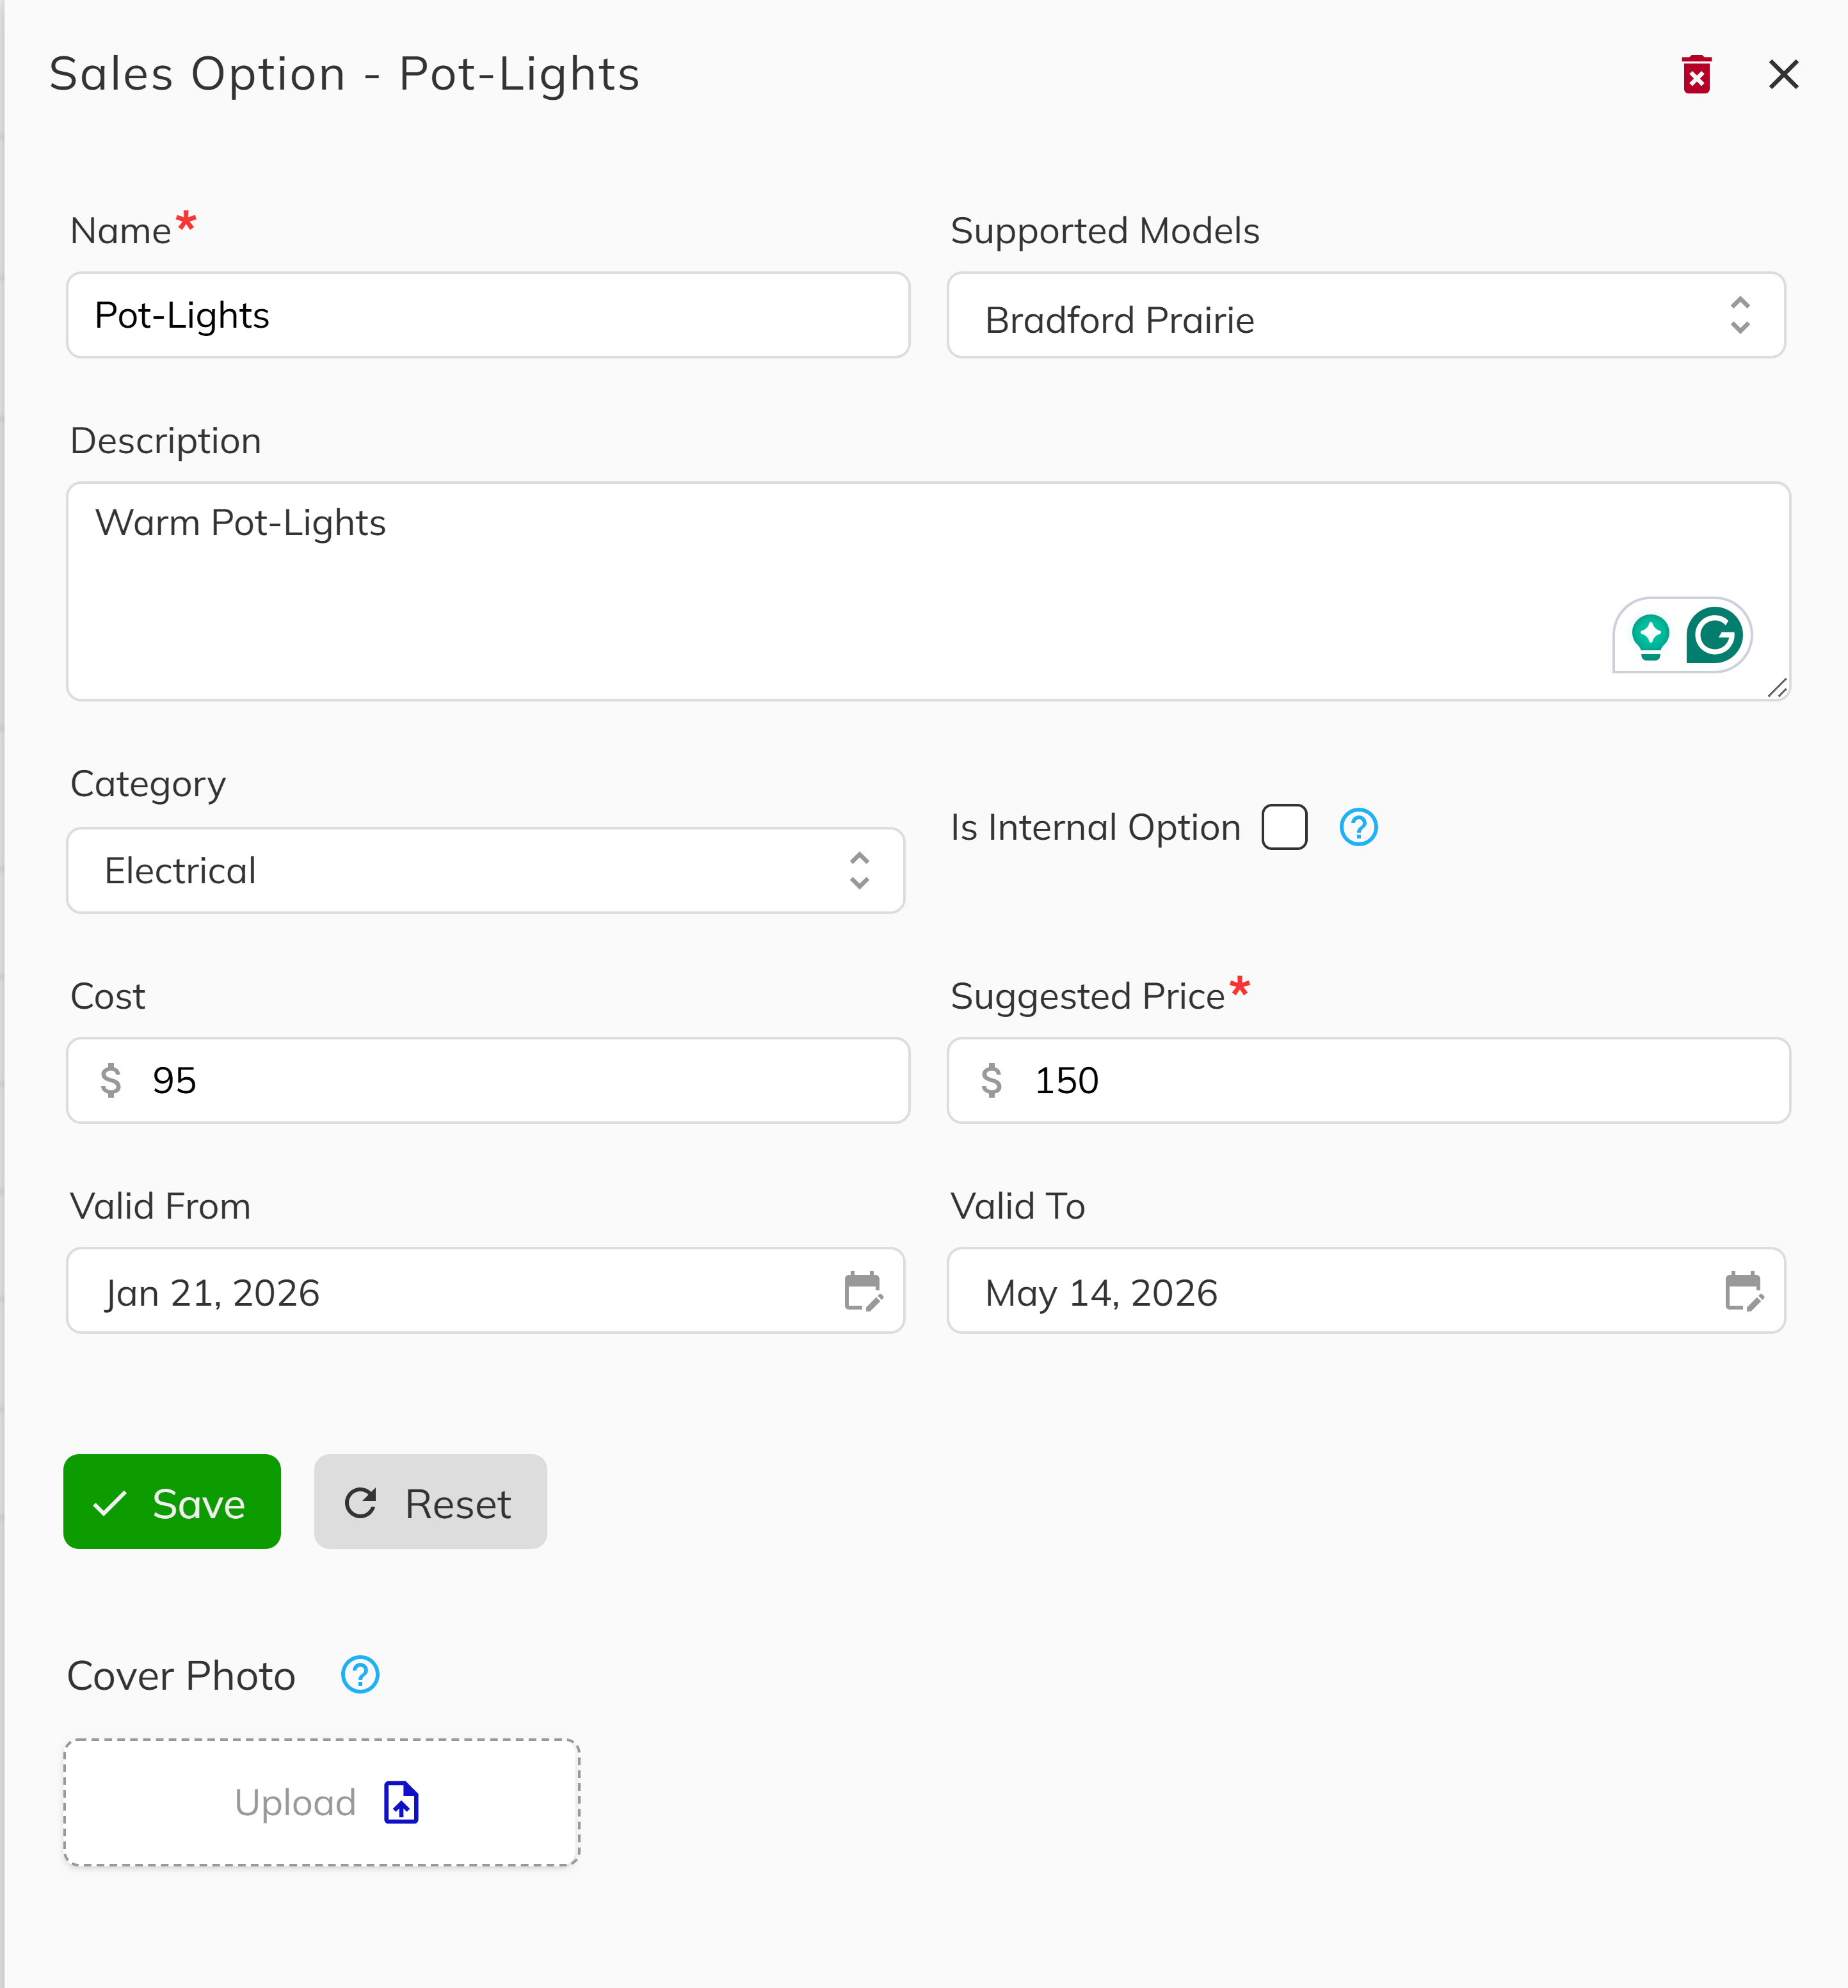
2. Define the Option Details
Fill in the required fields for your new option:
- Name — A clear, descriptive name (e.g., "Premium Kitchen Package")
- Description — Detailed information about what's included
- Category — Select the appropriate category for organization
- Suggested Price — The default selling price
- Cost — Your internal cost for this option (used for profit calculations)
- Valid From/To Dates — Optional date range for availability
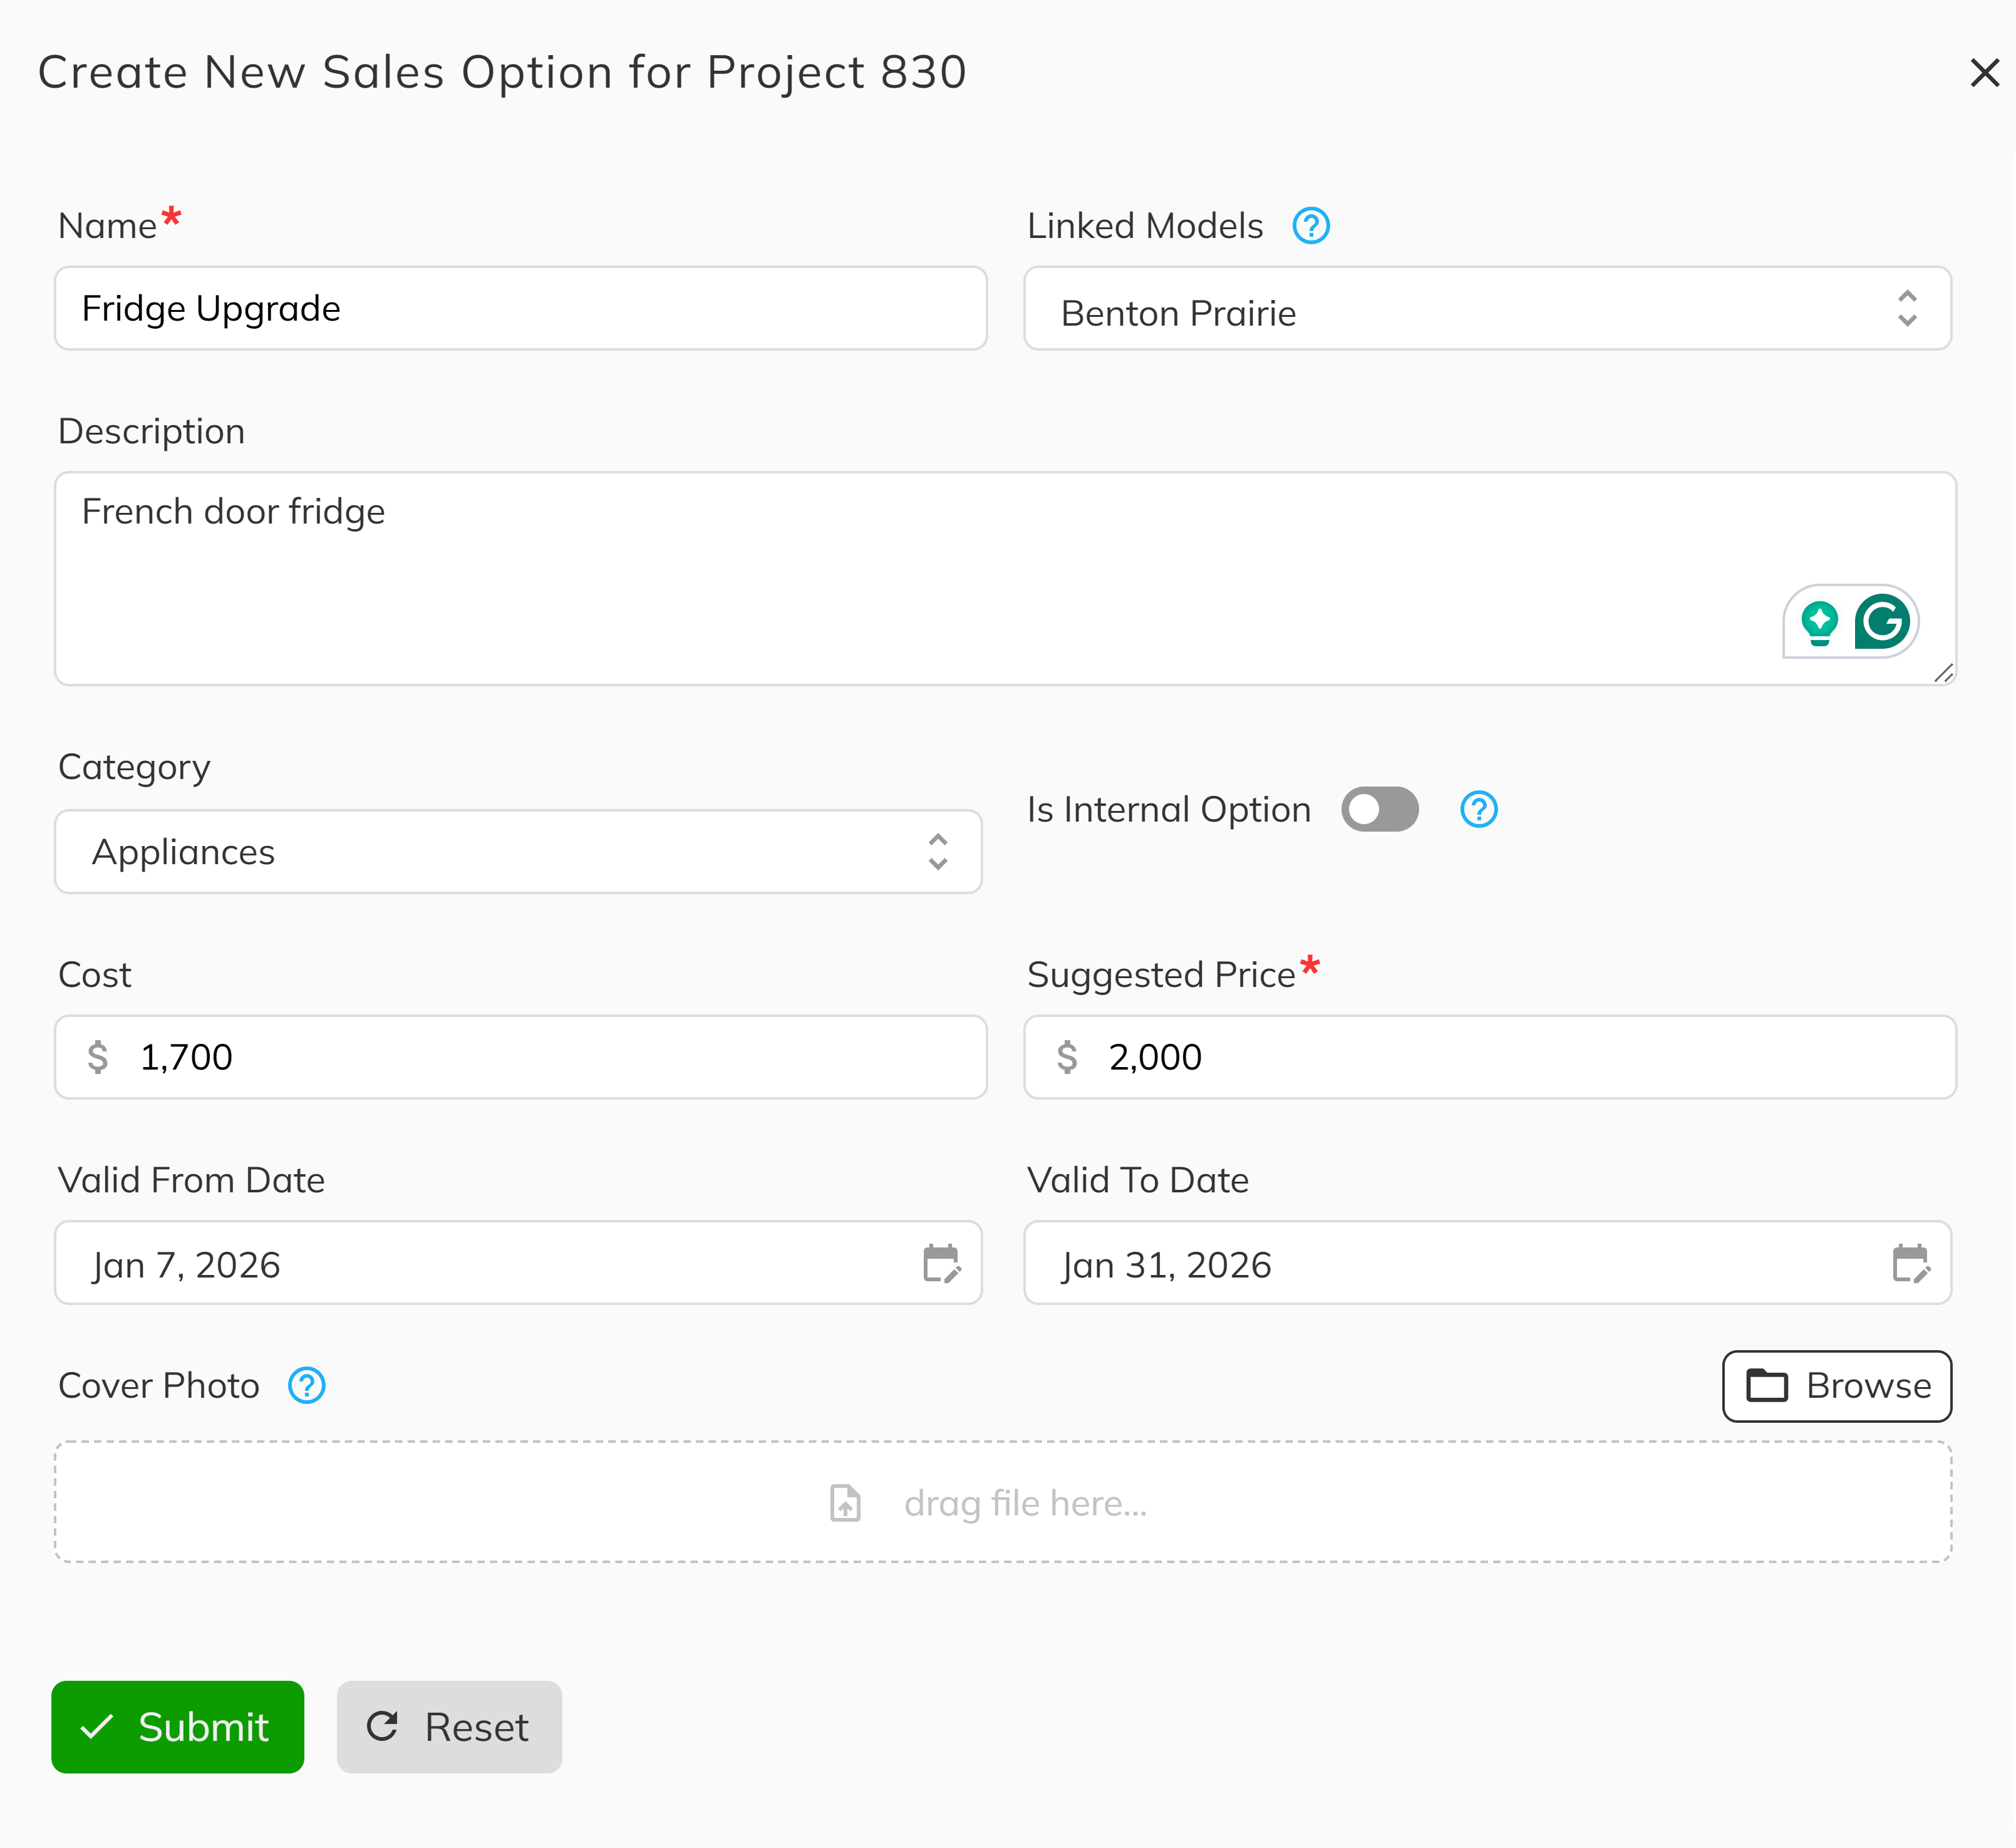
Use clear, consistent naming that includes enough detail for sales staff to identify the option quickly. For example, "Kitchen - Quartz Countertops Upgrade" is more helpful than "Kitchen Option 1".
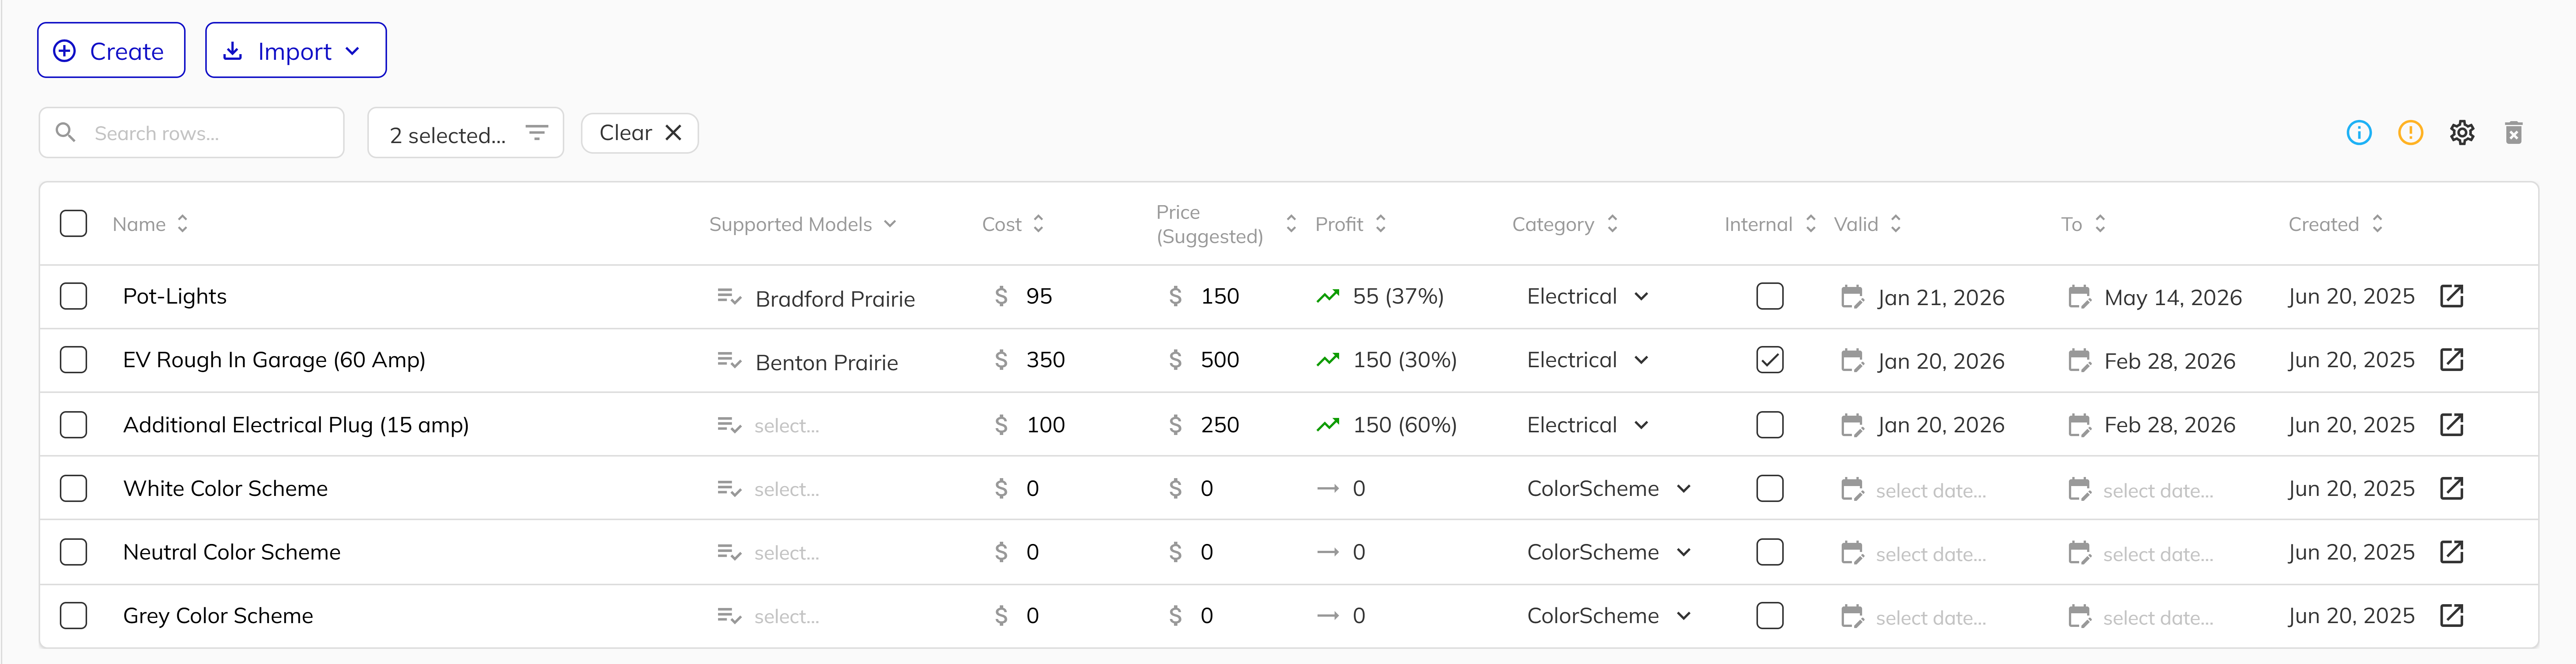
3. Associate with Models
Select which floor plan models this option applies to. Options can be available for all models or restricted to specific ones. This ensures staff only see relevant options when working with a particular home.
For example, a "Finished Basement" option might only apply to models that have basements, while "Smart Home Package" could apply to all models.
4. Add Cover Photos (Optional)
Upload images that showcase the option. These photos help sales staff and purchasers understand what they're selecting. High-quality photos are especially important for visual options like flooring, countertops, or exterior finishes.
Importing Options from Other Projects
1. Use the Import Options Feature
If you have similar options across multiple projects, use the Import Options workflow to copy options from another project. You can also import options using a CSV file. This saves time and ensures consistency across your portfolio.
Click Import Options, then:
- Select the source project to copy from
- Choose which options to import (you can select multiple)
- Decide whether to preserve the original validity dates or reset them
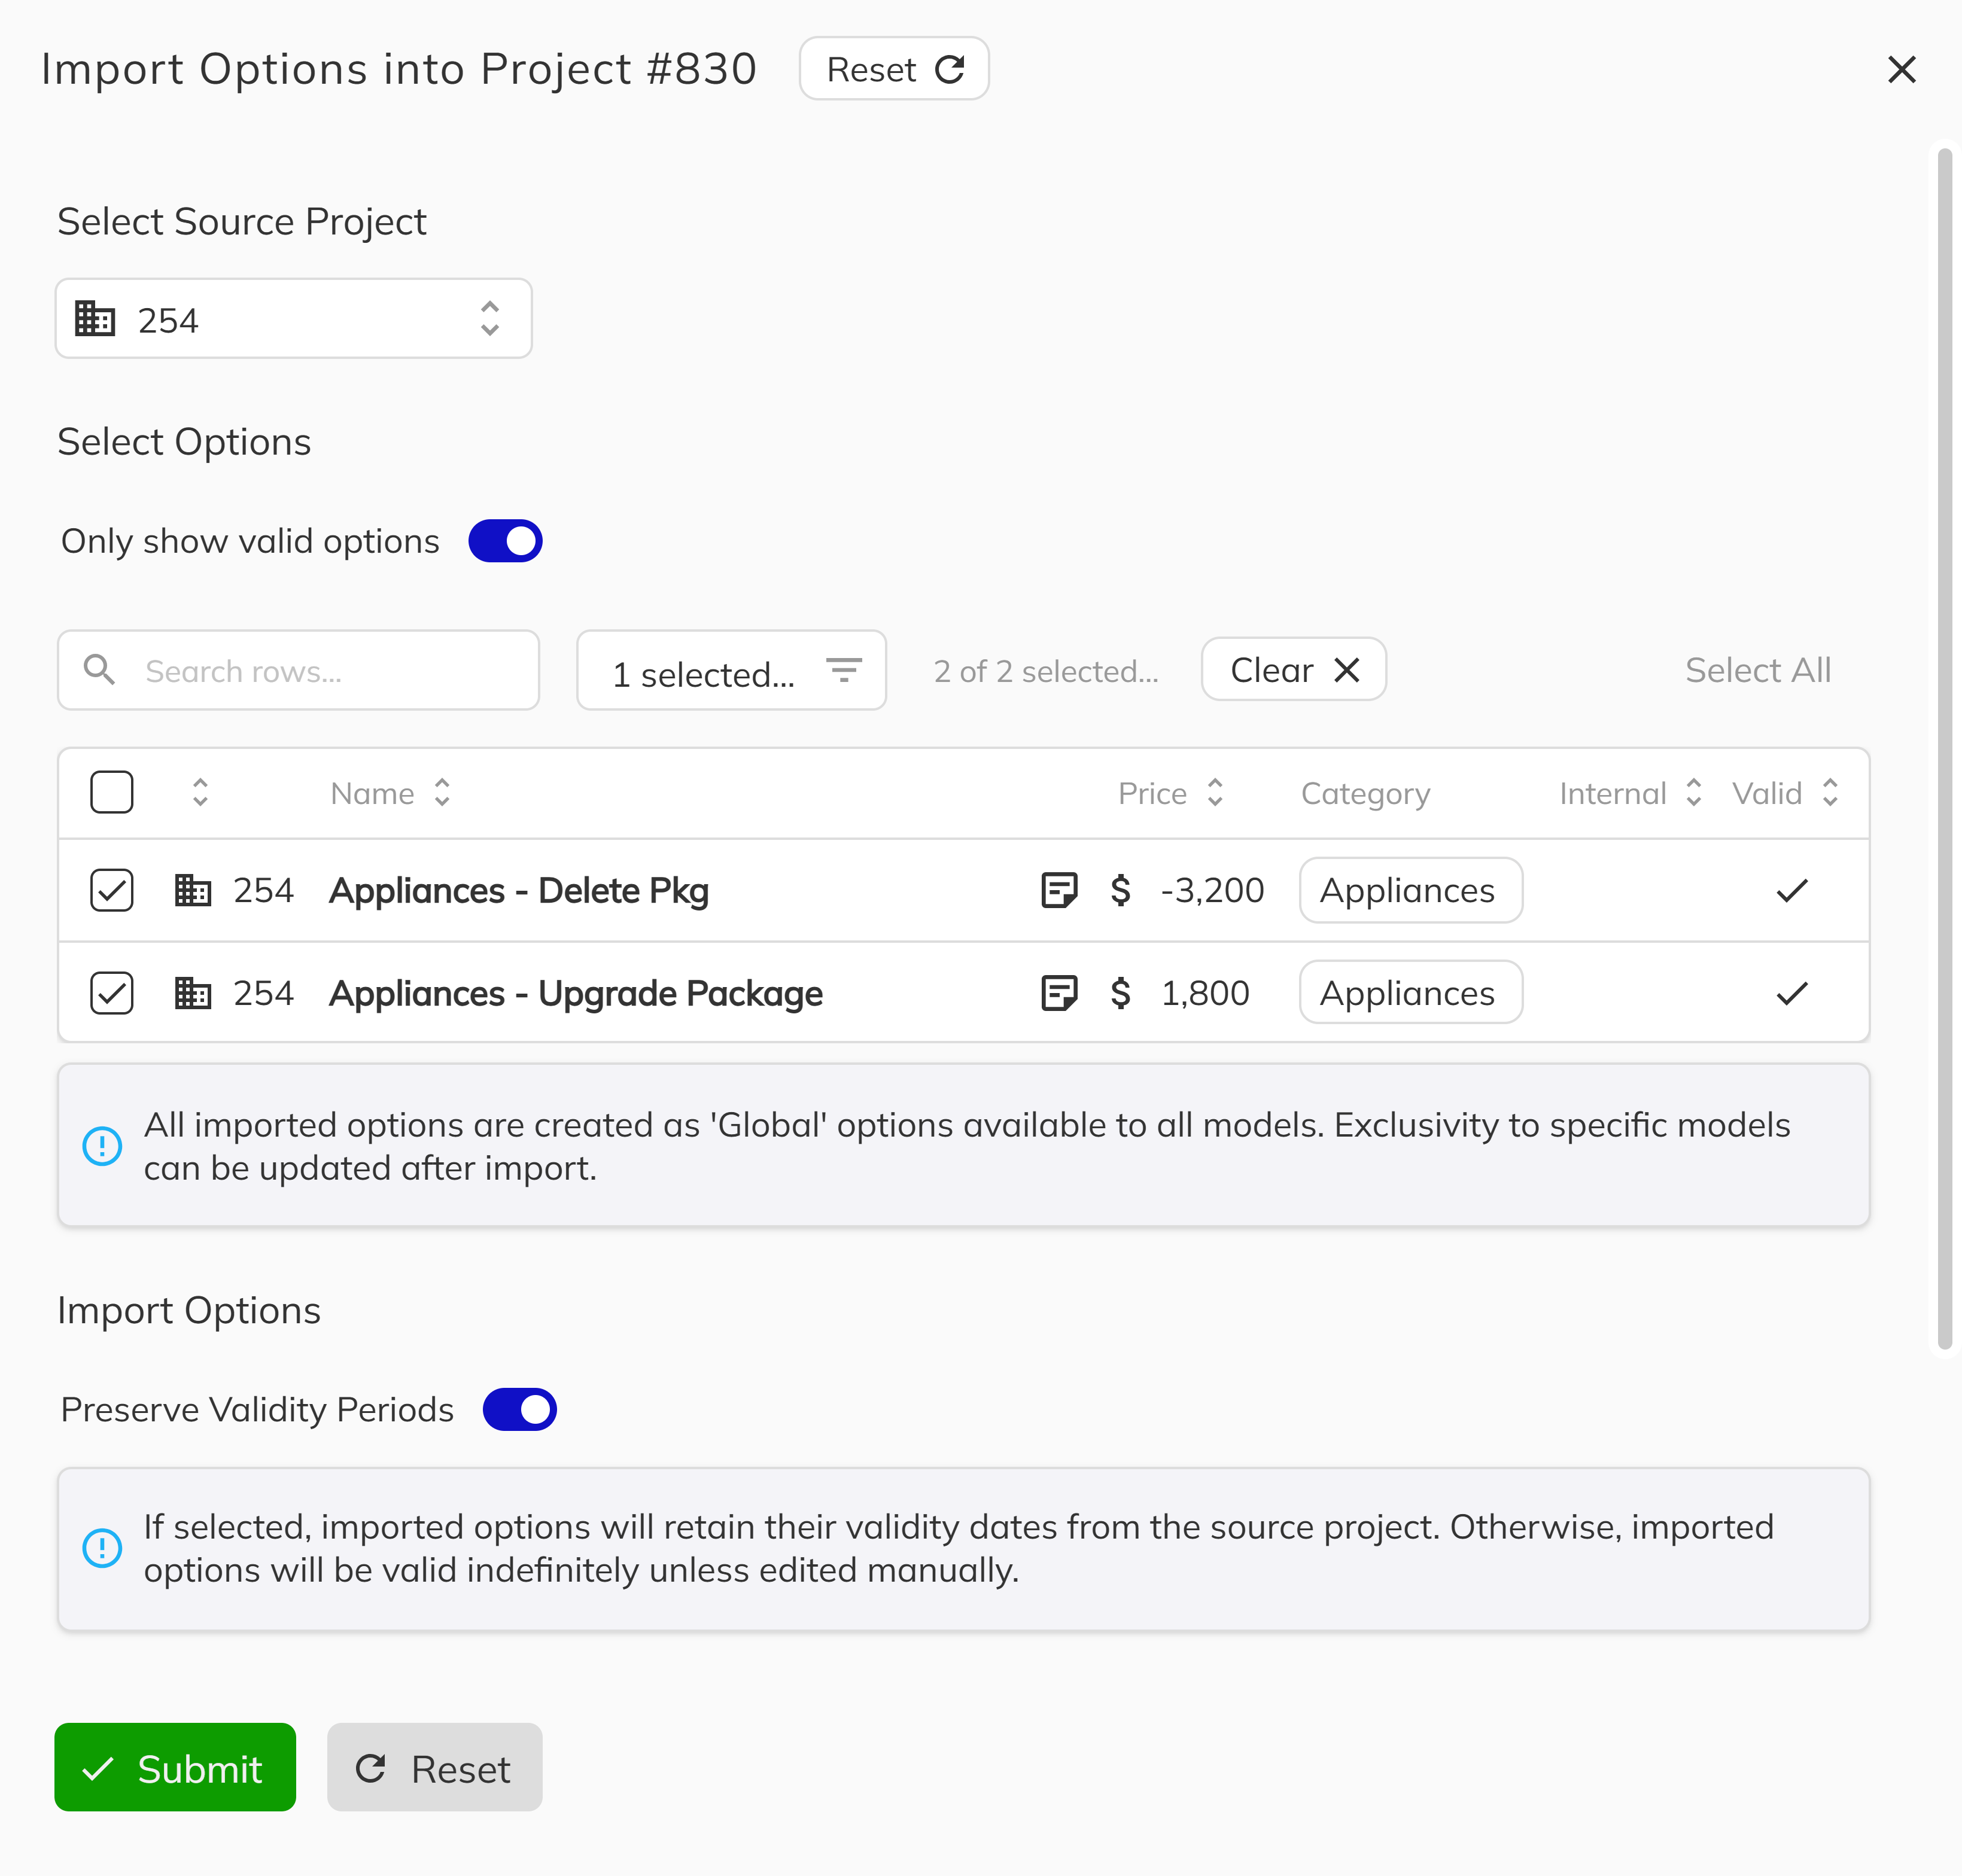
Imported options are copies—changes to the original won't affect the imported version, and vice versa. Model associations are preserved if the target project has models with matching names.
Managing Existing Options
1. Edit or Update Options
Click on any option in the list to open its detail panel. From here you can:
- Update pricing or descriptions
- Modify model associations
- Change validity dates
- Add or remove cover photos
Changes to a Sales Option do not automatically update existing applied Sales Options. Each applied Sales Option maintains its own price and details from the time it was created. This is by design—it ensures contract pricing remains accurate.
2. Deactivating Options
To remove an option from availability without deleting it, set the Valid To date to a past date. This preserves historical data while preventing new selections.
3. Deleting Options
Options that have never been used on a deal can be deleted. Options with existing applied Sales Options cannot be deleted—they can only be deactivated.
Option Categories Reference
When creating options, select the appropriate category:
| Category | Use For |
|---|---|
| Appliances | Kitchen and laundry appliances |
| Blinds | Window blinds and coverings |
| Cabinets | Cabinet selections and upgrades |
| Color Scheme | Interior and exterior color selections |
| Doors | Door selections and upgrades |
| Electrical | Electrical upgrades and additions |
| Exterior Finish | Exterior finish materials and selections |
| Flooring | Floor covering selections |
| Finishing | General finishing work and details |
| Heating | Heating system upgrades |
| Home Automation | Smart home and automation features |
| Interior Finish | Interior finish materials and selections |
| Lighting | Lighting fixtures and upgrades |
| Mechanical | Mechanical system upgrades |
| Multiple | Options spanning multiple categories |
| Parking Slot | Assigned parking spaces (special handling) |
| Plumbing | Plumbing upgrades and additions |
| Rough-Ins | Rough-in preparations for future installations |
| Storage Locker | Assigned storage units (special handling) |
| Structure | Changes affecting the building structure |
| Tile | Tile selections and upgrades |
Color Scheme, Parking Slot, and Storage Locker have special behavior in the system. See Special Option Categories for details.
Congratulations! You have successfully learned how to implement Sales Options in the Workbench. By working through each section—from navigating to the options management area, creating new options with all required details, associating options with specific models, importing options from other projects, to editing and managing existing options—you now have a complete understanding of how to build and maintain your options catalog. Your options catalog is the foundation for tracking home customizations, and with clear naming and accurate categorization, your sales team will have everything they need to serve purchasers effectively.
Next Steps:
- Understand special option types: Workbench FAQS