Options Inbox
The Options Inbox is a centralized location for managing Sales Option approvals and custom requests. This is especially important for authorization before they can proceed.
In this guide, we will cover:
- Accessing and navigating the Options Inbox
- Reviewing and approving pending Sales Options
- Processing custom option requests
- Using bulk operations
- Tracking activity history
How We Got Here
Sales staff have added Late Sales Options to deals or submitted custom option requests. These items need review and approval before they become active on the contract. The Options Inbox provides a single place to manage all pending items across your accessible projects.
Accessing the Options Inbox
1. Open the Options Inbox
Click on Options Inbox in the side navigation. This view shows all pending items requiring attention across your accessible communities and projects.
The inbox is organized into tabs:
- Inbox — Pending Sales Options awaiting approval
- Customs Requests — Custom option requests awaiting processing
- All Options — Recent Sales Option events and activity
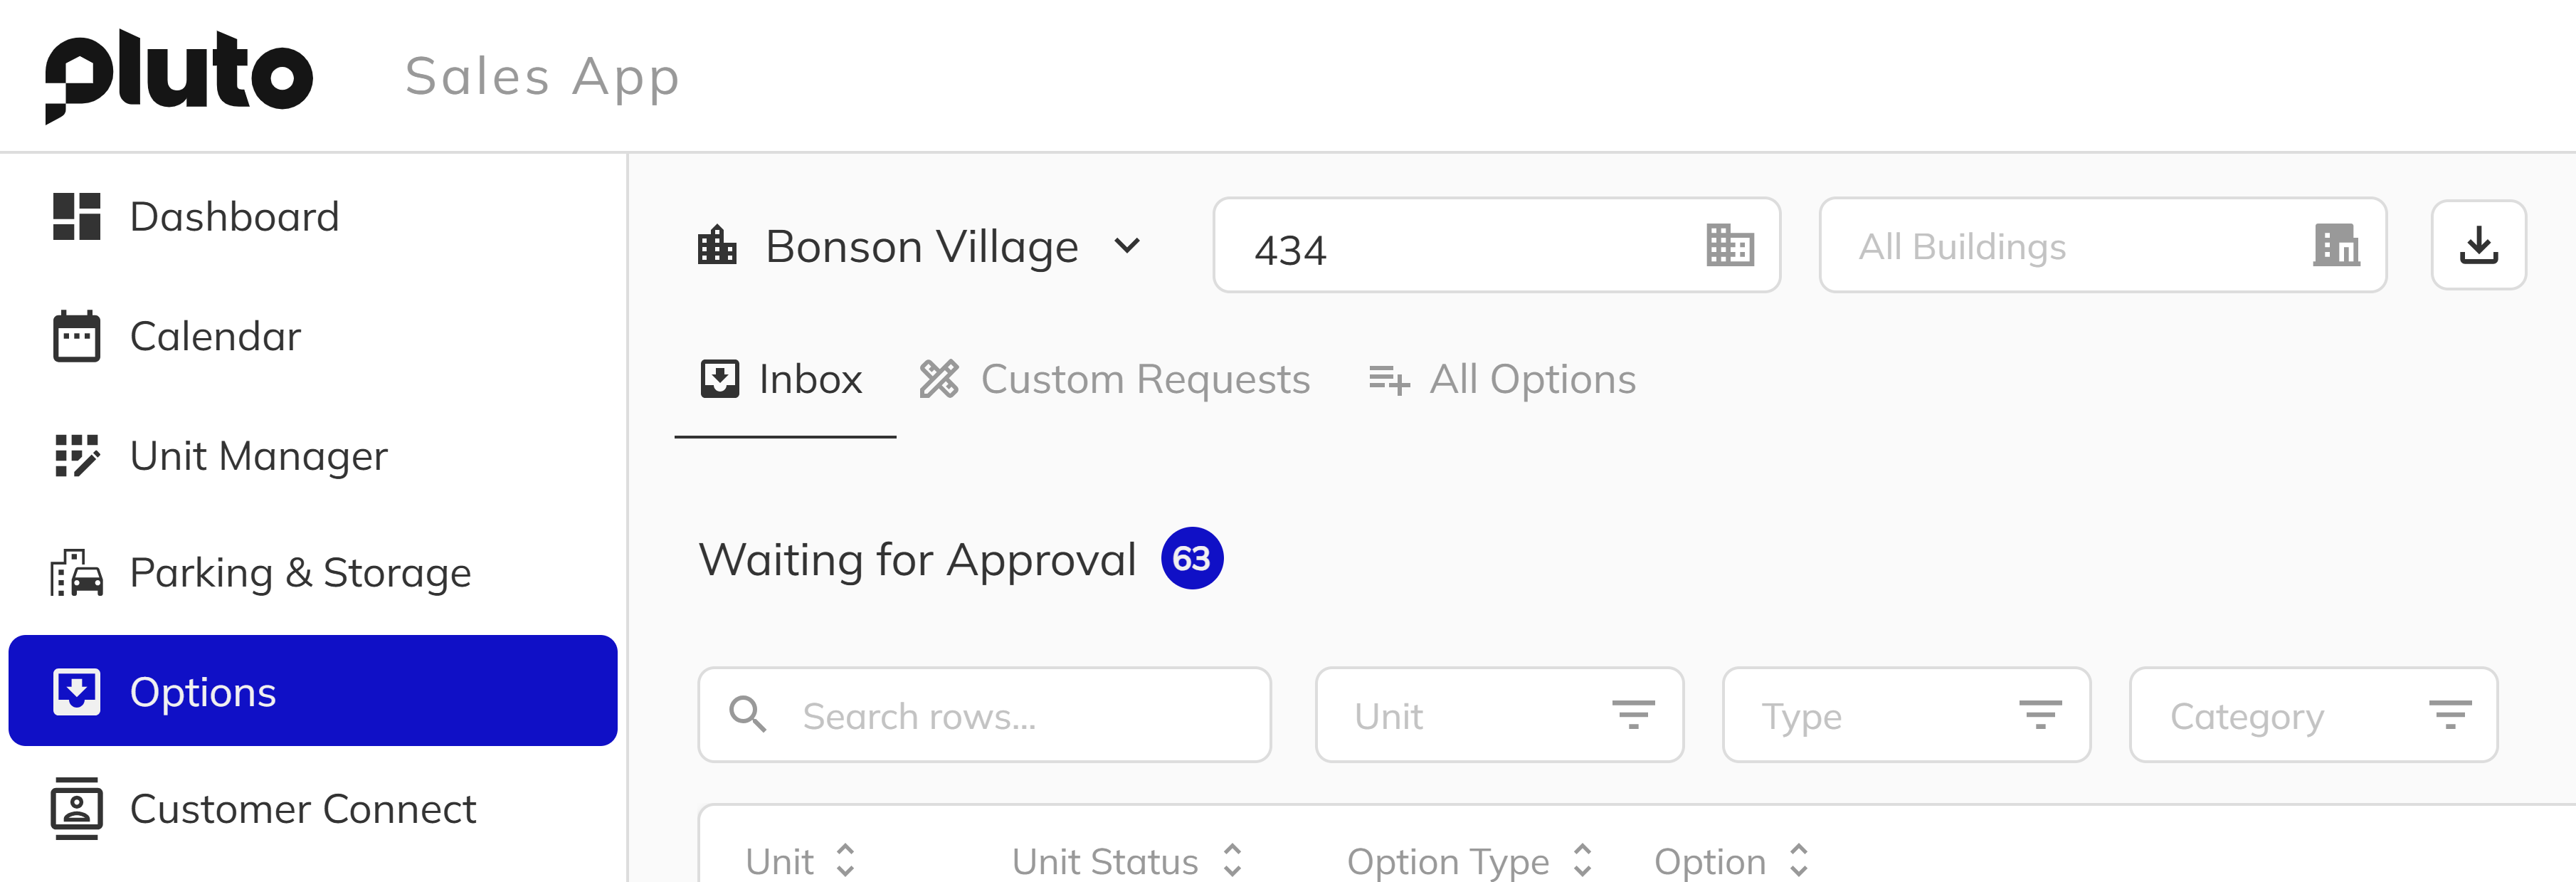
The Inbox Tab
The Inbox tab shows all Sales Options awaiting approval. This is where you'll spend most of your time when processing Sales Options.
1. Review Pending Approvals
Items are organized by priority with Late Sales Options typically requiring more urgent attention. The list shows:
- The unit (unit number)
- Unit Status
- Option Type
- Option with Description
- Sales Price
- Profit
- Waiting
- Action Buttons

2. Filtering the Inbox
Use the filters to narrow down the list:
- Search — Search by option name, unit number, or other keywords
- Community — Focus on a specific community
- Project — Filter to specific projects within the selected community
- Unit — Filter to a specific unit (unit number)
- Type — Filter by Sales Option type (Internal, Standard, Late Request, Custom Request)
- Category — Filter by option category (Appliances, Electrical, Flooring, etc.)
3. Approve or Deny Sales Options
Click on a pending Sales Option to review details. The detail panel shows:
- Full option information and description
- Price, cost, and quantity
- Profit margin
- Who created it and when
- The unit and building details
- Option cutoff date for the unit
You can then:
- Edit — Adjust the price, cost, or quantity before taking action
- Approve — Authorize the Sales Option to proceed to finalization
- Finalize — Complete the Sales Option (typically done by construction after approval)
- Deny — Reject with a required reason (reason is visible to the submitter)
Approval and finalization are separate steps. Sales staff typically approve Sales Options, while construction staff finalize them after verifying the work can be completed. Depending on your permissions, you may be able to perform one or both actions.
4. Approval Considerations
Before approving, consider:
- Is the pricing correct?
- Is this within construction cutoff dates? Even though the system should catch this, it's always worth double-checking.
- Does this option require any coordination?
- Are there any contract implications?
When denying a request, always provide a clear reason. This helps the submitter understand the decision and potentially resubmit with corrections. Common denial reasons include: pricing error, past construction cutoff, requires additional documentation.
The Custom Requests Tab
1. Process Custom Option Requests
The Customs tab shows all pending custom option requests. These are items that need to be converted into formal Sales Options.
Custom requests come from sales staff when a purchaser wants something not in the standard catalog. The tab is organized into two sections:
- Awaiting Completion — Requests that need to be processed into Sales Options
- Awaiting Sales Approval — Completed requests waiting for final sales approval (if configured)
Click on a request to see:
- The requested title and description
- Suggested price and quantity
- Category
- The unit (building and unit number)
- Who requested it and when
- Supported images

2. Accepting or Deny Options
You can:
- Complete — Accept the custom request to create a sales option within the system
- Deny — Reject with will prompt for a required reason
3. Complete Custom Requests
When completing a custom request, you're creating both a Sales Option (added to the project catalog) and an applied Sales Option (for this specific deal).
Fill in:
- Option Title — The name for the new Sales Option (may differ from the requested title)
- Description — Complete details for the option
- Category — Select the appropriate category for organization
- Cost — Your internal cost for this item
- Price — The selling price for this purchaser
- Quantity — The number of units being ordered
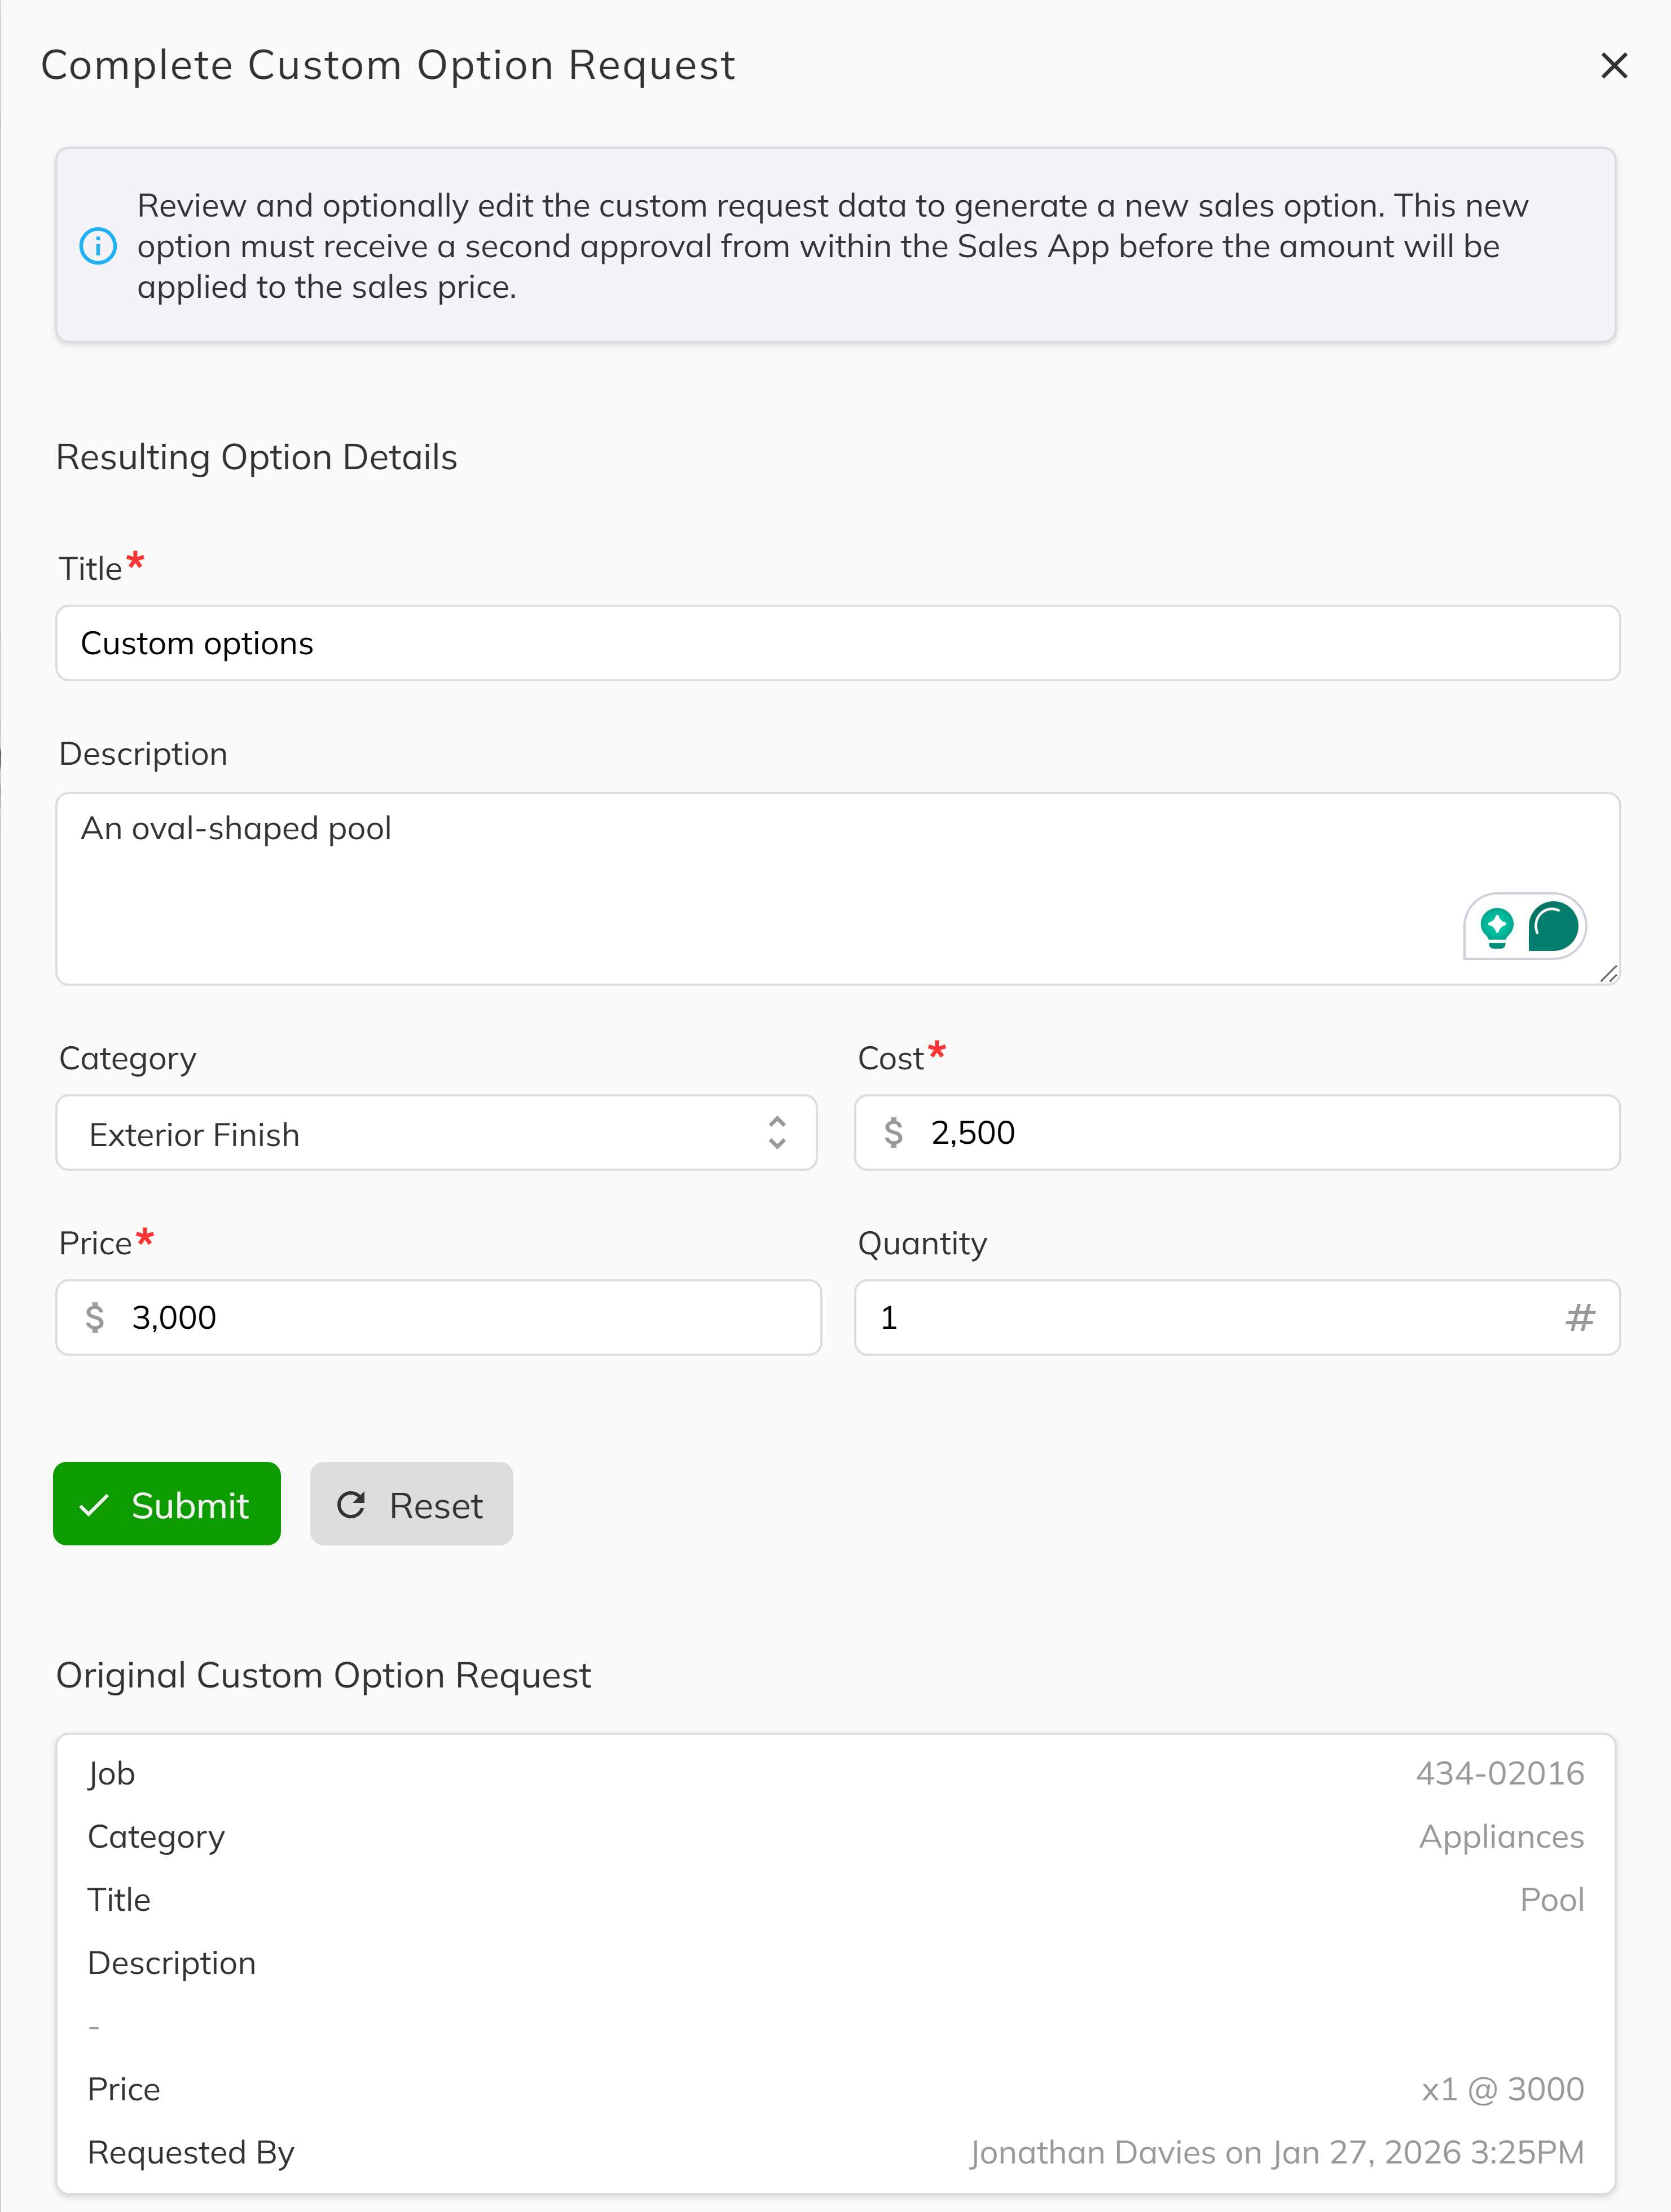
Depending on your project configuration, completed custom requests may require an additional sales approval step before the applied Sales Option is finalized. This setting is controlled by the Use Custom Sales Option Final Approval option in Project Configuration.
If you need to gather pricing from suppliers or construction before completing a request, you can leave it in the Customs tab until you have accurate numbers. The submitter will be notified once you complete or deny the request.
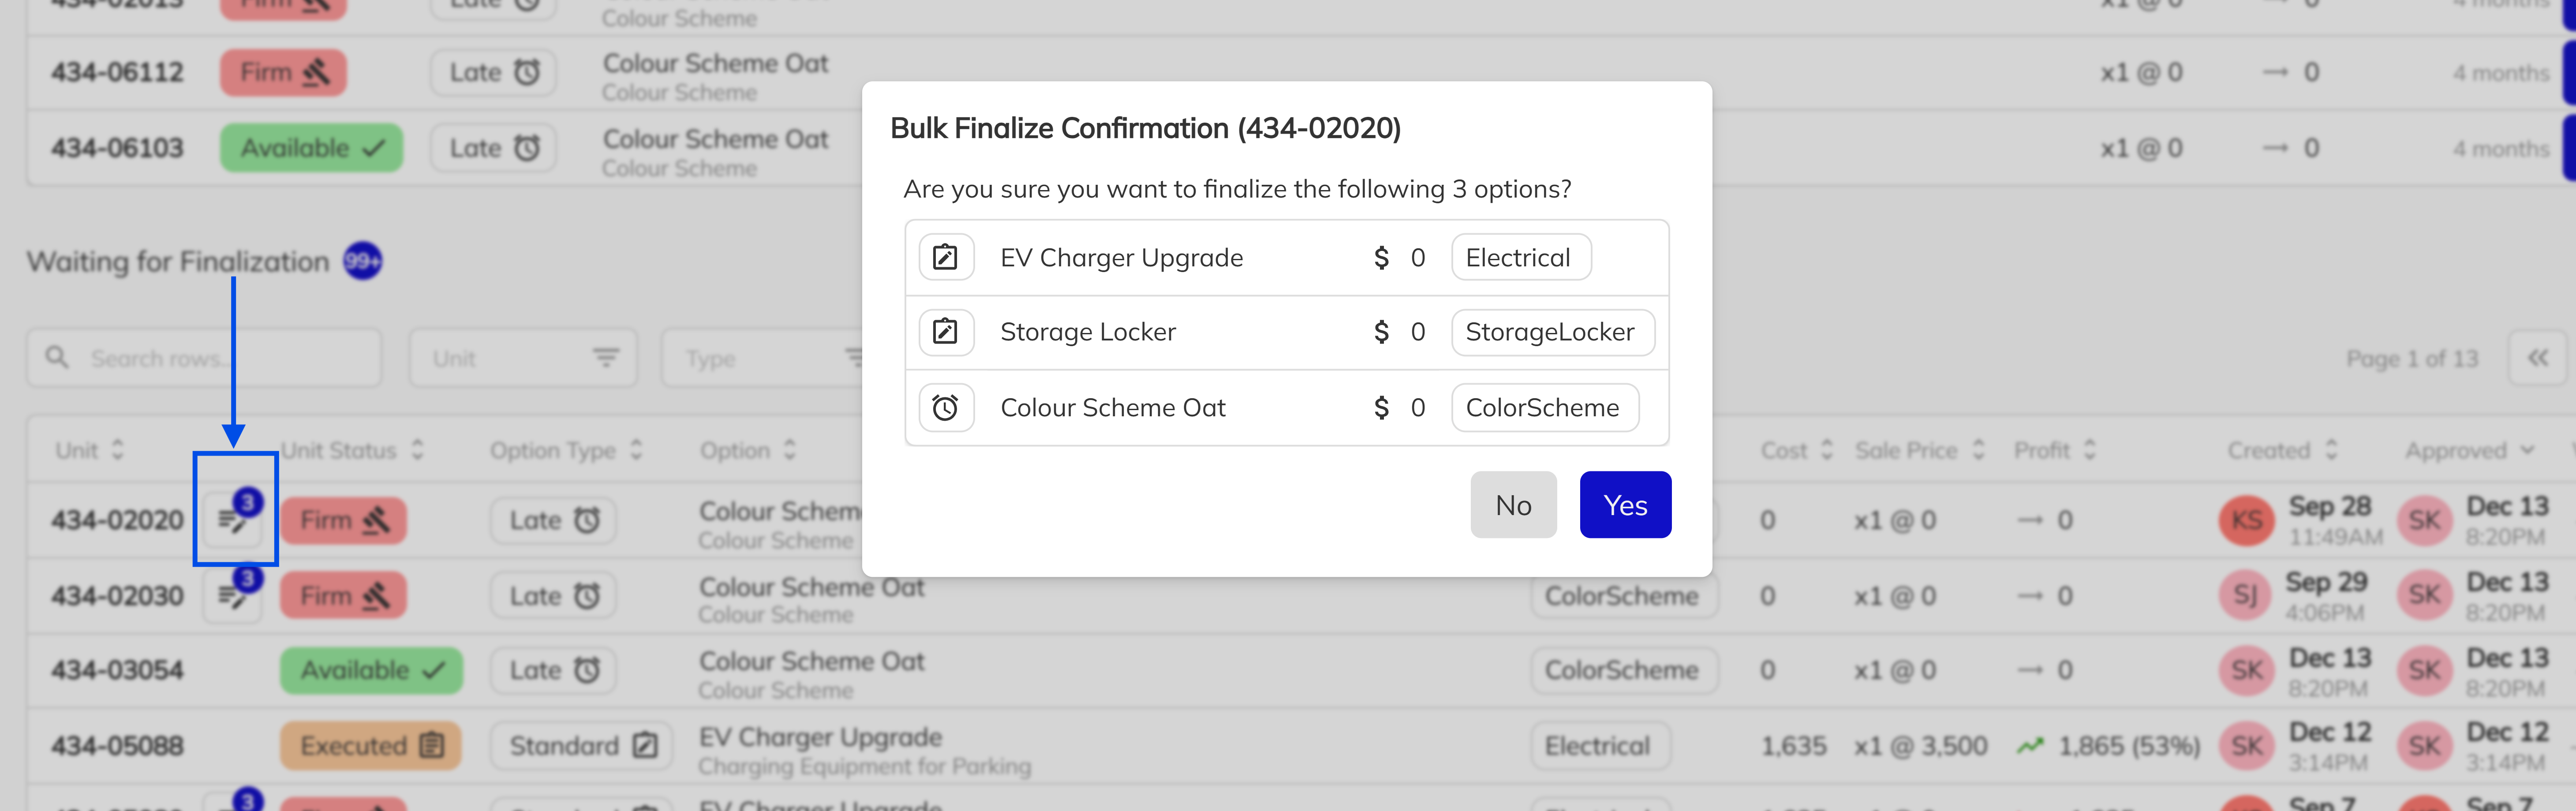
Bulk Operations
Process Multiple Items
Use the checkbox selection to process multiple Sales Options at once. This is useful when:
- Processing a batch of similar unit requests
- Clearing a backlog of routine approvals
- Finalizing multiple approved items together
Select the items you want to process, then use the available bulk actions to finalize all selected approved Sales Options.
Dashboard Integration
Sales Options also appear on your main dashboard in dedicated panels:
| Panel | Description |
|---|---|
| Pending Late Sales Options | Shows Late SOs awaiting your approval |
| Pending Custom Requests | Displays custom requests needing processing |
These panels provide quick access to your most urgent items without navigating to the full Options Inbox.
Workflow Best Practices
Processing Efficiency
- Process daily — Don't let items pile up; daily processing keeps deals moving
- Use filters — Focus on one project or category at a time
- Batch similar items — Approve routine items together when appropriate
Communication
- Provide denial reasons — Always explain why something was denied
- Follow up on complex requests — Some items may need conversation before approval/denial
- Notify of delays — If processing will take time, let the submitter know
Documentation
- Accurate pricing — Verify prices before approval, especially for custom items
- Complete descriptions — Ensure custom options have thorough descriptions
- Track patterns — If you see repeated custom requests, consider adding a standard option
Congratulations! You have successfully learned how to manage the Options Inbox. By working through each section—from navigating the Options Inbox and its tabs, reviewing and approving or denying pending Sales Options, processing custom option requests, to using bulk operations for efficiency—you now have a complete understanding of how to keep your options workflow moving smoothly. Keeping the Options Inbox current ensures deals move forward and purchasers get timely responses on their upgrade requests.