Inspection Templates: Create, Edit, and Manage
Inspection templates define the structure and checklist for each type of inspection in your project. They determine which locations are inspected, what line items appear at each location, and which vendor trade category is responsible for the work. By building templates once—either as a master for an entire division or scoped to a specific project—you can standardize quality control across all your buildings and Units.
In this guide, we will cover:
- The benefits of inspection templates
- The different inspection types you can template
- Master templates vs. project templates
- Creating, editing, and deleting templates
- Adding and managing line items with vendor categories
- How property locations, multi-zone, and multi-instance work within templates
- Understanding associations and link items
How We Got Here
Your project has buildings and Units progressing through construction stages, and you need a repeatable inspection structure so every unit is checked consistently. Before inspections can be created, an administrator must define templates that specify what to look for, where to look, and which trade is accountable. The templates pull from the Property Locations, Items & Deficiency Tags system you configured in Admin.
Why Templates Matter
Templates give you:
- Consistency — Every inspection of the same type follows the same checklist, preventing missed items.
- Speed — New inspections are generated from a template in one click instead of being built from scratch.
- Accountability — Vendor categories on line items tie directly to assigned vendors, so work orders route to the right trade automatically.
- Scalability — Master templates apply across all projects in a division. Project templates let you customize for specific building requirements without affecting others.
- Reusability — Copy an existing template to a new project and adjust only what's different.
Inspection Types
Each template is created for a specific inspection type. The available types represent the major construction stages:
| Type | Description |
|---|---|
| Pre Pour | Concrete pre-pour inspection checklist |
| Foundation | Foundation stage inspection items |
| Framing | Structural framing verification |
| Building Envelope | Exterior envelope and weather barrier |
| Mechanical | HVAC, plumbing, and mechanical systems |
| Insulation | Insulation installation verification |
| Drywall | Drywall installation quality check |
| QC Deficiencies | Quality control deficiency walkthrough |
When creating a template, you select one of these types. The type cannot be changed after creation—if you need a different type, create a new template.
Master Templates vs. Project Templates
The system supports two scopes for templates, distinguished by whether a project is assigned:
| Master Template | Project Template | |
|---|---|---|
| Scope | Entire division (all projects) | One specific project |
| Project field | Not set | Set to a specific project |
| Use case | Standardize a baseline inspection across all projects | Customize inspections for a project with unique requirements |
| Visible to | All projects in the division | Only the assigned project |
| Title prefix | Automatically prefixed with "Master" | Named after the project and type |
When to use each
- Start with a master template when your inspection requirements are the same across projects. This is your baseline.
- Copy the master into a project template when a specific project needs additional items, different locations, or unique vendor assignments that don't apply elsewhere.
- Create a project template directly when the inspection structure is entirely unique to one project.
Crafting a New Template
1. Open the Inspection Templates page
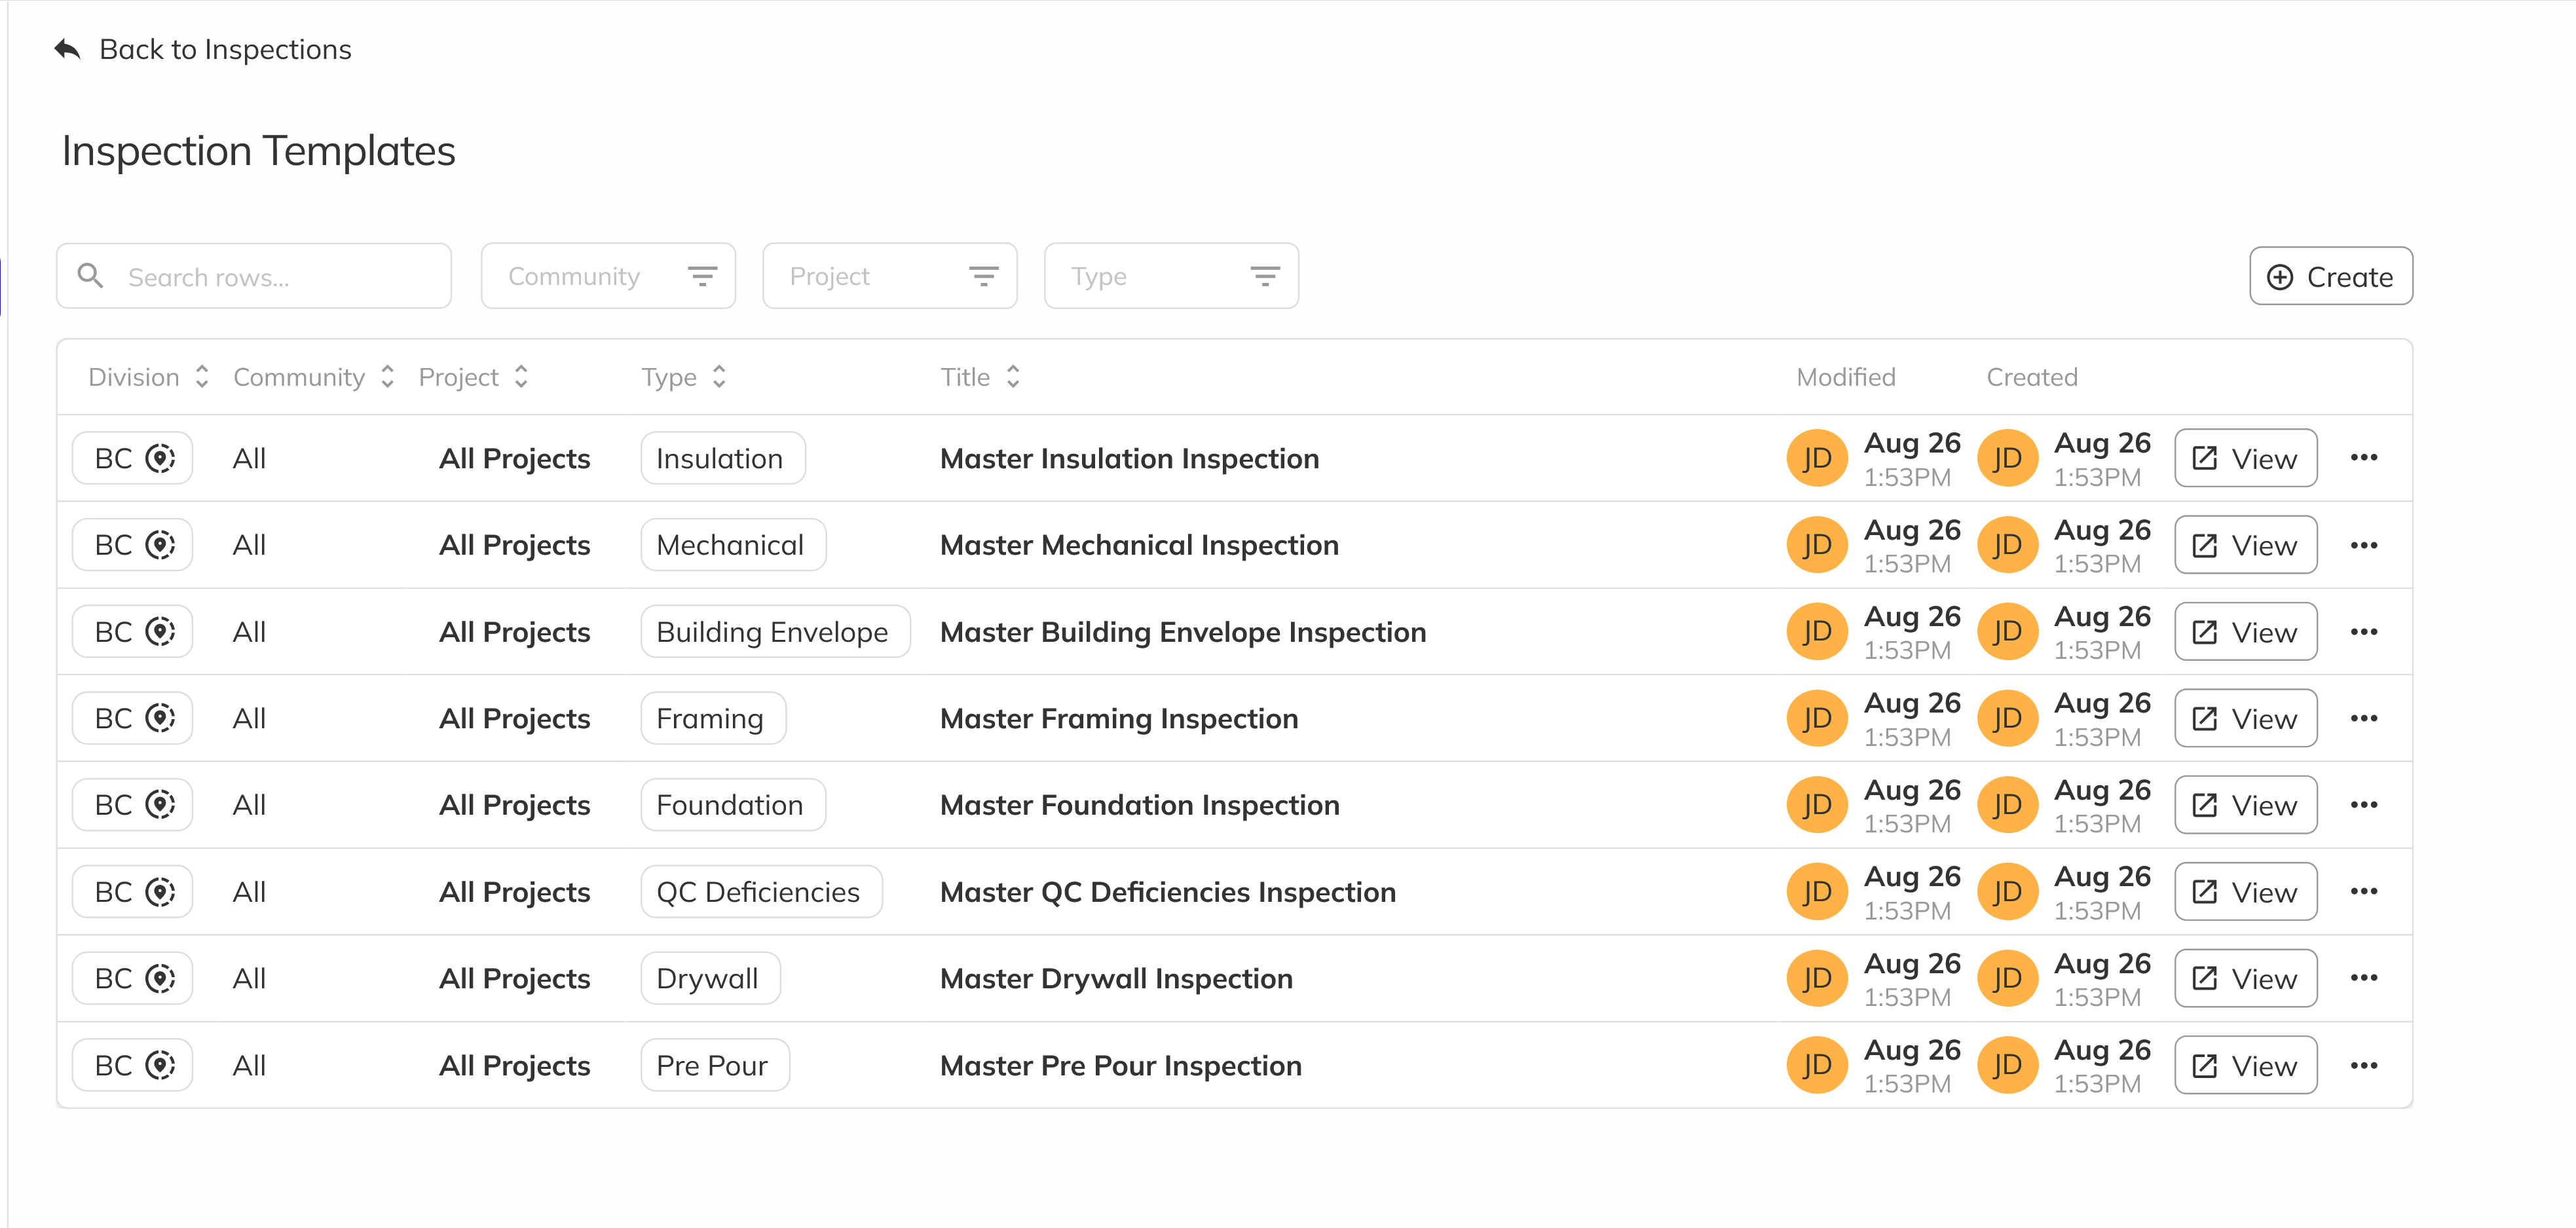
Navigate to Workbench → Inspections → Templates to see the full list of existing templates. The grid shows division, community, project (or "All Projects" for masters), type, title, and modification history.
2. Click Create to open the template dialog
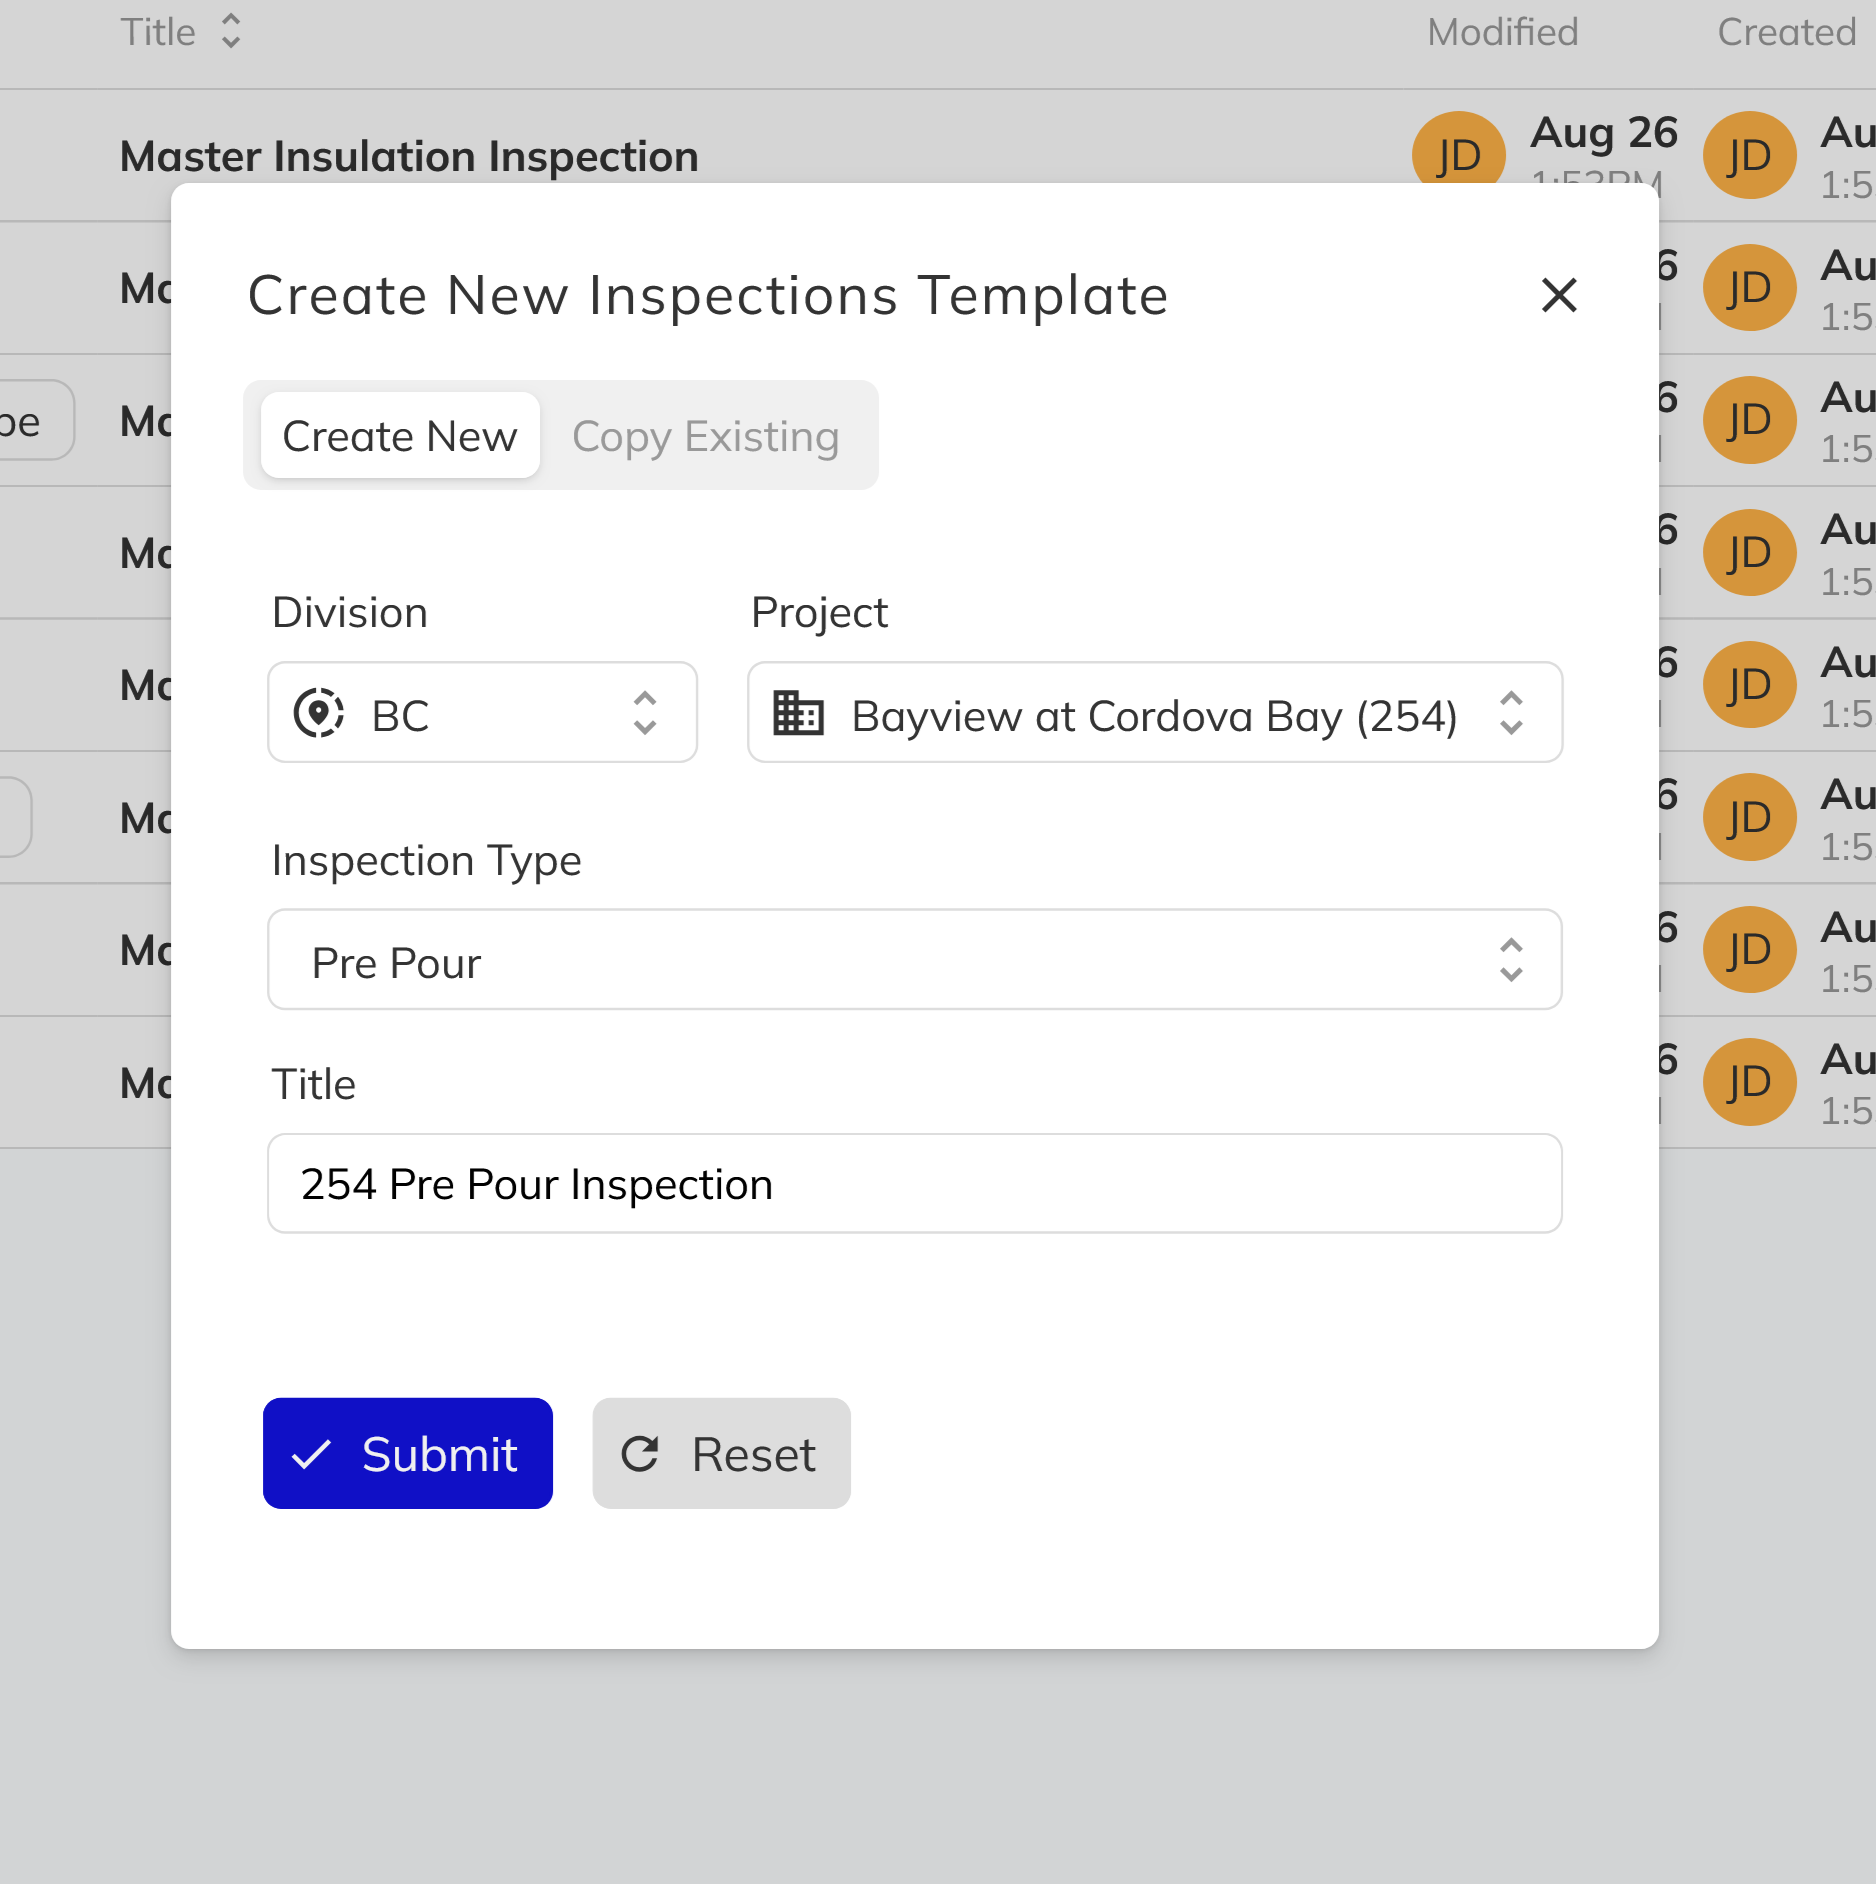
Click the Create button at the top of the page. A dialog appears with two modes: Create New and Copy Existing. Select Create New to start from scratch.
3. Fill in the template fields
Complete the required fields:
| Field | Description |
|---|---|
| Division | Which division this template belongs to |
| Project | Select a project, or choose "Master Template" (available to all projects) |
| Inspection Type | The construction stage this template covers |
| Title | Auto-generated from the type and project, but editable |
The title auto-generates as you select options—for example, selecting "Pre Pour" with no project produces "Master Pre Pour Inspection". You can override this with any custom title.
4. Save the template
Click Create to save. You'll be taken to the template editor view where you can begin adding locations and line items.
Copying an Existing Template
1. Open the Create dialog and select Copy Existing
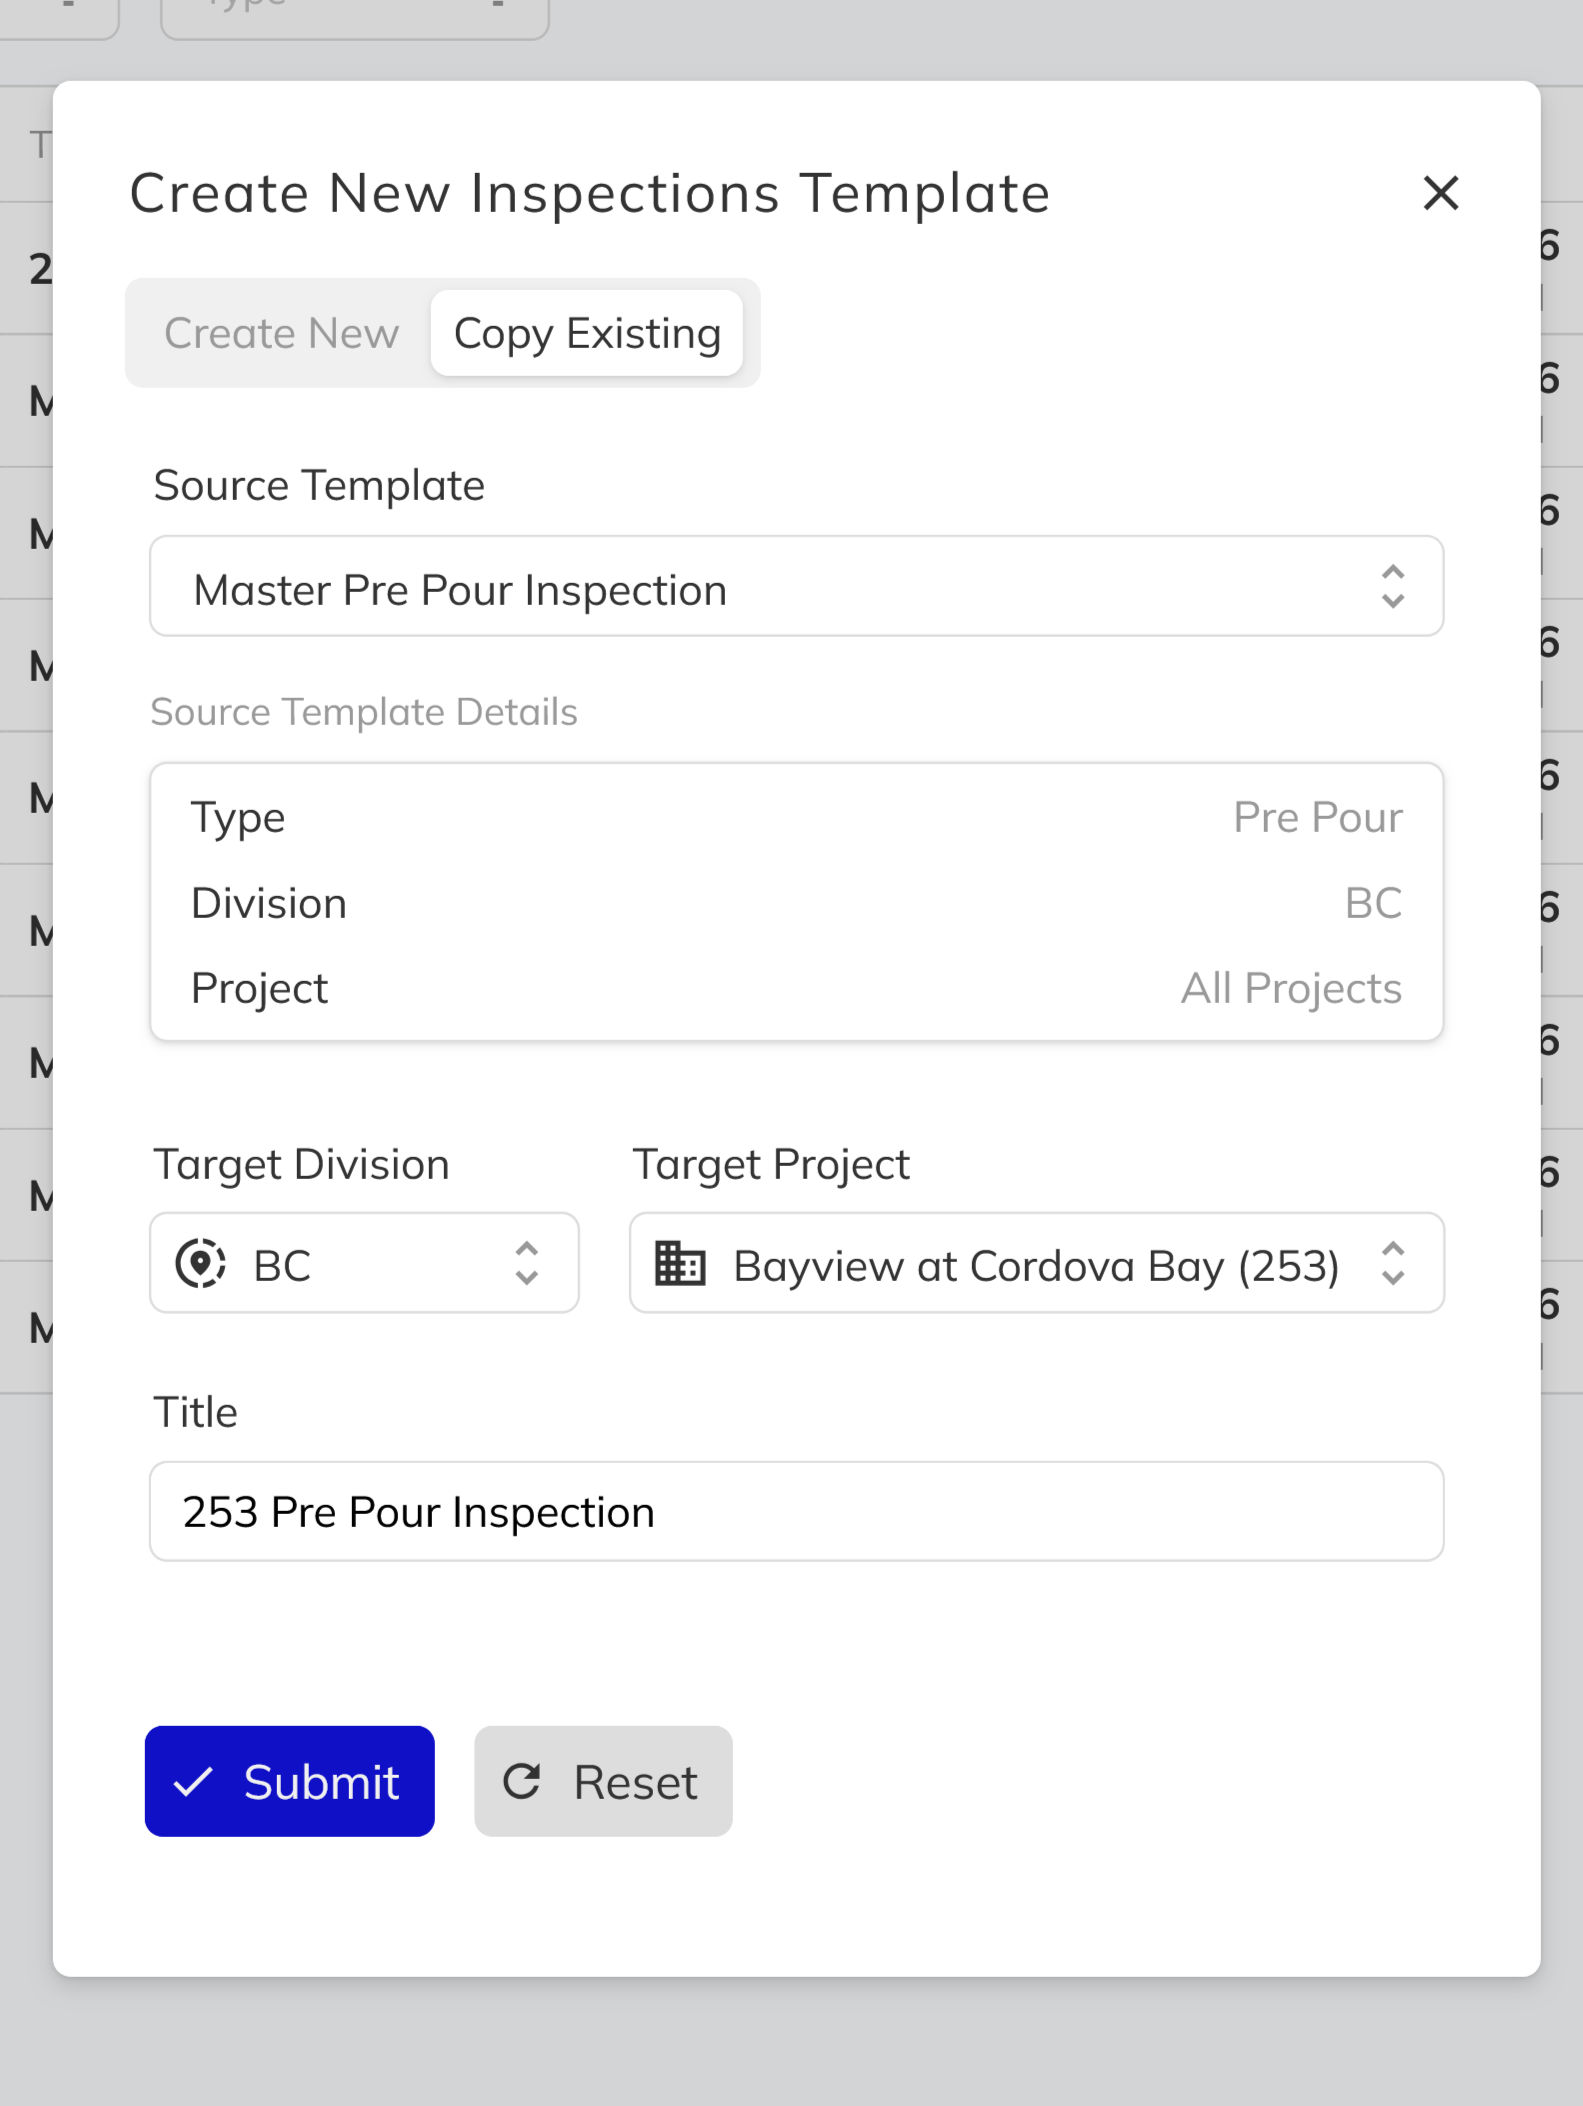
Instead of starting from scratch, select Copy Existing in the creation dialog. This clones all line items, locations, vendor categories, and zone assignments from a source template.
2. Choose the source and target
Select the source template to copy from, then set the target division, project (or master), and title. If you're copying a master into a project, the "Master" prefix is automatically removed from the title.
3. Create the copy
Click Create. The new template is an independent copy—changes to the source will not affect it, and vice versa.
Building Out Line Items
1. Enable locations from the property tree
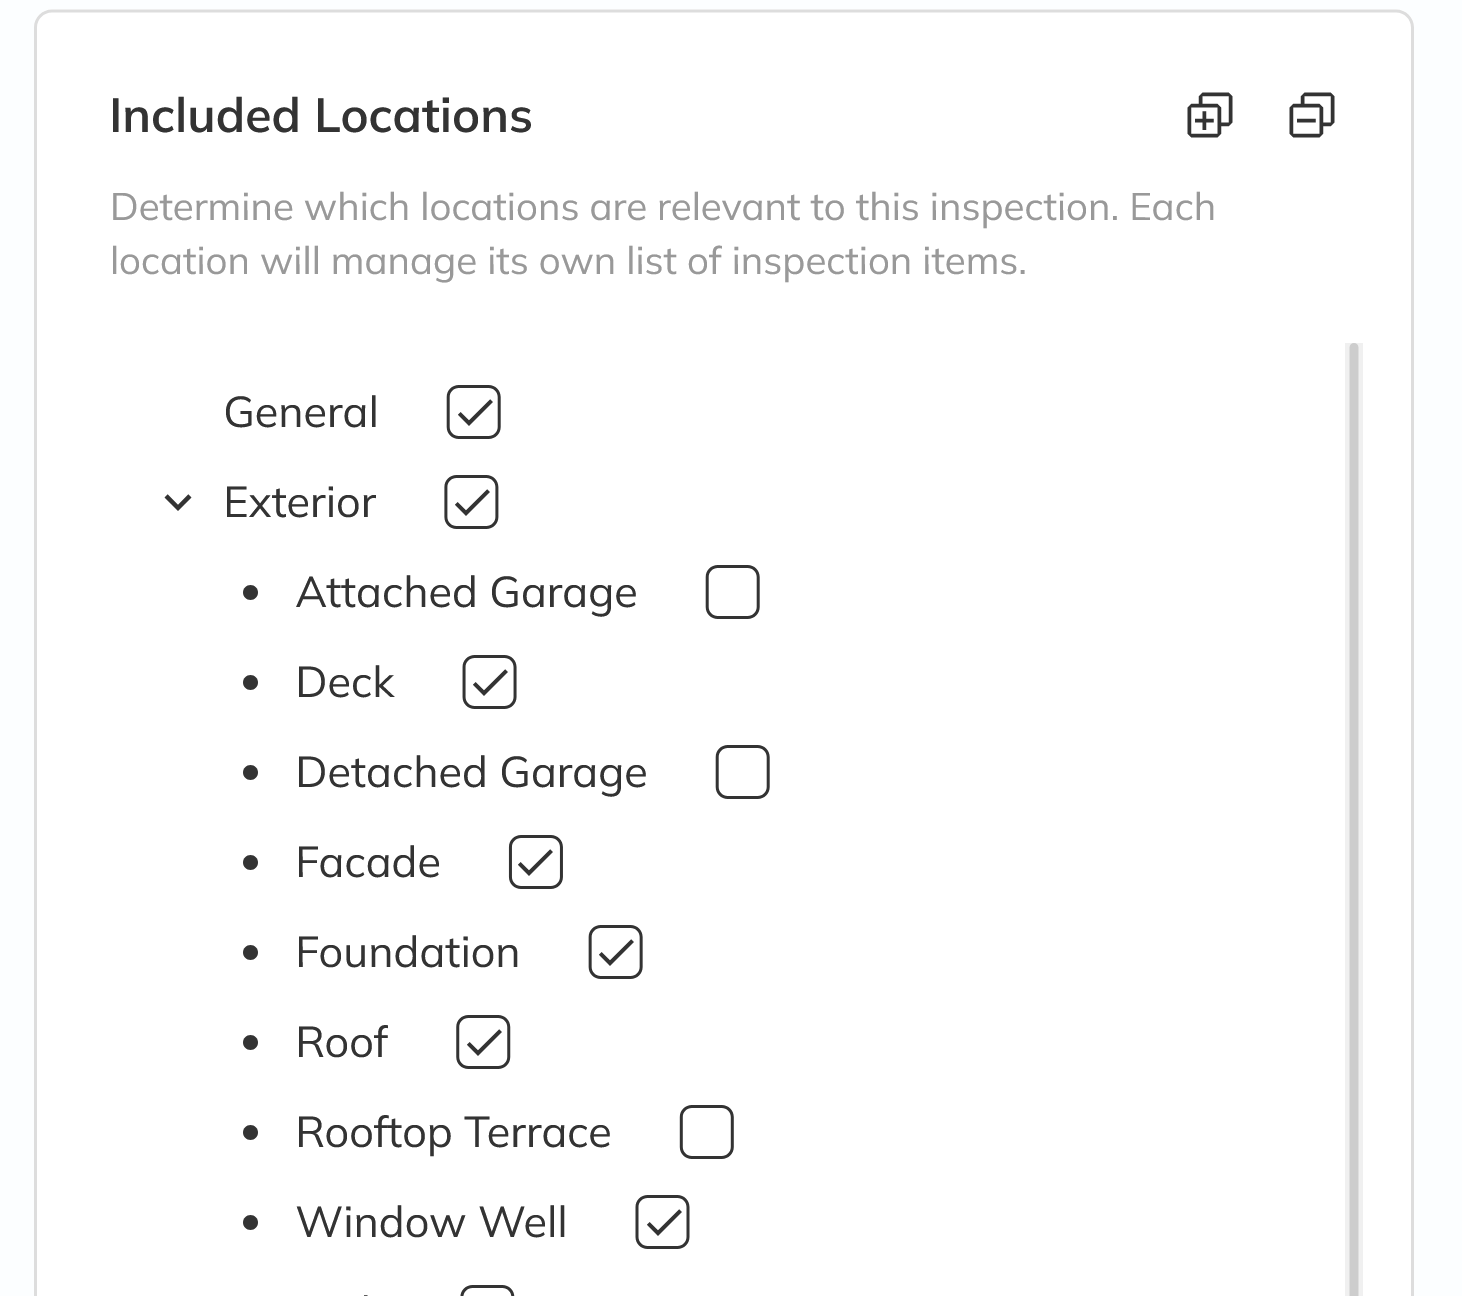
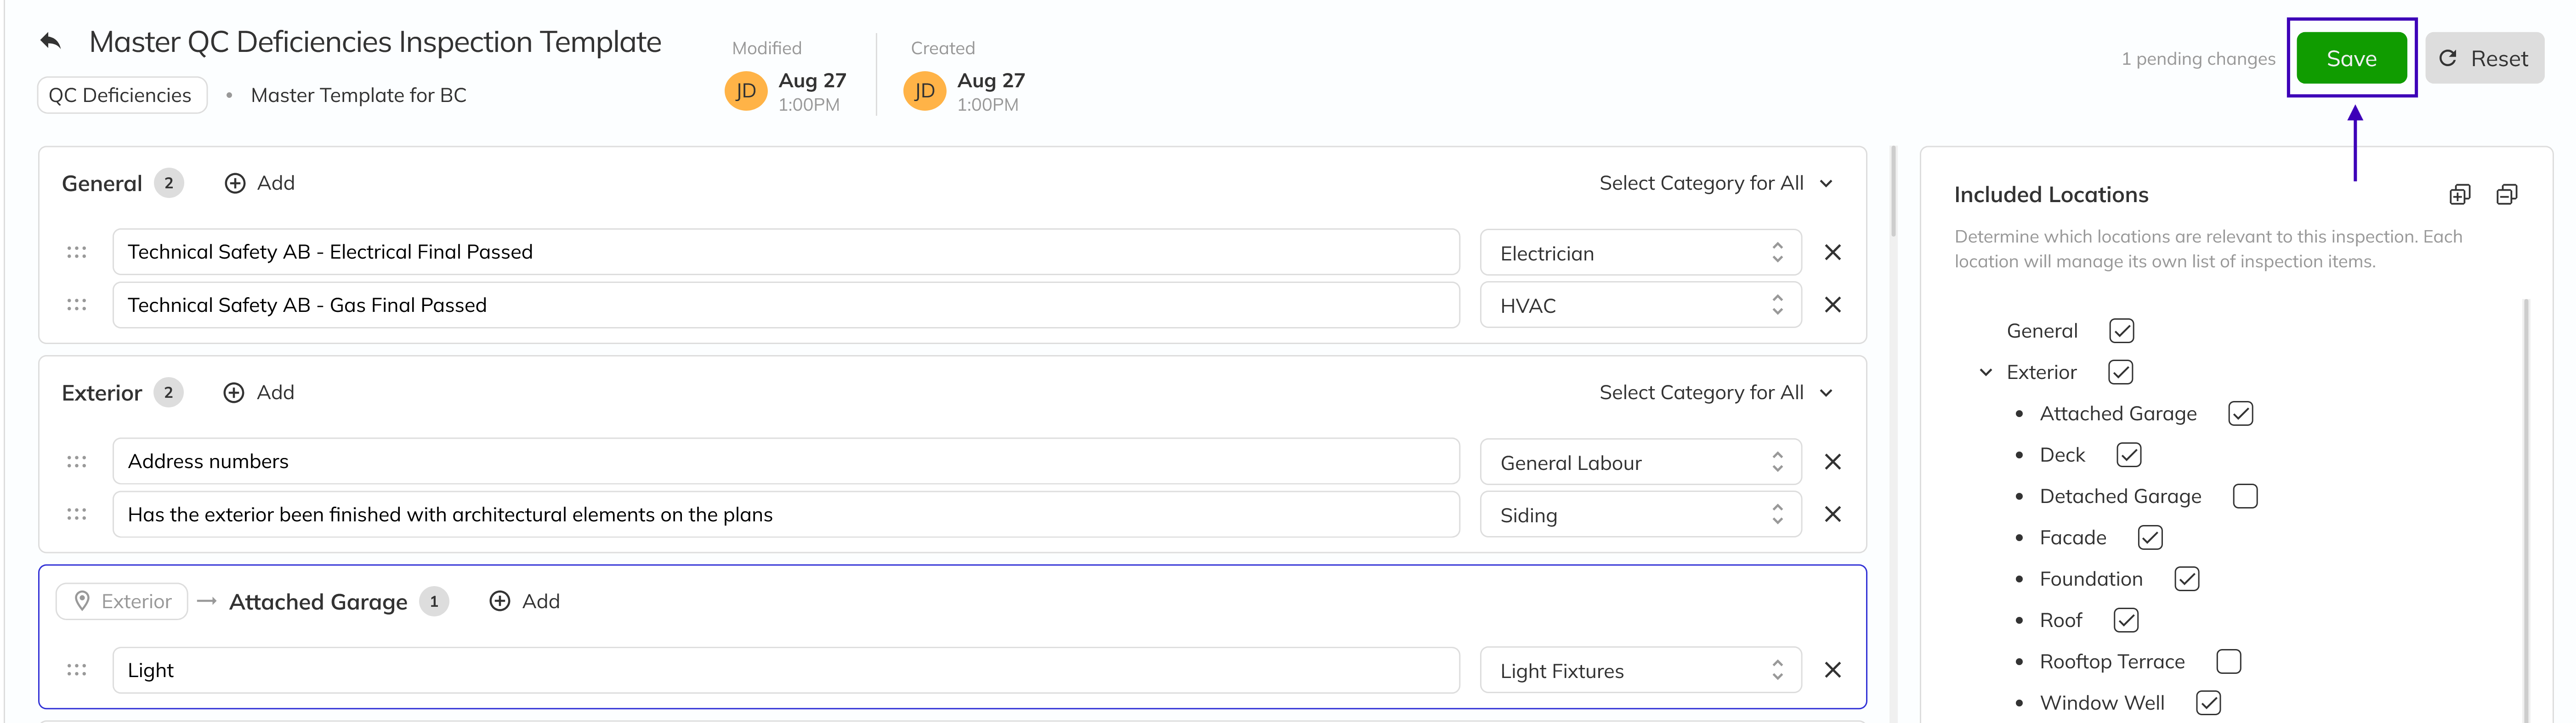
In the template editor, the right panel shows the Property Location Tree—a checkbox tree of all property locations configured in Admin. Check the locations that should be included in this inspection. Each enabled location becomes a card in the left panel.
A special General section exists for items that don't belong to any specific location.
2. Add line items to a location
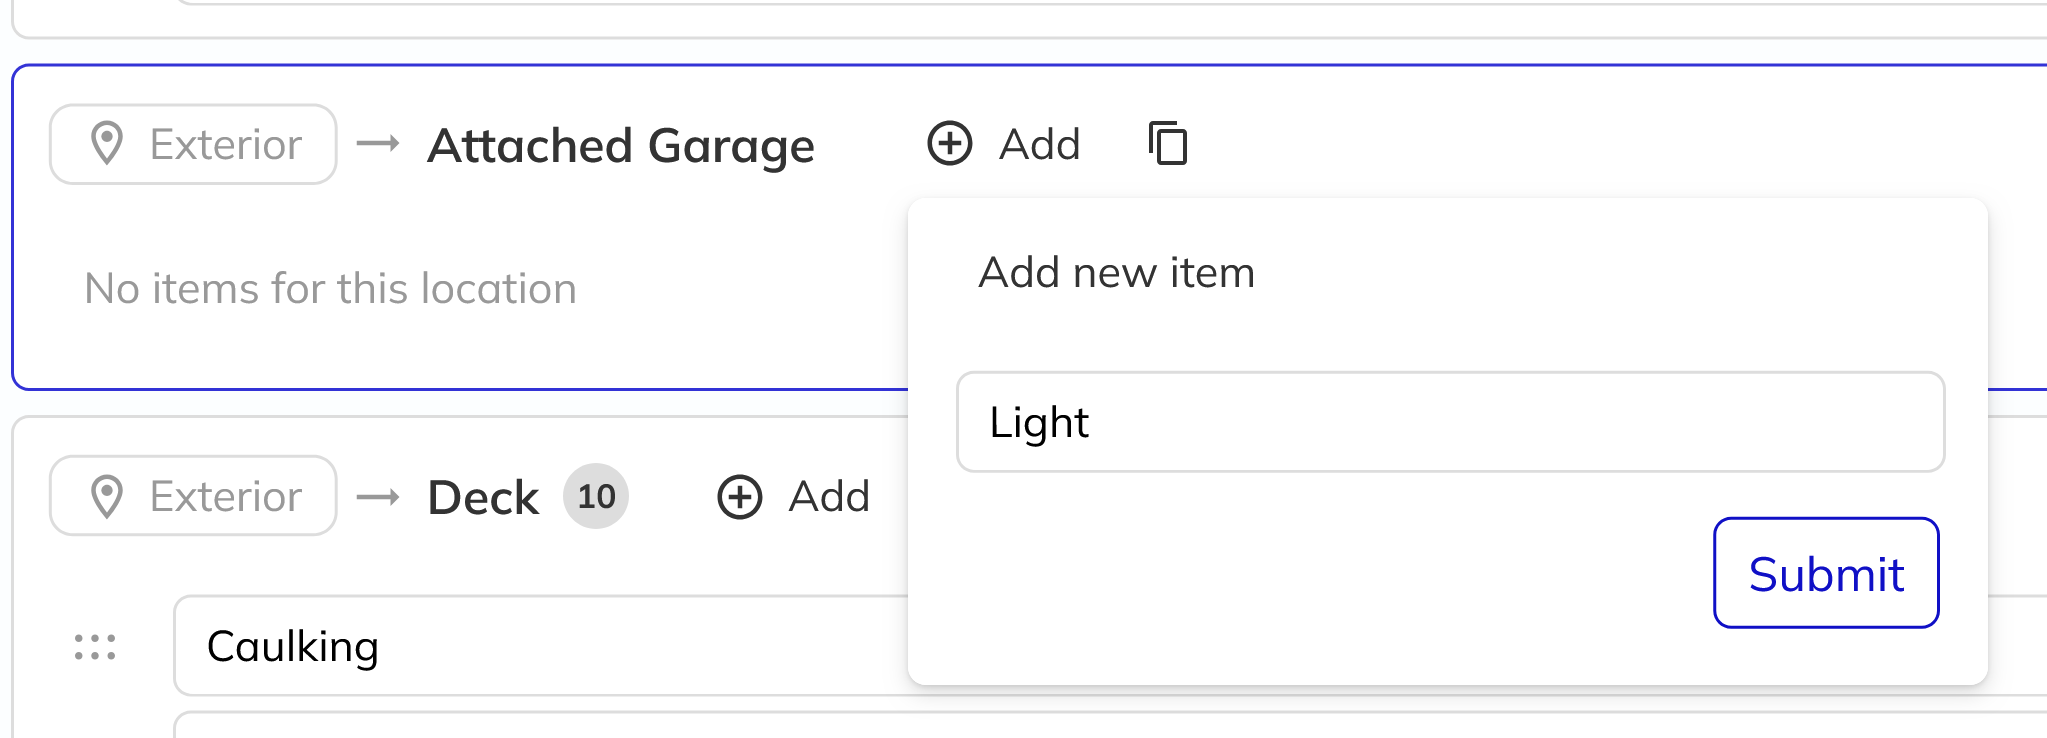
On any location card, click the Add Item button. A popover appears prompting you to enter the item title. Type the name and confirm. The item appears in the card's item list. Duplicate titles within the same location are not permitted.
3. Assign a vendor category to a line item
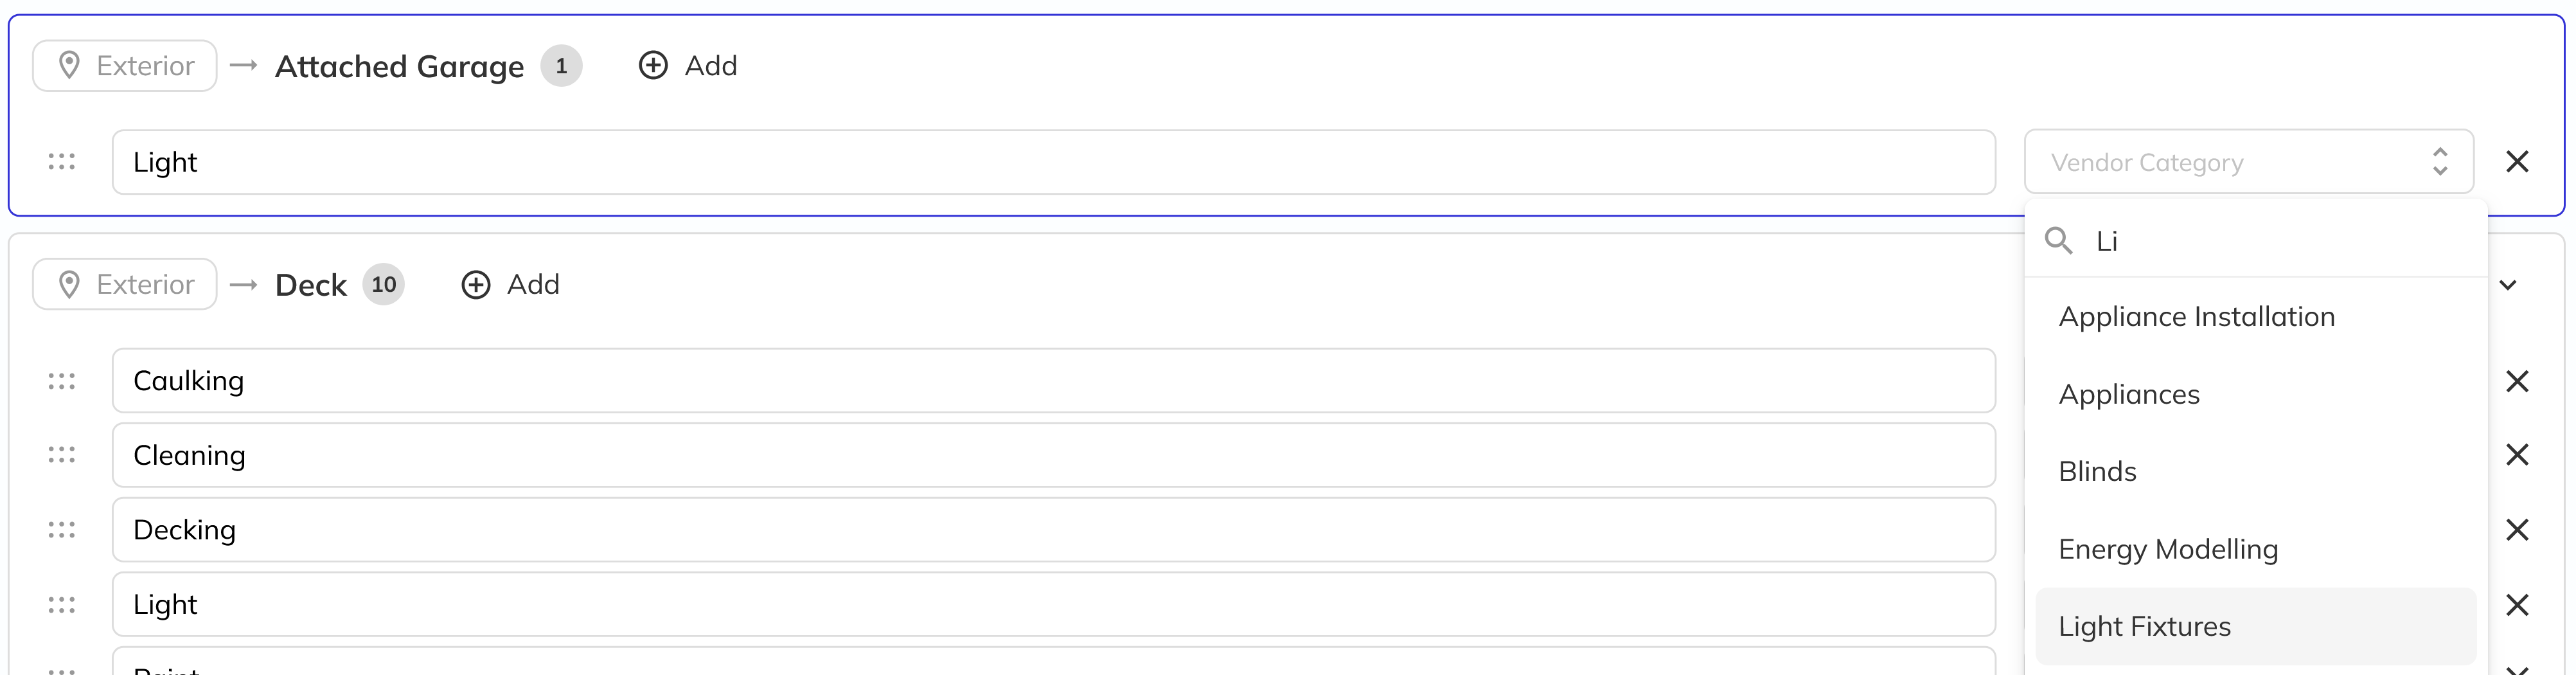
Each line item has a Vendor Category dropdown. Select the Trade or Supplier category that is responsible for this item. This links the inspection item to the vendor assigned to that category on the project, so work orders generated from deficiencies route to the correct trade.
4. Bulk-assign a vendor category to all items in a location
Use the Select Category for All dropdown at the top of a location card to set the same vendor category across every item in that location at once. This is useful when an entire location is the responsibility of a single trade.

5. Reorder and edit items
Drag items using the handle to reorder them. Click the item title to edit it inline. Click the X button to delete an item. All changes are tracked locally and saved together when you click Save.
6. Save your changes
The save bar at the bottom shows a count of pending changes. Click Save to bulk-create, update, and delete items in a single operation. Click Reset to discard unsaved changes.
Multi-Zone and Multi-Instance in Templates
When property locations are configured with multi-zone or multi-instance in Admin, they behave differently inside templates.
Multi-Zone Locations
When you enable a multi-zone location on a template, a zone selector appears on the location card header. You can check which zones apply (e.g., Front, Left Side, Right Side, Rear). The system stores each line item once per selected zone behind the scenes, but the UI shows a single deduplicated list—edits to an item propagate to all zone copies automatically.
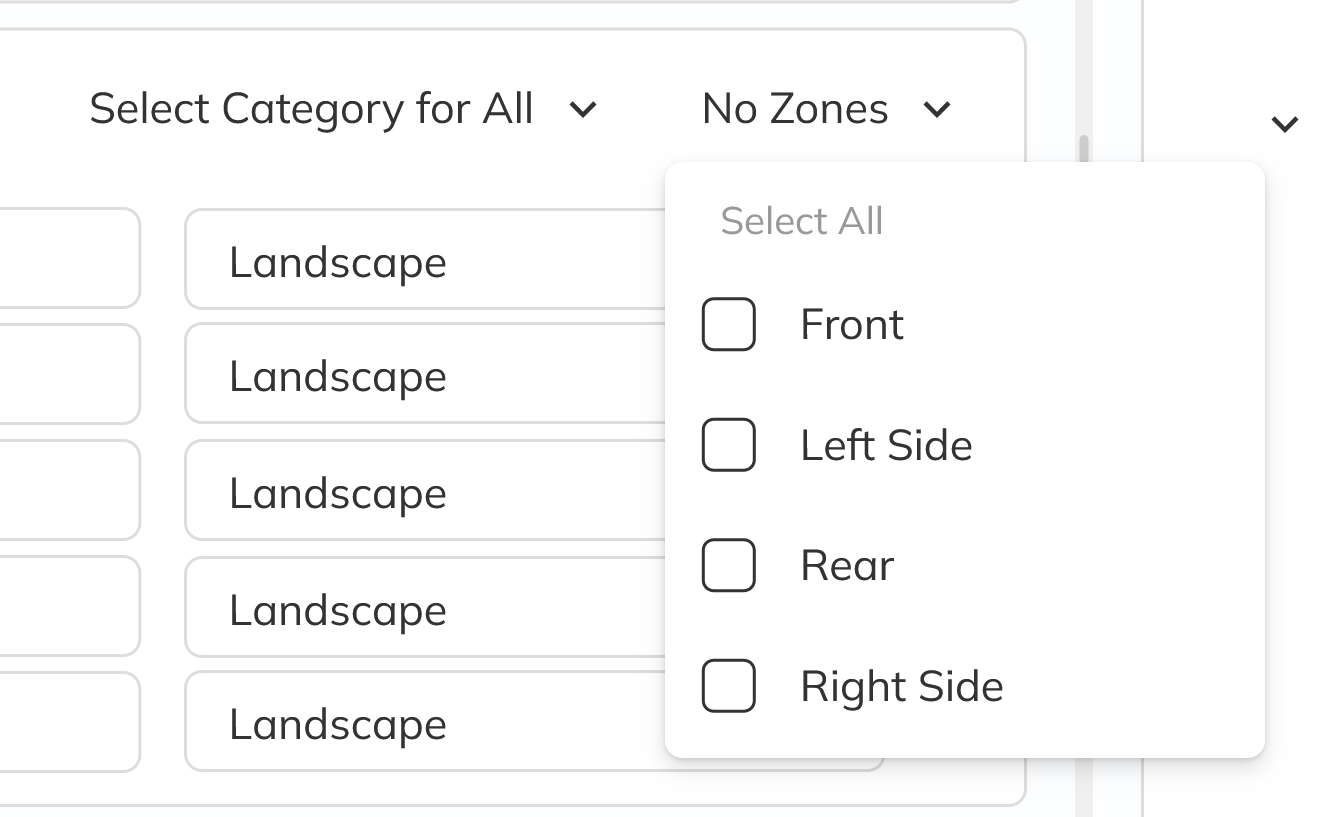
What this means: During an actual inspection, each zone becomes its own section with the same items. Inspectors can record deficiencies against specific zones (e.g., "Yard – Front" vs. "Yard – Rear") without the template needing duplicate line items.
Multi-Instance Locations
When you enable a multi-instance location, the card shows an informational indicator noting that multiple instances of this location can exist per inspection and every item applies to all instances.
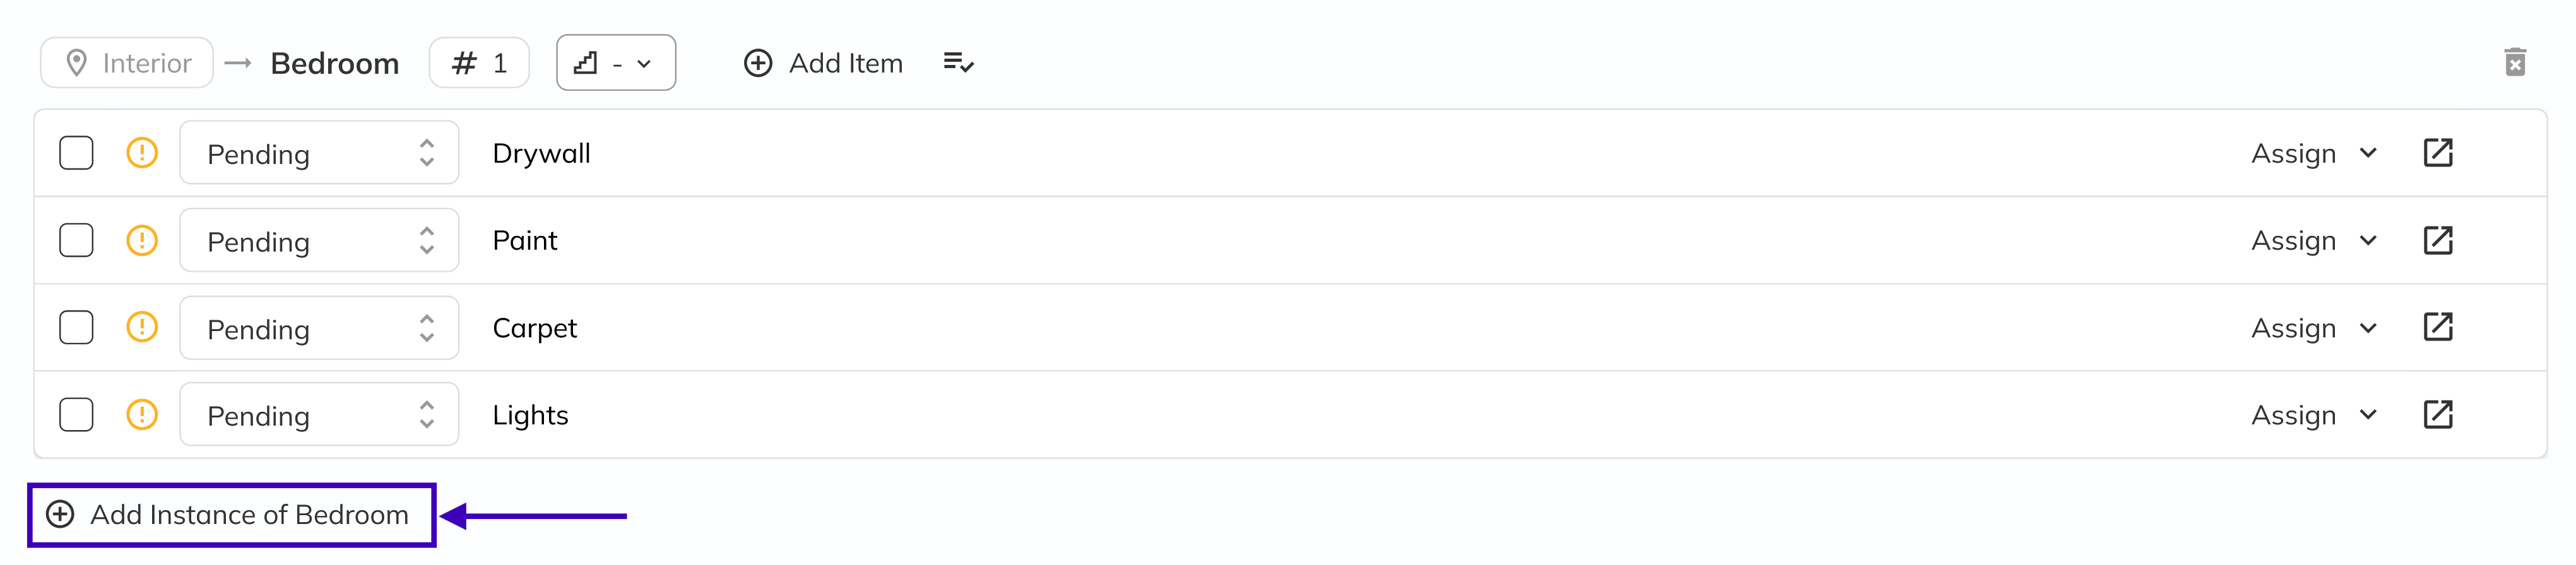
What this means: During an actual inspection, inspectors can create Bedroom 1, Bedroom 2, Bedroom 3, etc. Each instance gets the same items from the template. Unlike multi-zone, instances are created at inspection time rather than defined in the template.
Key Differences
| Multi-Zone | Multi-Instance | |
|---|---|---|
| Defined in | Template (zone selection) | Inspection (instance creation) |
| Purpose | Named subdivisions of one location (Front, Rear, etc.) | Multiple identical copies (Bedroom 1, 2, 3) |
| Template behavior | Zone selector on card; items stored per zone | Info indicator only; no template-level config |
| Inspection behavior | Each zone appears as separate section | "Add Instance" button creates copies |
Associations and Link Items
The template's power comes from the associations defined in Property Locations, Items & Deficiency Tags. Here's how the chain flows:
Property Location → (linked to) → Property Items → (linked to) → Deficiency Tags
       ↓
Inspection Template enables the Location
       ↓
Line Items define what to check at that Location
       ↓
Vendor Category on each item → routes to assigned vendor
How associations affect templates
- Location → Item links determine which property items are available at a location during inspections. These links are managed in Admin, not in the template itself.
- Item → Tag links determine which deficiency tags are available when logging a deficiency against that item during an inspection.
- Template line items are your checklist at each location. They reference the location but are independent of property item links—you write custom inspection descriptions that may correspond to property items but aren't constrained by them.
Link items explained
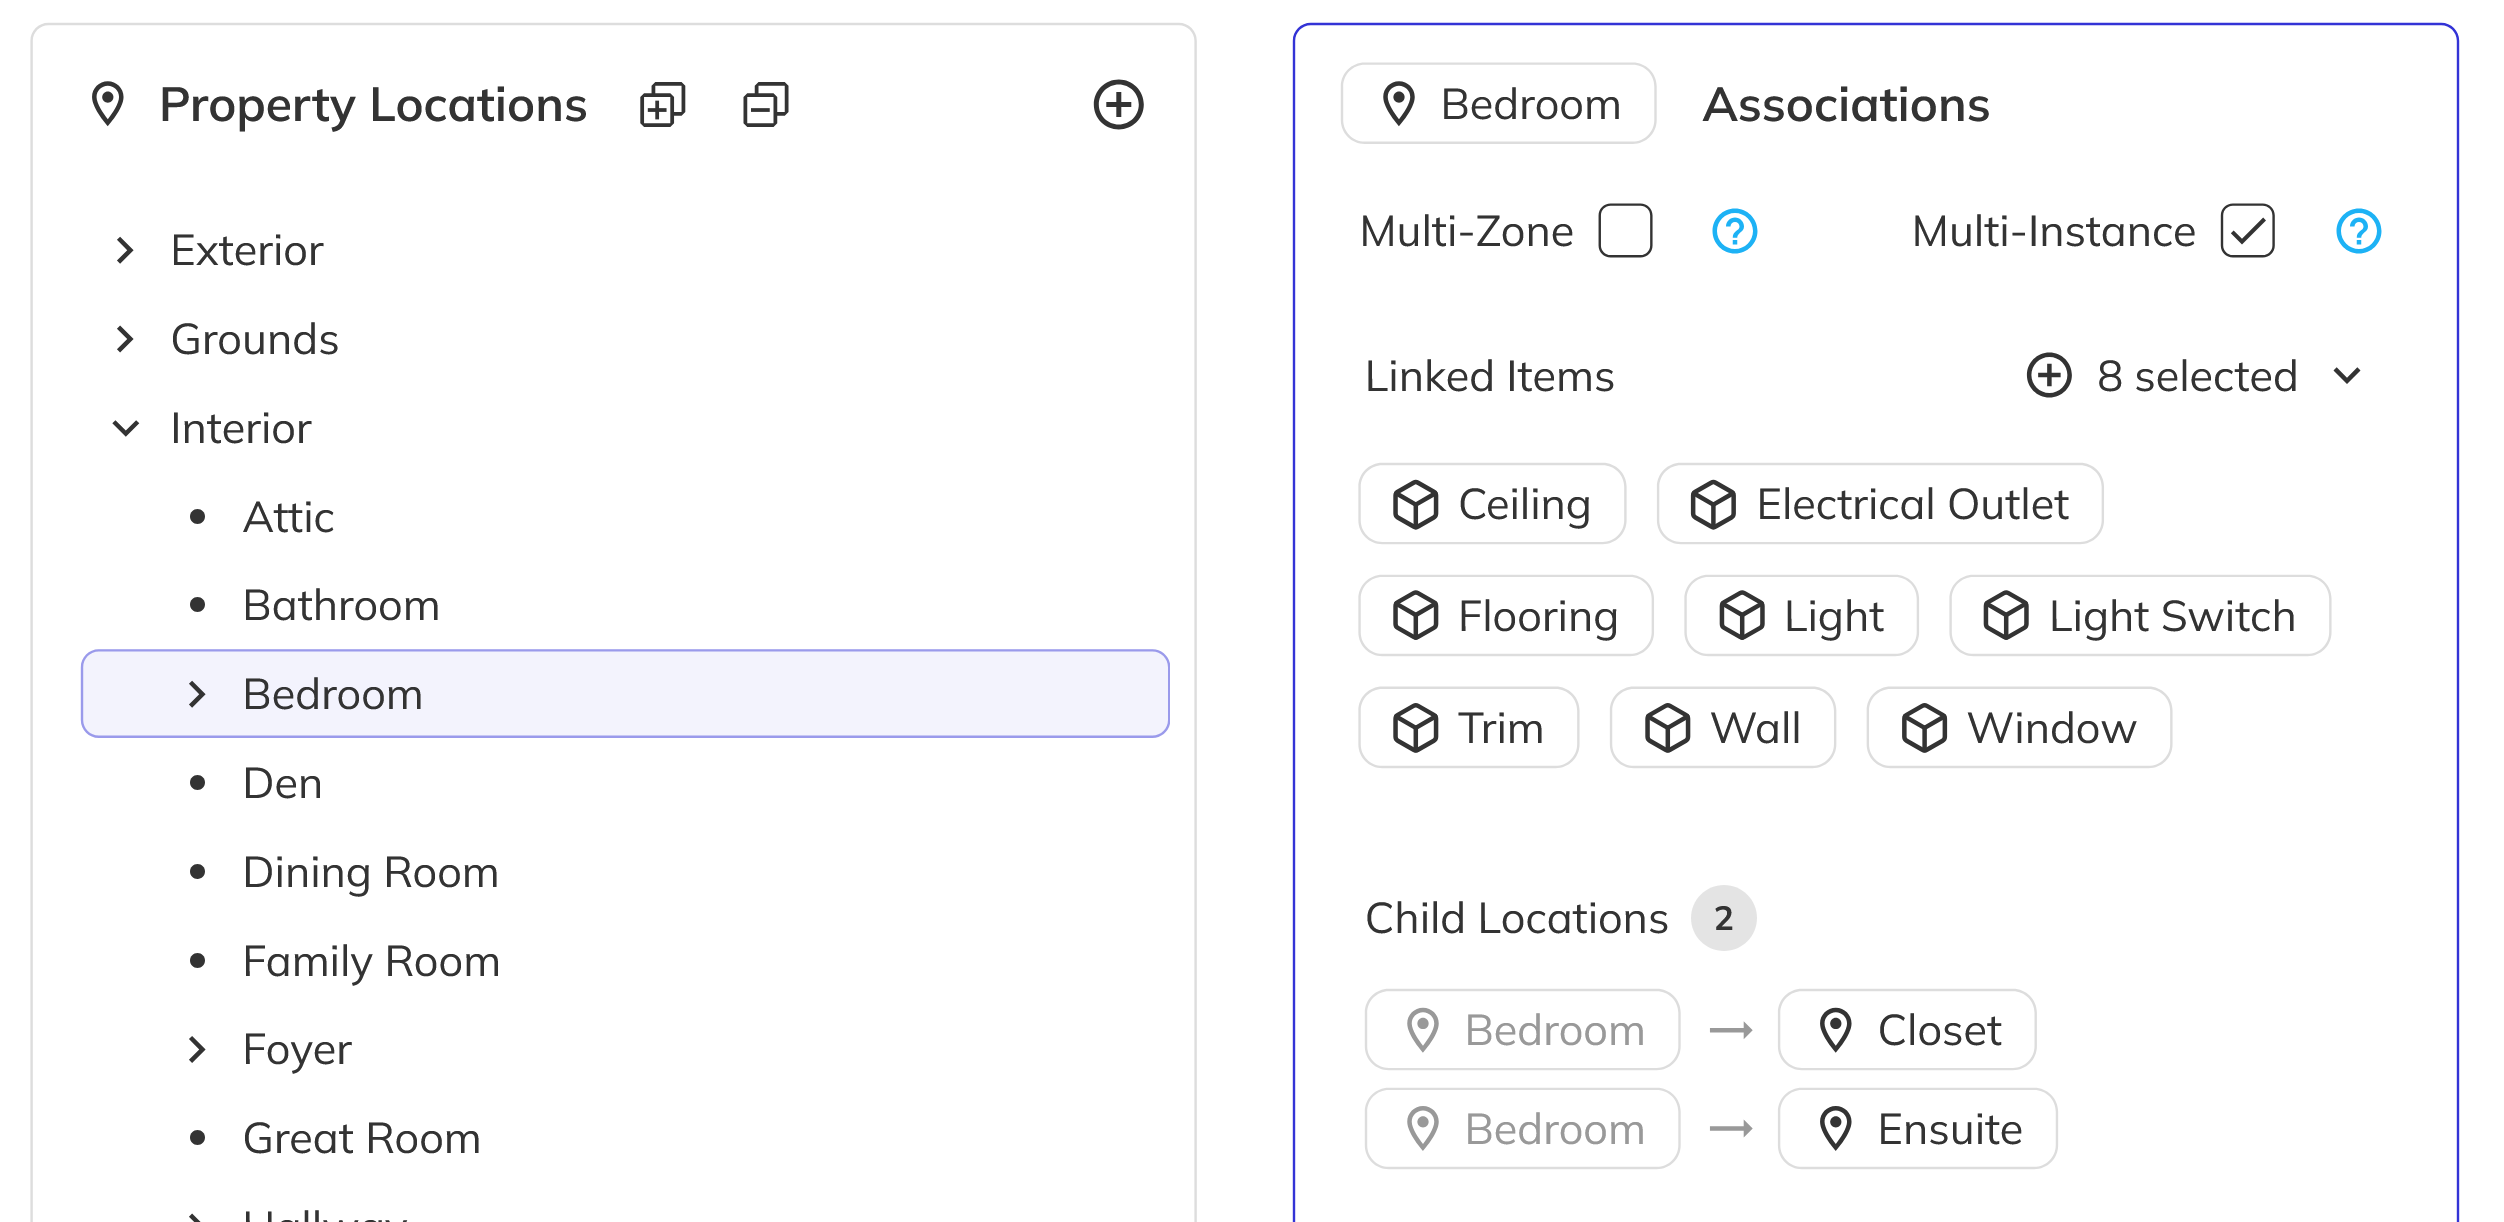
A "link item" is the many-to-many relationship between a property location and a property item (managed in Admin → Property Locations → Associations panel). Key rules:
- Only root-level property items can be linked to locations. Child items inherit their parent's links.
- A single property item (e.g., "Paint") can be linked to multiple locations (Kitchen, Bedroom, Bathroom).
- A single location can have many items linked to it.
- Links can be managed from either the location side or the item side.
These links determine what shows up in the property item dropdown during live inspections when recording deficiencies—they don't directly appear in the template editor, but they define the vocabulary available to inspectors.
Deleting a Template
1. Find the template in the grid
Navigate back to the Inspection Templates list page and locate the template you want to remove.
2. Confirm deletion
Click the kebab menu (⋮) on the template row and select Delete. A confirmation dialog will ask you to confirm. Deleting a template permanently removes it and all of its line items. Existing inspections that were created from this template are not affected.
Quick Reference
| Action | Where | Notes |
|---|---|---|
| Create template | Templates list → Create | Choose Create New or Copy Existing |
| Edit line items | Template editor (click View) | Add, edit, reorder, assign categories |
| Assign vendor category | Item row dropdown | Links to vendors assigned that category on the project |
| Enable locations | Right panel location tree | Check/uncheck locations |
| Select zones | Multi-zone card header | Only for multi-zone locations |
| Delete template | Templates list → kebab → Delete | Cascades to all line items |
| Copy template | Create dialog → Copy Existing | Independent copy, source unaffected |
Congratulations! You have successfully learned how to build and manage inspection templates in the Workbench. From understanding the difference between master and project templates, creating templates for each construction stage, structuring line items with vendor category assignments, leveraging multi-zone and multi-instance locations, and understanding how associations tie locations, items, and tags together—you now have full control over how inspections are structured across your projects.