Creating & Managing Staff
Managing your team starts with setting up the right staff accounts. This guide walks you through creating new staff members, choosing the appropriate role for each user, fine-tuning their permissions, and archiving accounts when a team member departs. Understanding the relationship between roles and permissions is essential to maintaining a secure and well-organized workspace.
How We Got Here
Before you can create staff members, your organization must have an active Pluto Systems account with at least one Admin user. The Admin page is accessed from the main sidebar navigation, and the Staff tab is only visible to users with the User Management permission. If you don't see the Staff tab, contact your existing administrator to have this permission granted to your account.
Understanding Roles
Every staff member is assigned a single User Role when their account is created. The role determines the initial set of permissions the user receives. Think of roles as a starting point — permissions can always be adjusted individually after creation.
| Role | Best For | Description |
|---|---|---|
| Admin | System administrators | Full access to every permission in the platform. Should only be assigned to users who need to manage other users or billing. |
| Senior Management | Executives and leadership | Full access to reporting and read-only information without standard workflow activities. Ideal for oversight without day-to-day operations. |
| Sales Manager | Team leads and managers | Full access to all operations except Construction, User Management, and Billing. Can configure projects, manage commissions, and oversee sales workflows. |
| Salesperson | Most team members | Standard workflows and unit-level data management. The recommended starting point for most users — additional permissions can be added individually as needed. |
| Construction Admin | Construction-only staff | Manages construction data in the Workbench, views construction-related reports, and handles Sales Option setup and processing. |
The Admin role grants unrestricted access to the entire platform, including the ability to create new users and revoke other users' privileges. Only assign this role when absolutely necessary, such as during initial system setup or for users who genuinely require full control.
Understanding Permissions
Permissions are individual capabilities that control what a staff member can do in the app. When a role is selected during creation, a default set of permissions is applied — but these can be toggled on or off at any time from the staff member's profile.
Permissions are organized into four categories:
Sales Permissions
| Permission | Description | Critical |
|---|---|---|
| Standard Workflow | Complete any operations within the standard sales workflow | |
| Admin Access | Access the Admin tab on the sidebar | |
| Manage Templates | Create, edit, and delete email and PDF templates | |
| Send Mass Email | Send emails en masse for multiple units at once | |
| Generate Mass Documents | Generate documents for multiple units and/or purchasers at once | |
| View Other Staff Dashboards | View other staff's dashboards, instead of just your own | |
| Project Configuration | Configure projects on a variety of important settings | ⚠️ |
| Receive Deposit | Record the receipt of a purchase price deposit for a unit | |
| Sign Contract as Developer | Sign Developer signature blocks on contracts | ⚠️ |
| Edit Contract | Add text, strikethrough, and manage sign blocks on existing contracts | |
| Collapse Deal | Collapse a deal that is in the Executed, Subject, or Firm status | |
| Manage Deal Fees & Commissions | Manage deal fees and commissions for internal and external staff and realtors | ⚠️ |
| Approve Realtor Registration | Approve a realtor's registration request received through Customer Connect | |
| Change Unit Price | Update the list price of a unit or bulk edit in Unit Manager | |
| Verify Contract | Record your verification of a finalized contract | |
| Toggle Unit Availability | Move units between Available and Unreleased status | |
| Overwrite Unit Status | Manually overwrite a unit's status (data correction only) | ⚠️ |
| Overwrite Deal Schedule | Manually overwrite a unit's contract schedule data | |
| Download Identity Verification Report | Download a purchaser's identity verification report containing private information | ⚠️ |
| Manually Verify Contact | Manually verify a contact's identity as an alternative to the self-serve digital flow |
Workbench Permissions
| Permission | Description | Critical |
|---|---|---|
| Workbench Admin | Full access to all workbench operations, configuration, and data editing | ⚠️ |
| Workbench Access | Access and edit most data in the workbench, excluding critical admin operations | |
| Project Creation | Create a new project using the workbench guided workflow | ⚠️ |
Options Permissions
| Permission | Description | Critical |
|---|---|---|
| Manage Options | Import, create, edit, and delete options in the workbench | |
| Create Custom Option Request | Create a custom option request for a specific unit | |
| Late Option Approval | Approve a late option requested by another sales staff | |
| Custom Option Approval | Approve a custom option request made by another sales staff and fulfilled by Construction | |
| Custom Option Request Completion | Complete a custom option requested by a sales staff, creating a new Custom Option for a specific unit | |
| Finalize All Options | Finalize options of all types |
Admin Permissions
| Permission | Description | Critical |
|---|---|---|
| User Management | Create new users, edit roles and permissions | ⚠️ |
| Billing Management | Manage the Pluto subscription, payment details and history | ⚠️ |
| Customer Connect Management | Manage what purchasers and realtors see in Customer Connect, including reservation limits and deposit requirements | |
| Client Portal Management | Manage what purchasers and realtors see in the Client Portal |
Permissions marked with ⚠️ are considered critical and are flagged with an alert icon in the app. These control sensitive operations and should be granted carefully.
Creating a New Staff Member
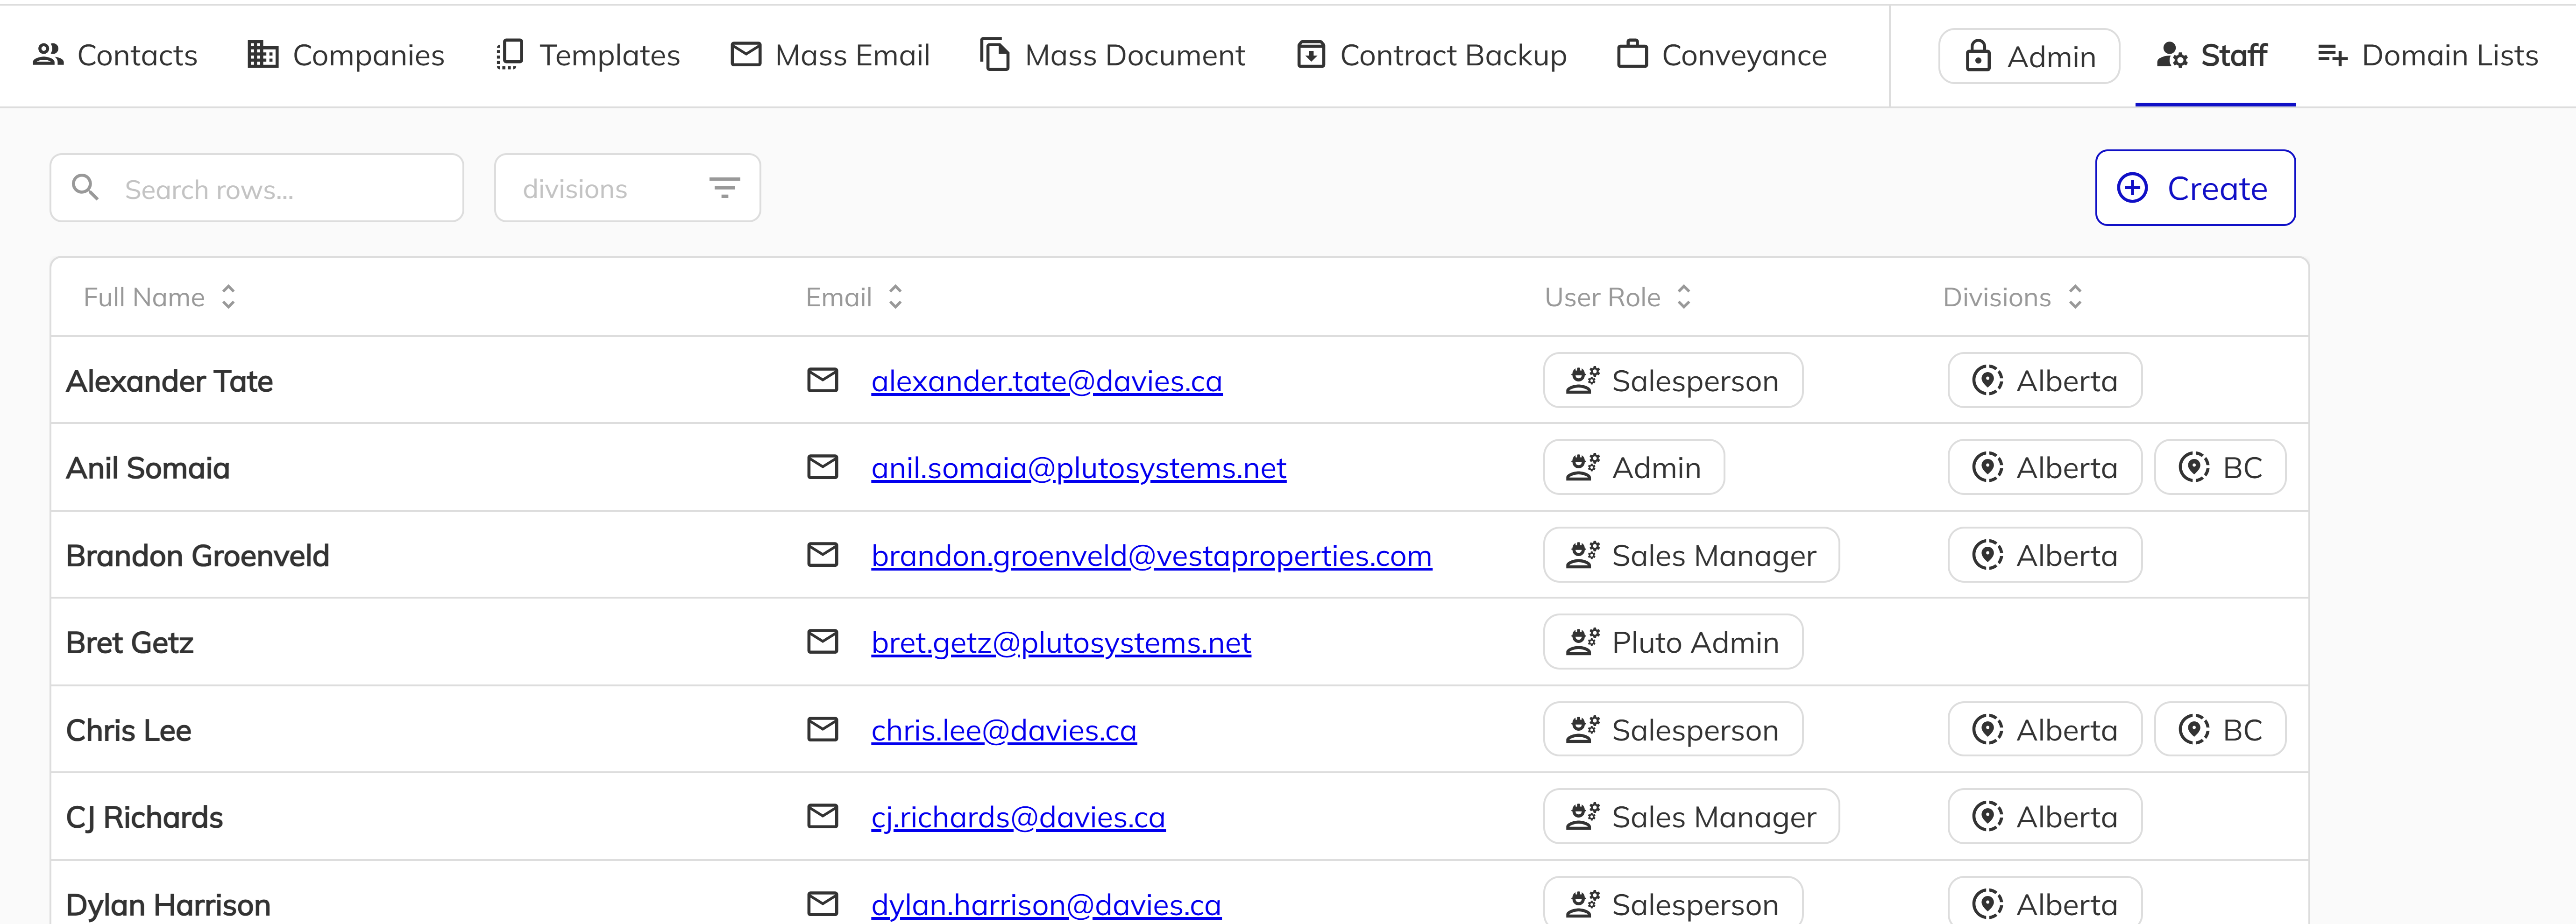
1. Navigate to the Staff page
Open the sales app and click Admin in the sidebar navigation. Select the Staff tab from the top toolbar. You will see the staff directory grid listing all current staff members.
2. Open the Create Staff panel
Left click the Create button above the staff grid. A side panel will slide open from the right with the staff creation form.
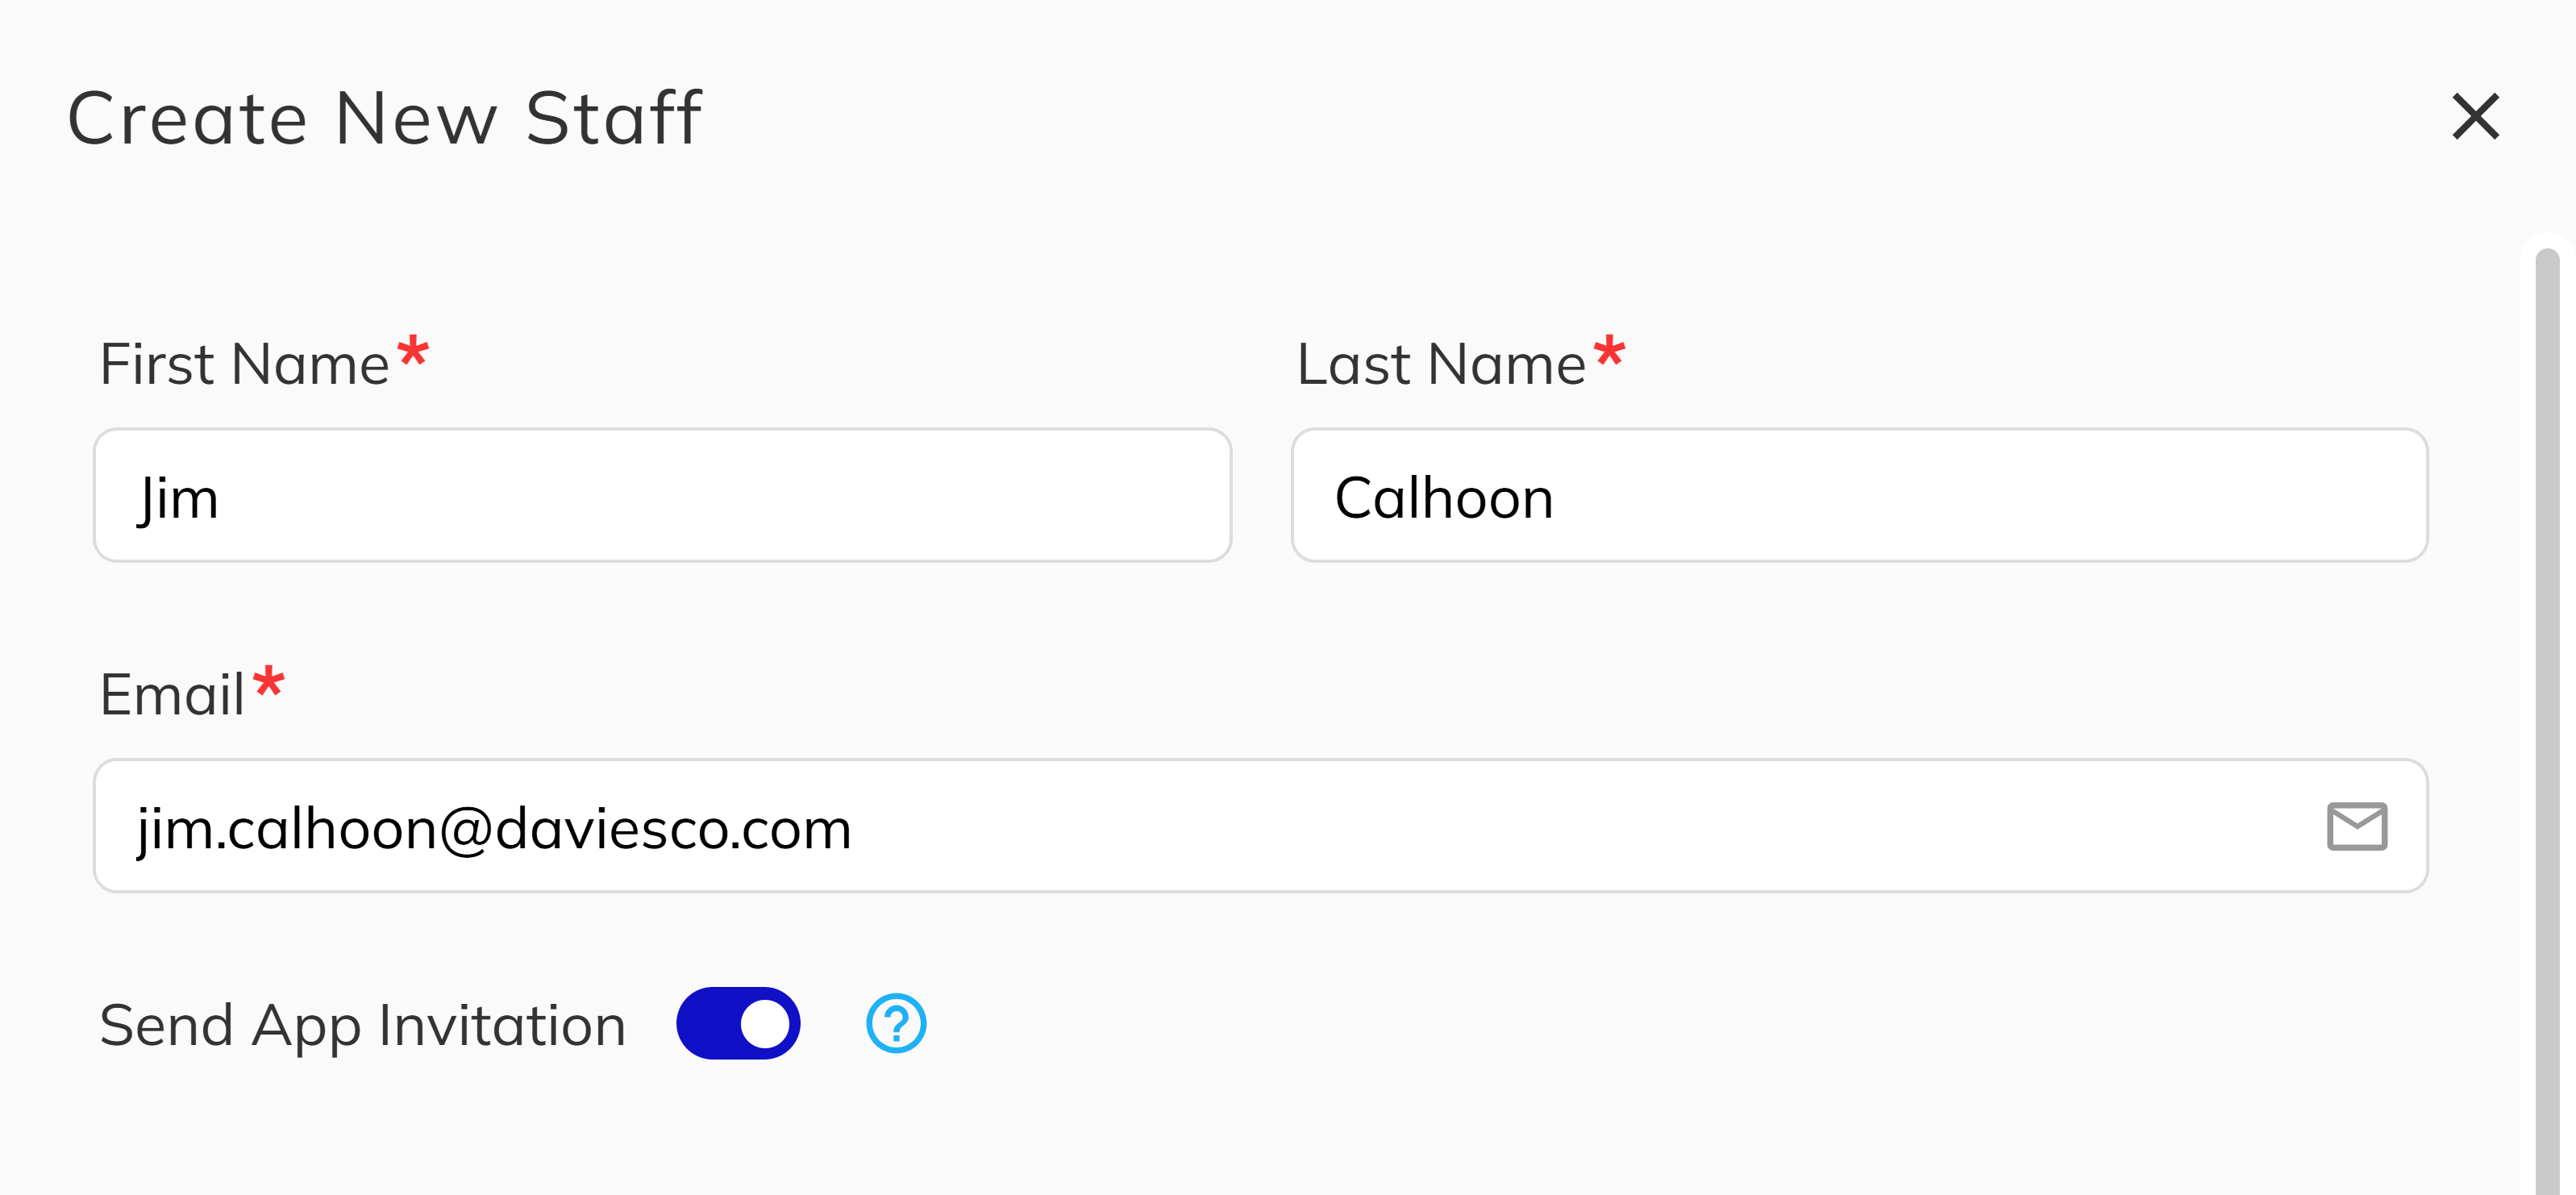
3. Enter the staff member's details
Fill in the required fields:
- First Name — The staff member's first name.
- Last Name — The staff member's last name.
- Email — The email address the staff member will use to log in. This must be unique across all contacts.
- Send App Invitation — Toggle this on (enabled by default) to send the new staff member an email with temporary login credentials. This is required for first-time access to the app.
The system automatically checks for duplicate contacts. If the email is already in use, you will be blocked from creating the account. If only the name matches an existing contact, you will see a warning but can still proceed.
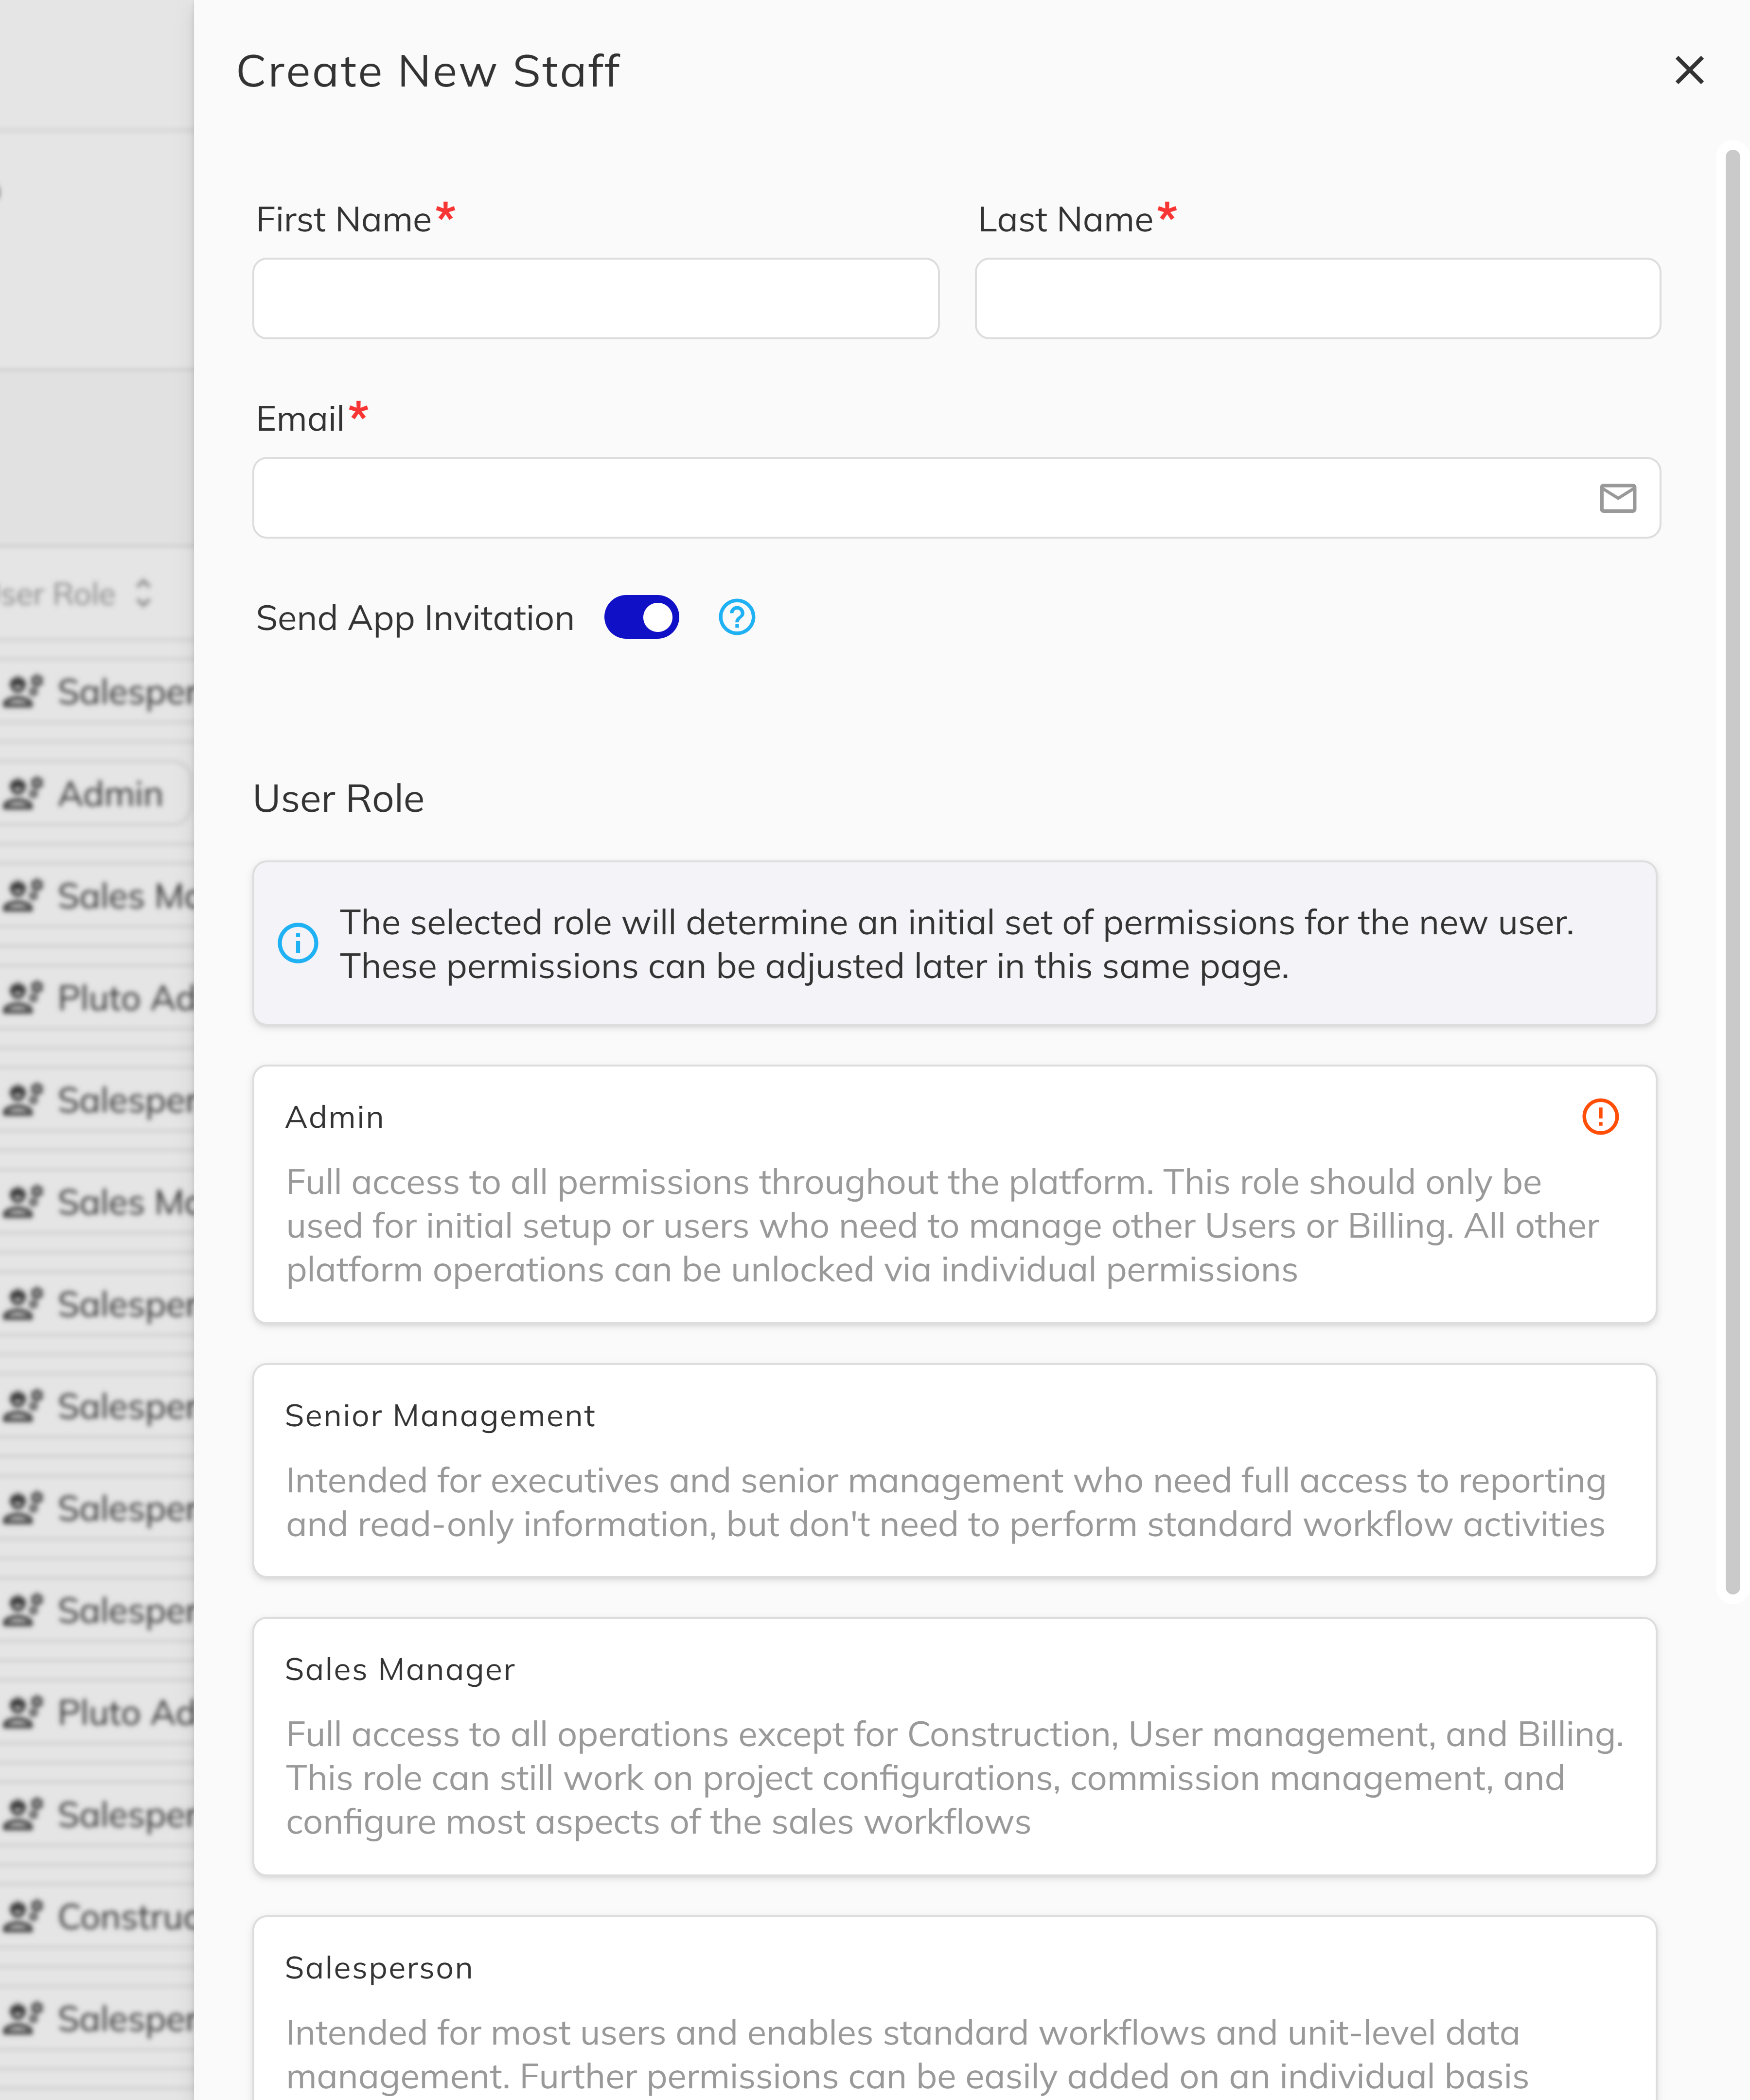
4. Select a User Role
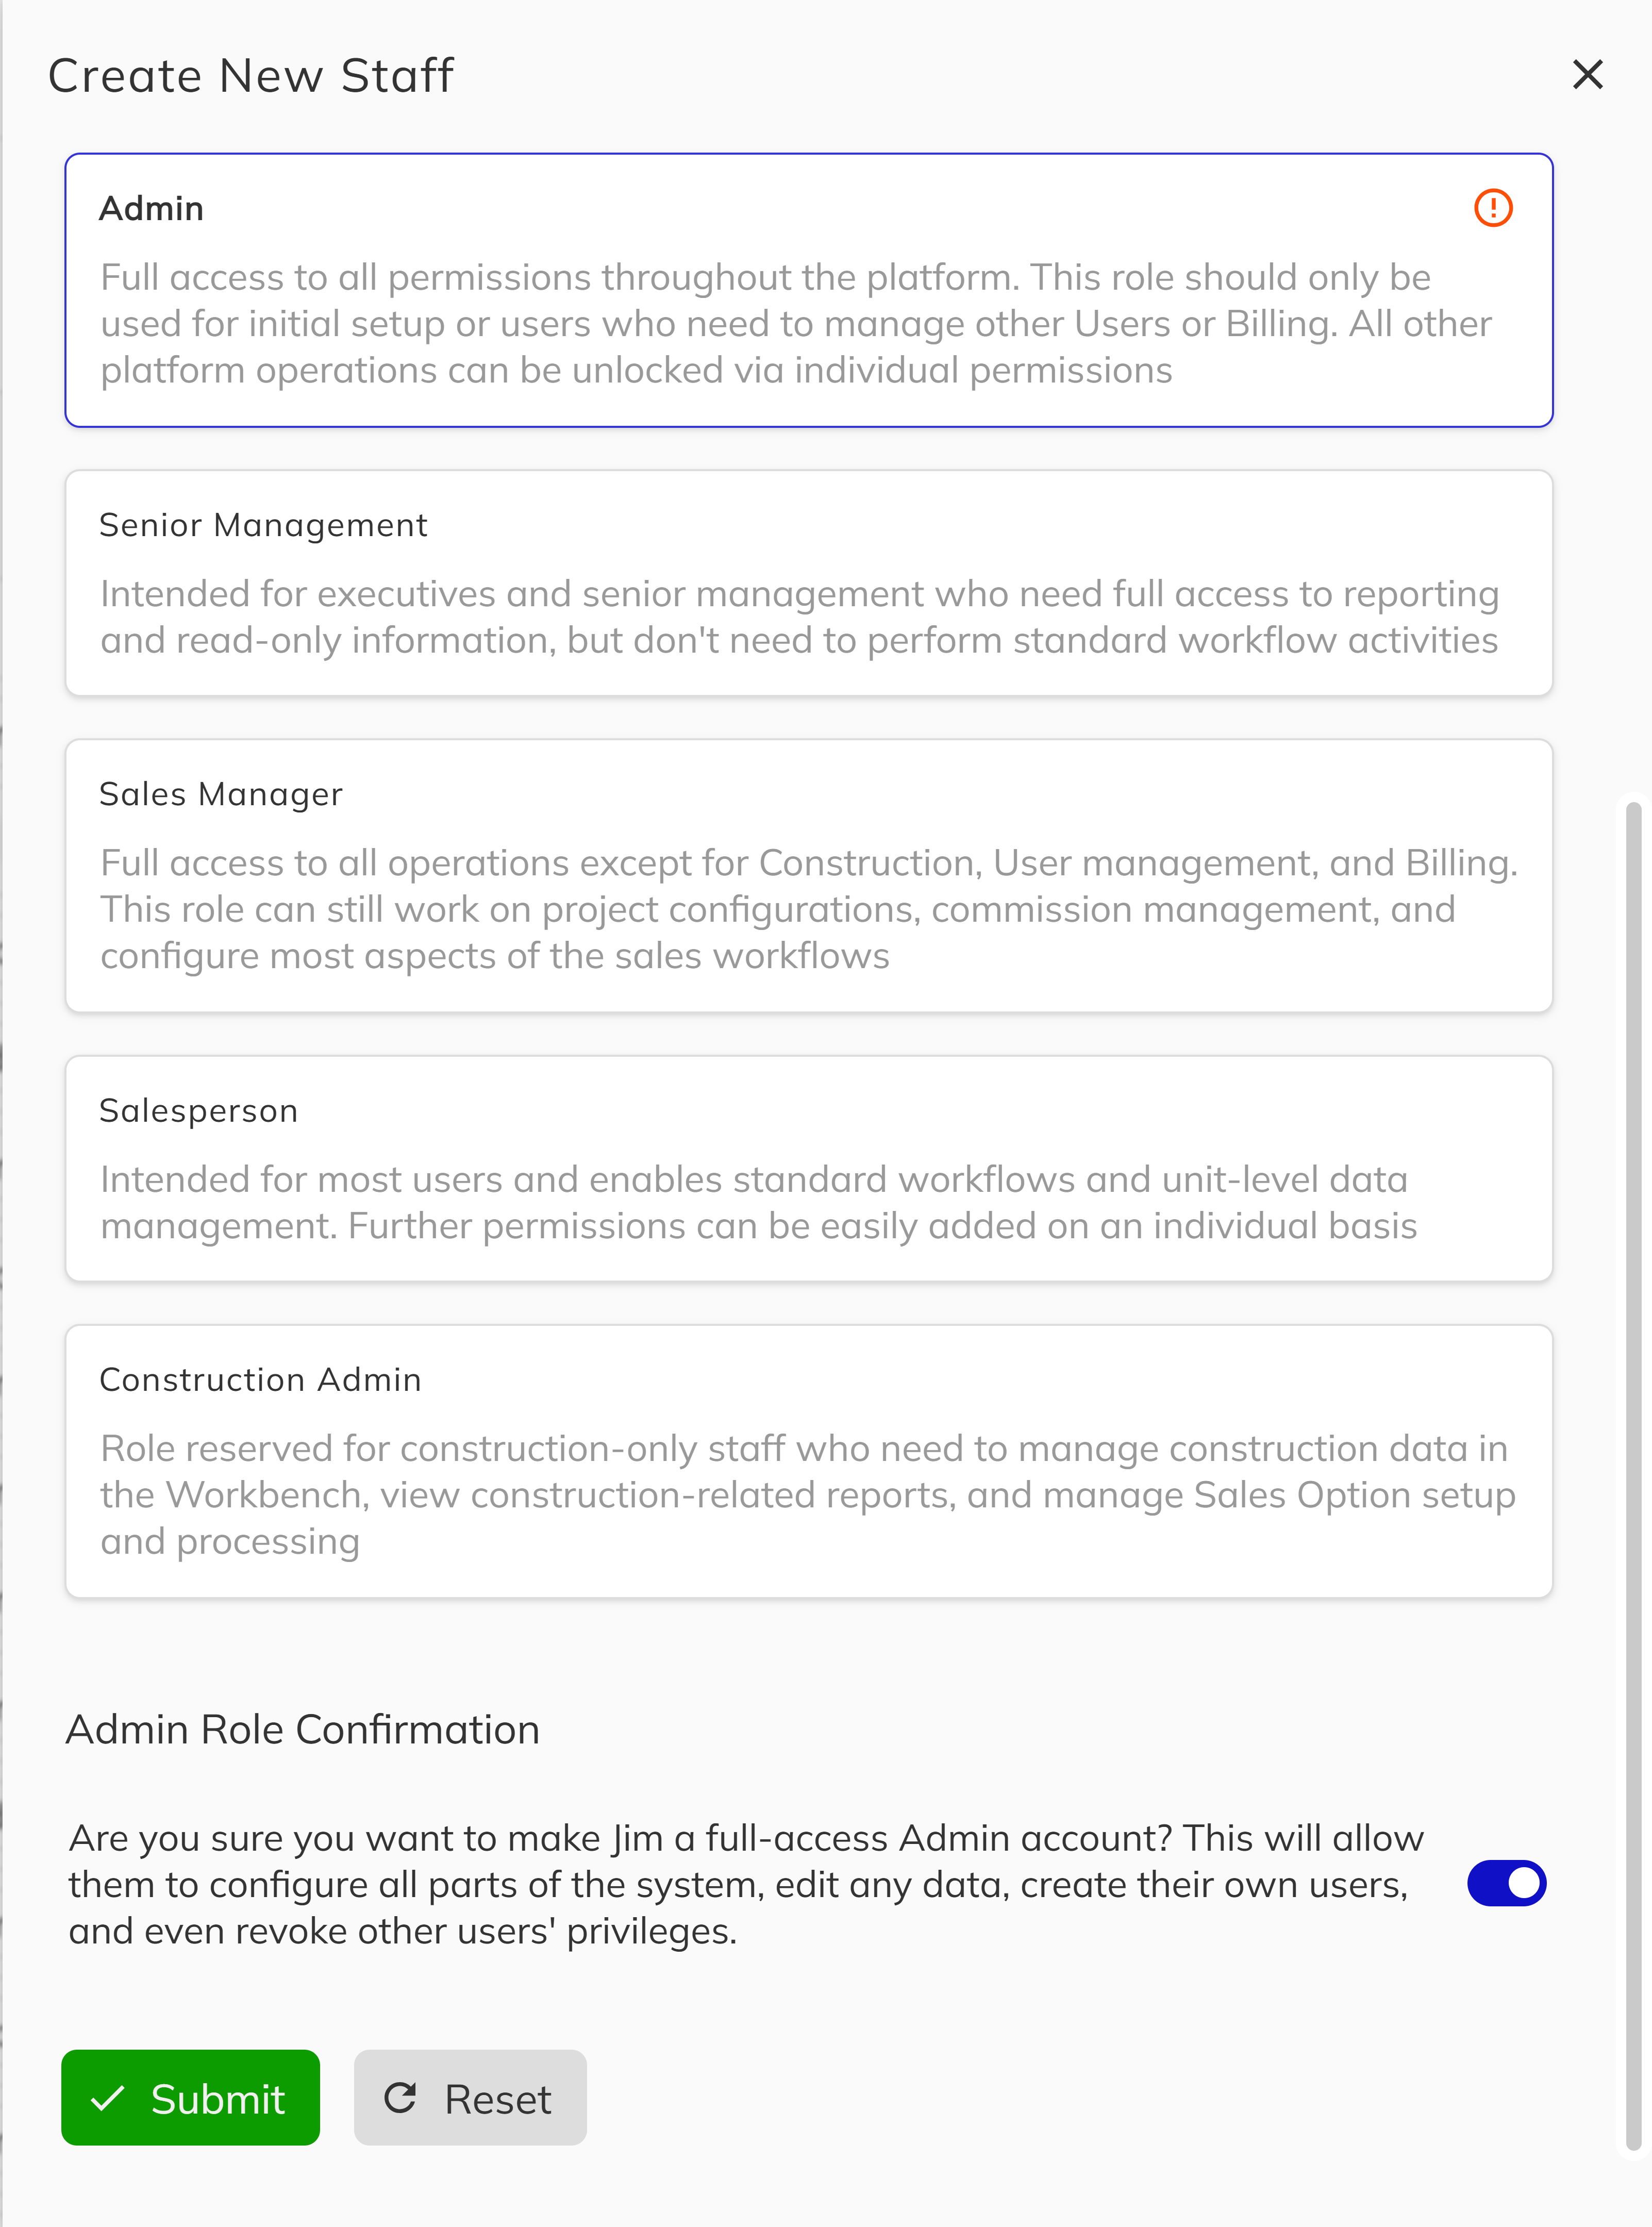
Below the contact details, choose the appropriate User Role from the available options. Each role card displays a description to help you decide. The selected role determines the initial permissions the staff member will receive.

5. Confirm the Admin role (if applicable)
If you selected the Admin role, an additional confirmation toggle will appear. You must acknowledge the implications of granting full-access Admin privileges before the form can be submitted. This safeguard prevents accidental Admin assignments.
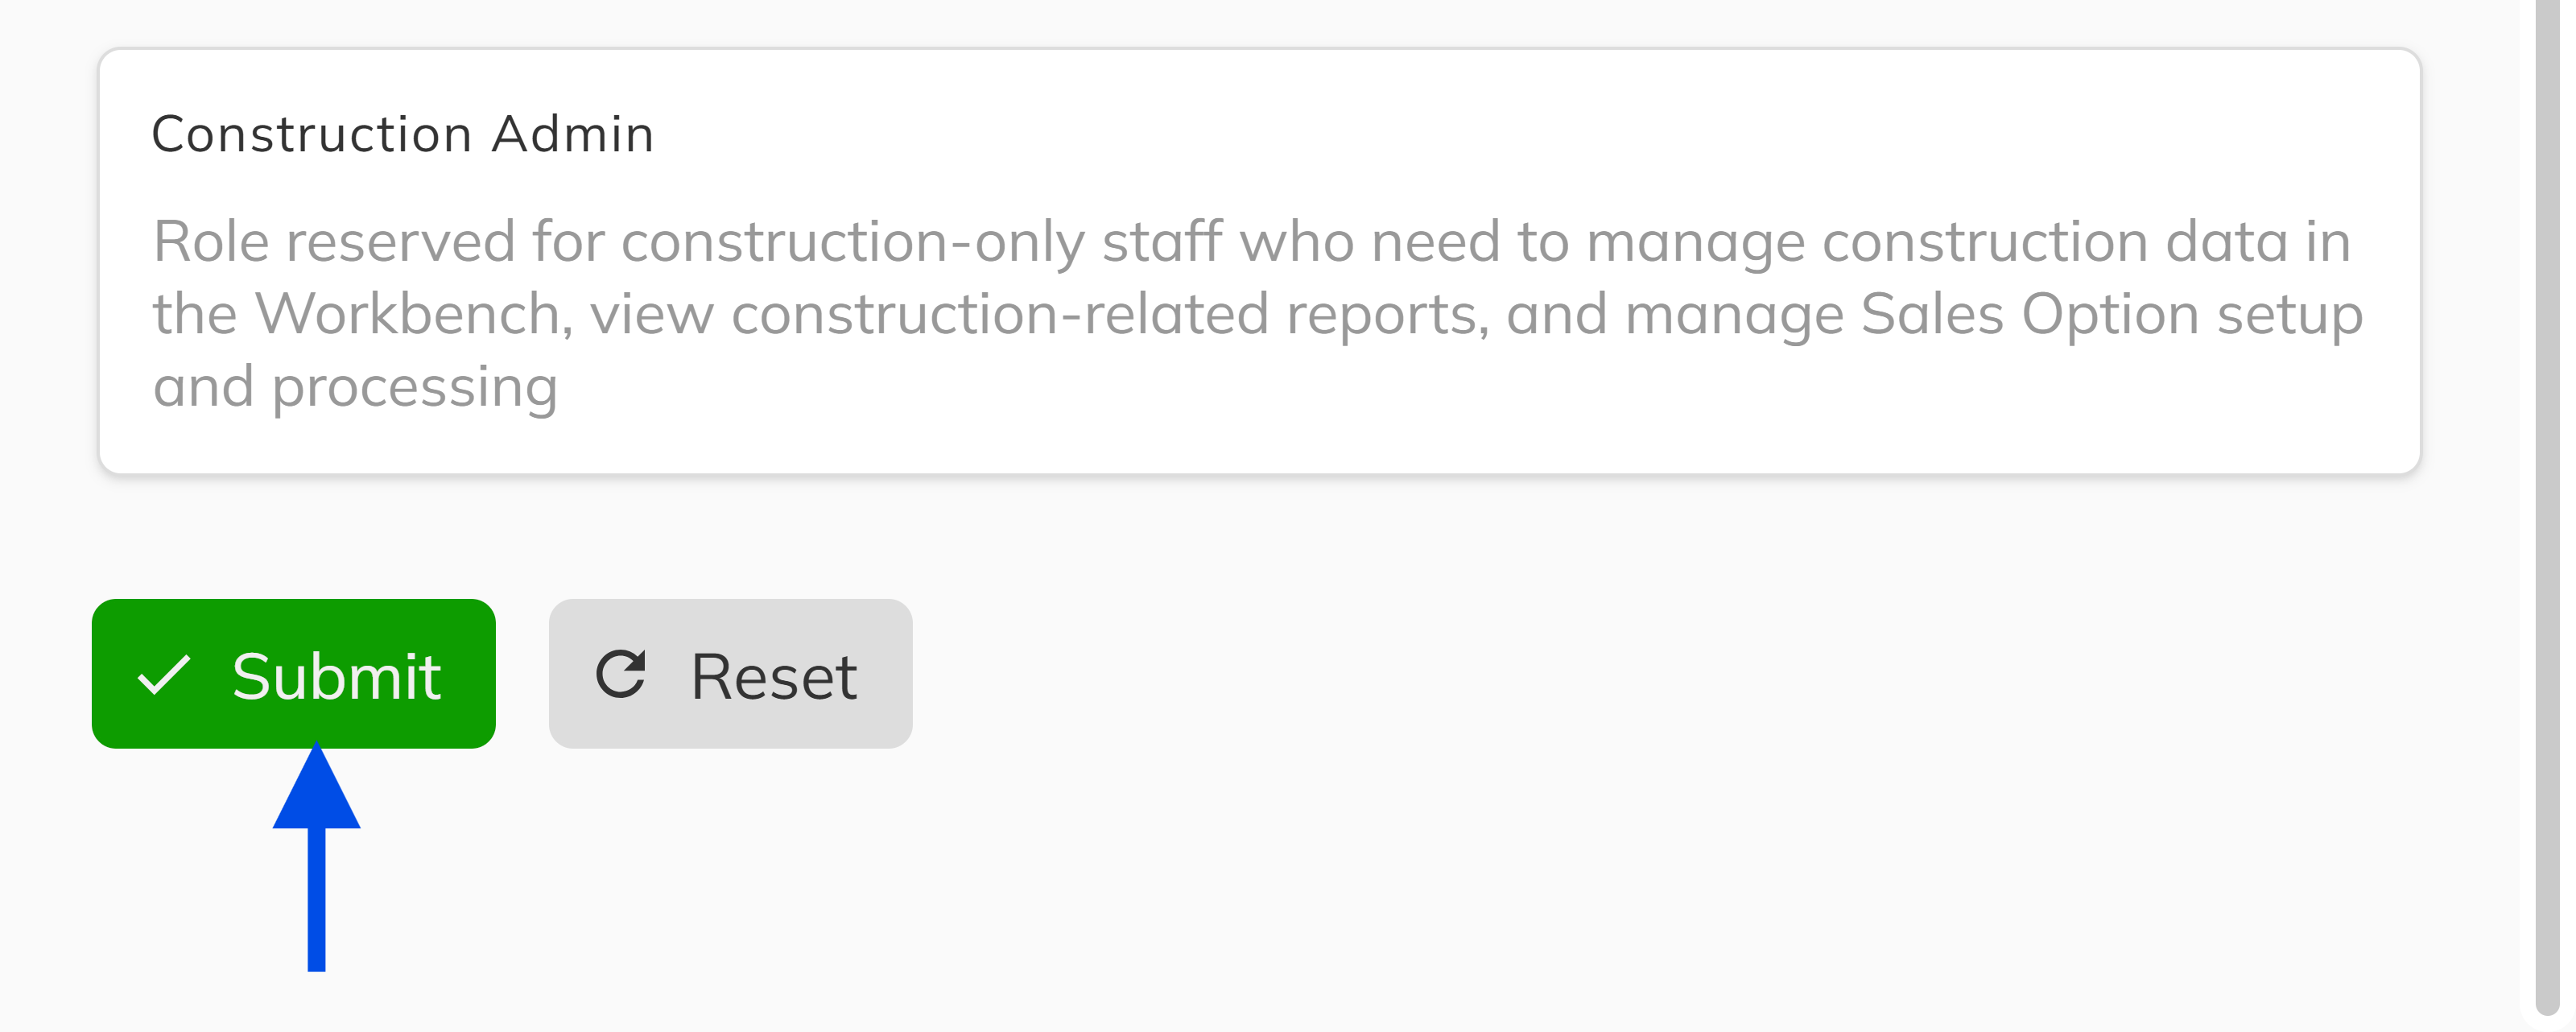
6. Submit the new staff member
Click Submit to create the account. A success notification will confirm the staff member was created. If the Send App Invitation toggle was enabled, the new staff member will receive an email with temporary login credentials.
Congratulations! You have successfully created a new staff member. The new account will appear in the staff directory grid, and the staff member can log in using the credentials sent to their email.
Managing an Existing Staff Member
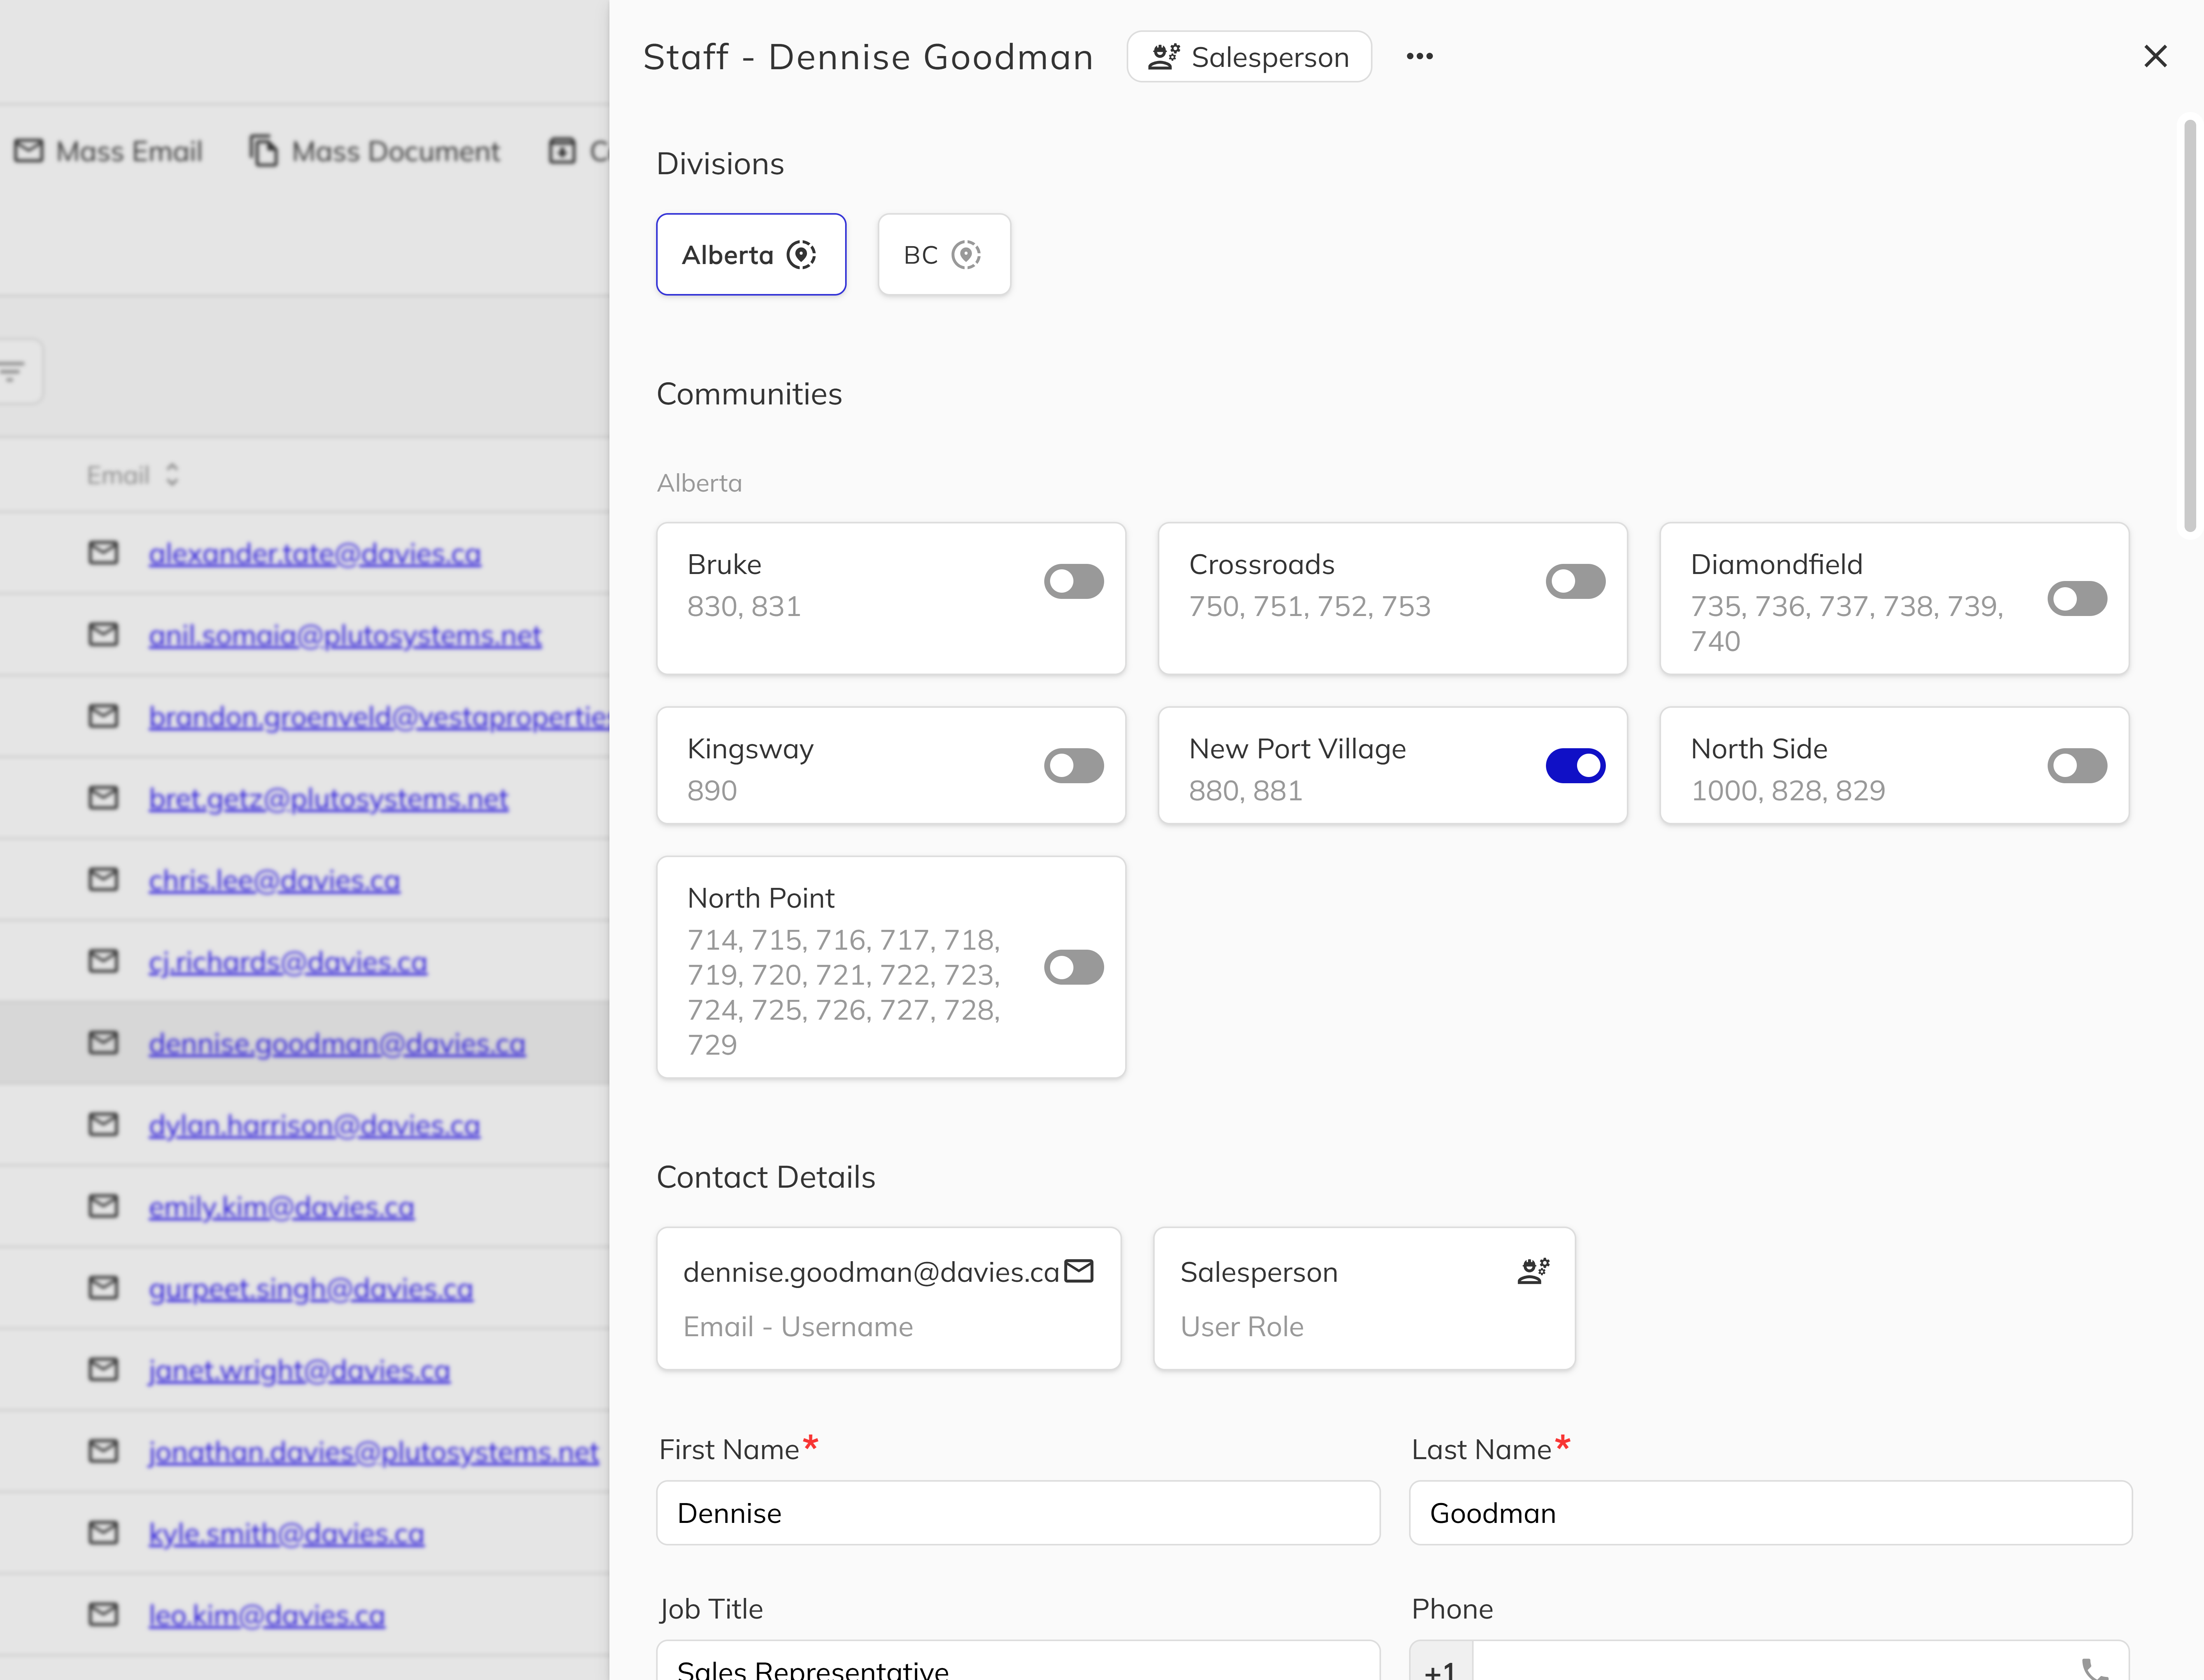
After creating a staff member, you can manage their account by clicking their row in the staff grid. The staff profile panel will open, giving you access to the following:
- Division & Community Assignments — Control which divisions and communities the staff member can access.
- Contact Details — Edit the staff member's name, job title, and phone number.
- User Permissions — Toggle individual permissions on or off. Use the Reset to Defaults button to revert all permissions back to the role's default set.
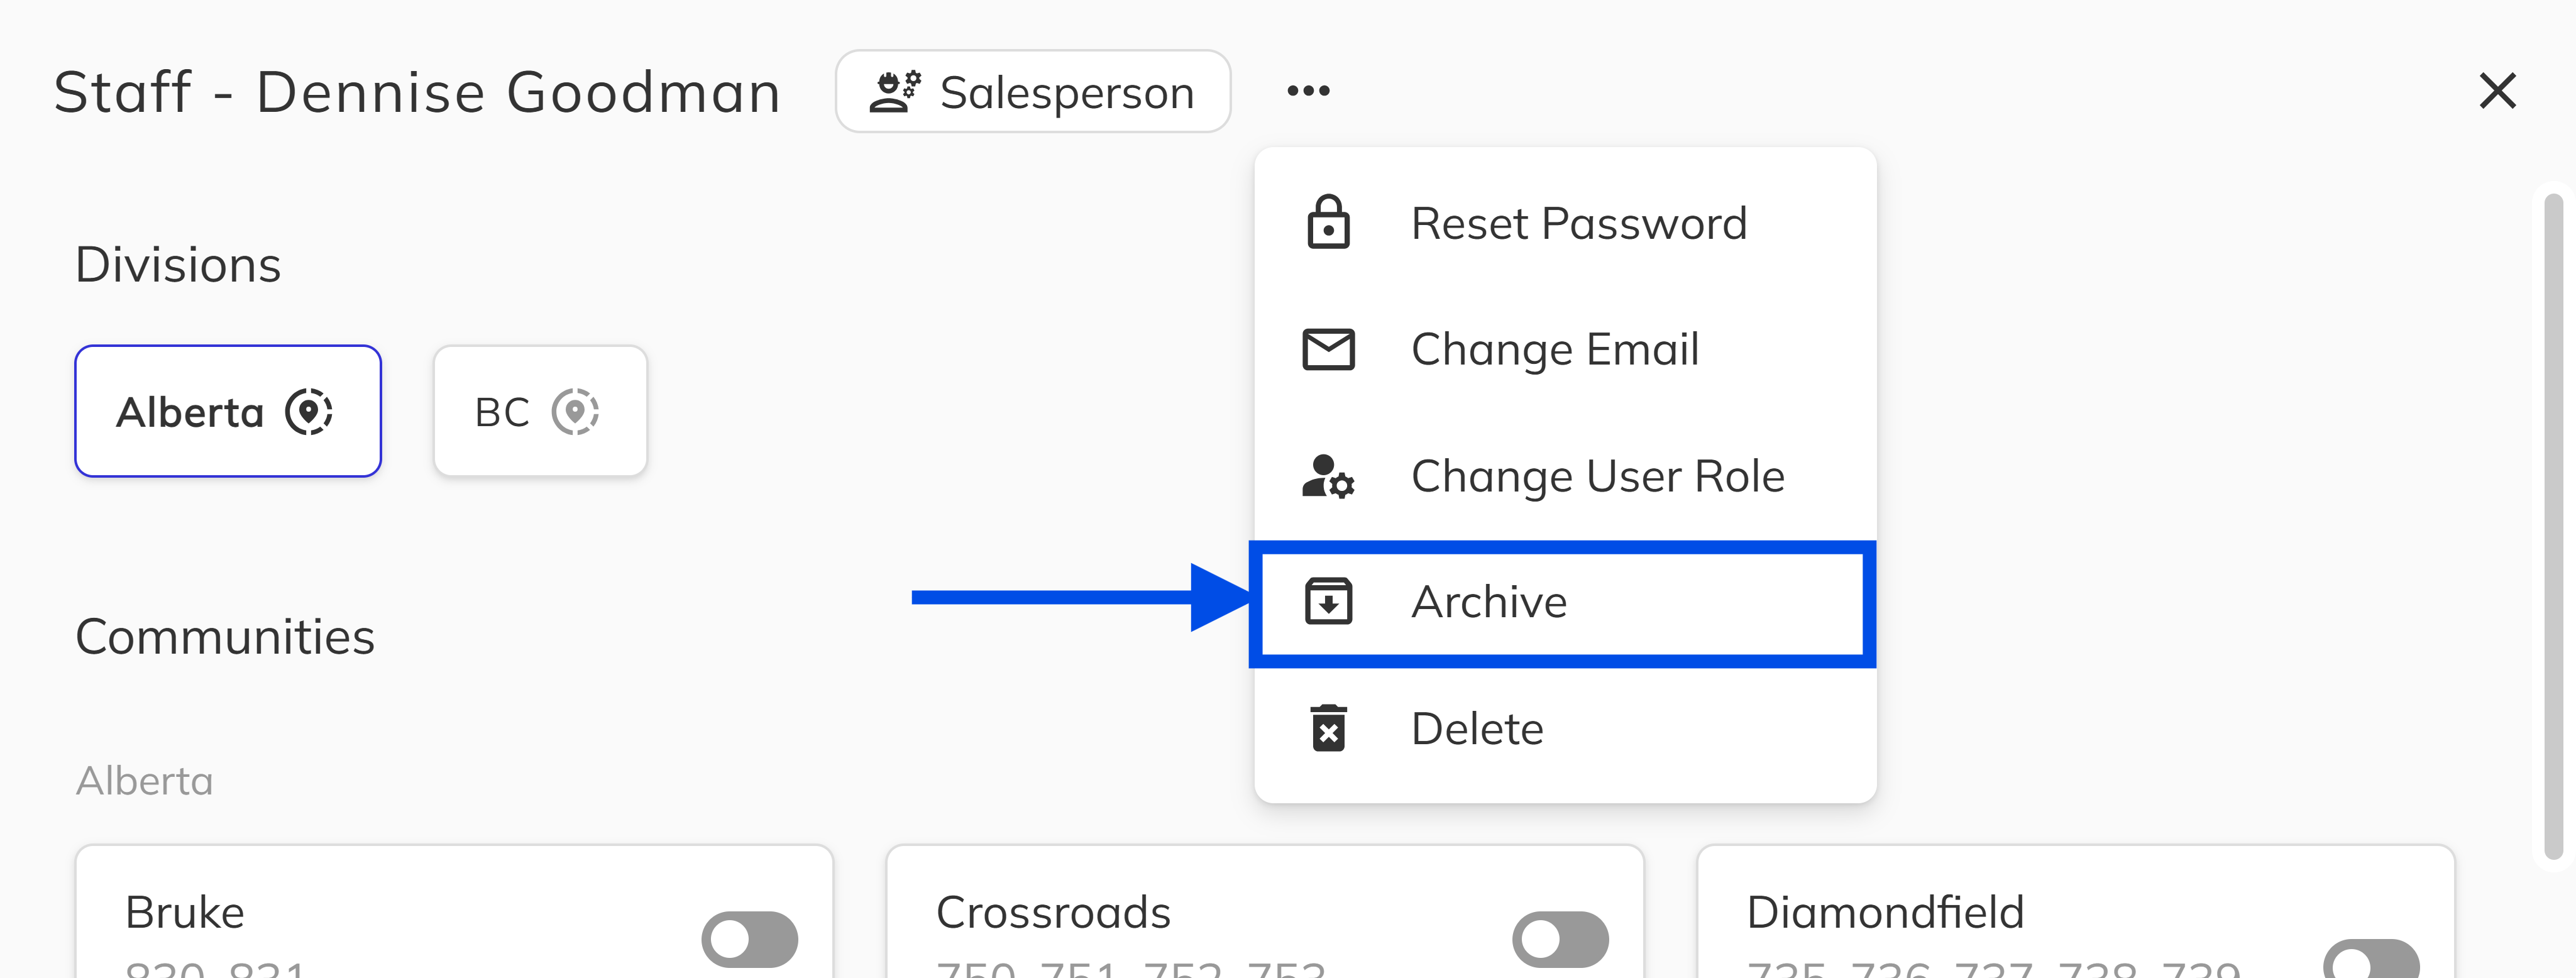
Additional actions are available from the dropdown menu in the staff panel header:
- Reset Password — Sends an email with new temporary login credentials.
- Change Email — Updates the staff member's login email address.
- Change User Role — Changes the assigned role. Note that changing the role does not automatically update the current permissions — it only changes the role label for reporting and app behavior.
- Archive — Removes the staff member from active use without deleting their data.
- Delete — Permanently removes the staff member's account.
Archiving Staff Members
When a team member leaves your organization or no longer needs access to the system, archiving their account is the recommended approach rather than deleting it.
Why Archive Instead of Delete?
Archiving preserves the staff member's data and history in the system while removing their access. This is important for several reasons:
- Audit trail — Archived staff remain linked to their historical activities, such as deals they worked on, contracts they signed, and emails they sent. Deleting would sever these connections and leave gaps in your records.
- Compliance — Many organizations require that records of who performed certain actions be maintained for regulatory or legal compliance. Archiving ensures this data is never lost.
- Reversibility — If a staff member returns or was archived in error, you can simply unarchive their account to restore full access instantly. Deletion is permanent and cannot be undone.
- Reporting accuracy — Historical reports that reference a staff member's name, role, or activities will continue to display correctly with archived accounts. Deletion could result in orphaned or incomplete records.
How to Archive a Staff Member
1. Open the staff member's profile
Navigate to Admin > Staff and left click on the staff member you want to archive in the staff directory grid to open their profile panel.
2. Archive the account
Left click the ... menu in the staff panel header and select Archive. A confirmation dialog will appear explaining that the staff member's data will be preserved but they will no longer be available in most apps and reports. Click Yes to confirm.
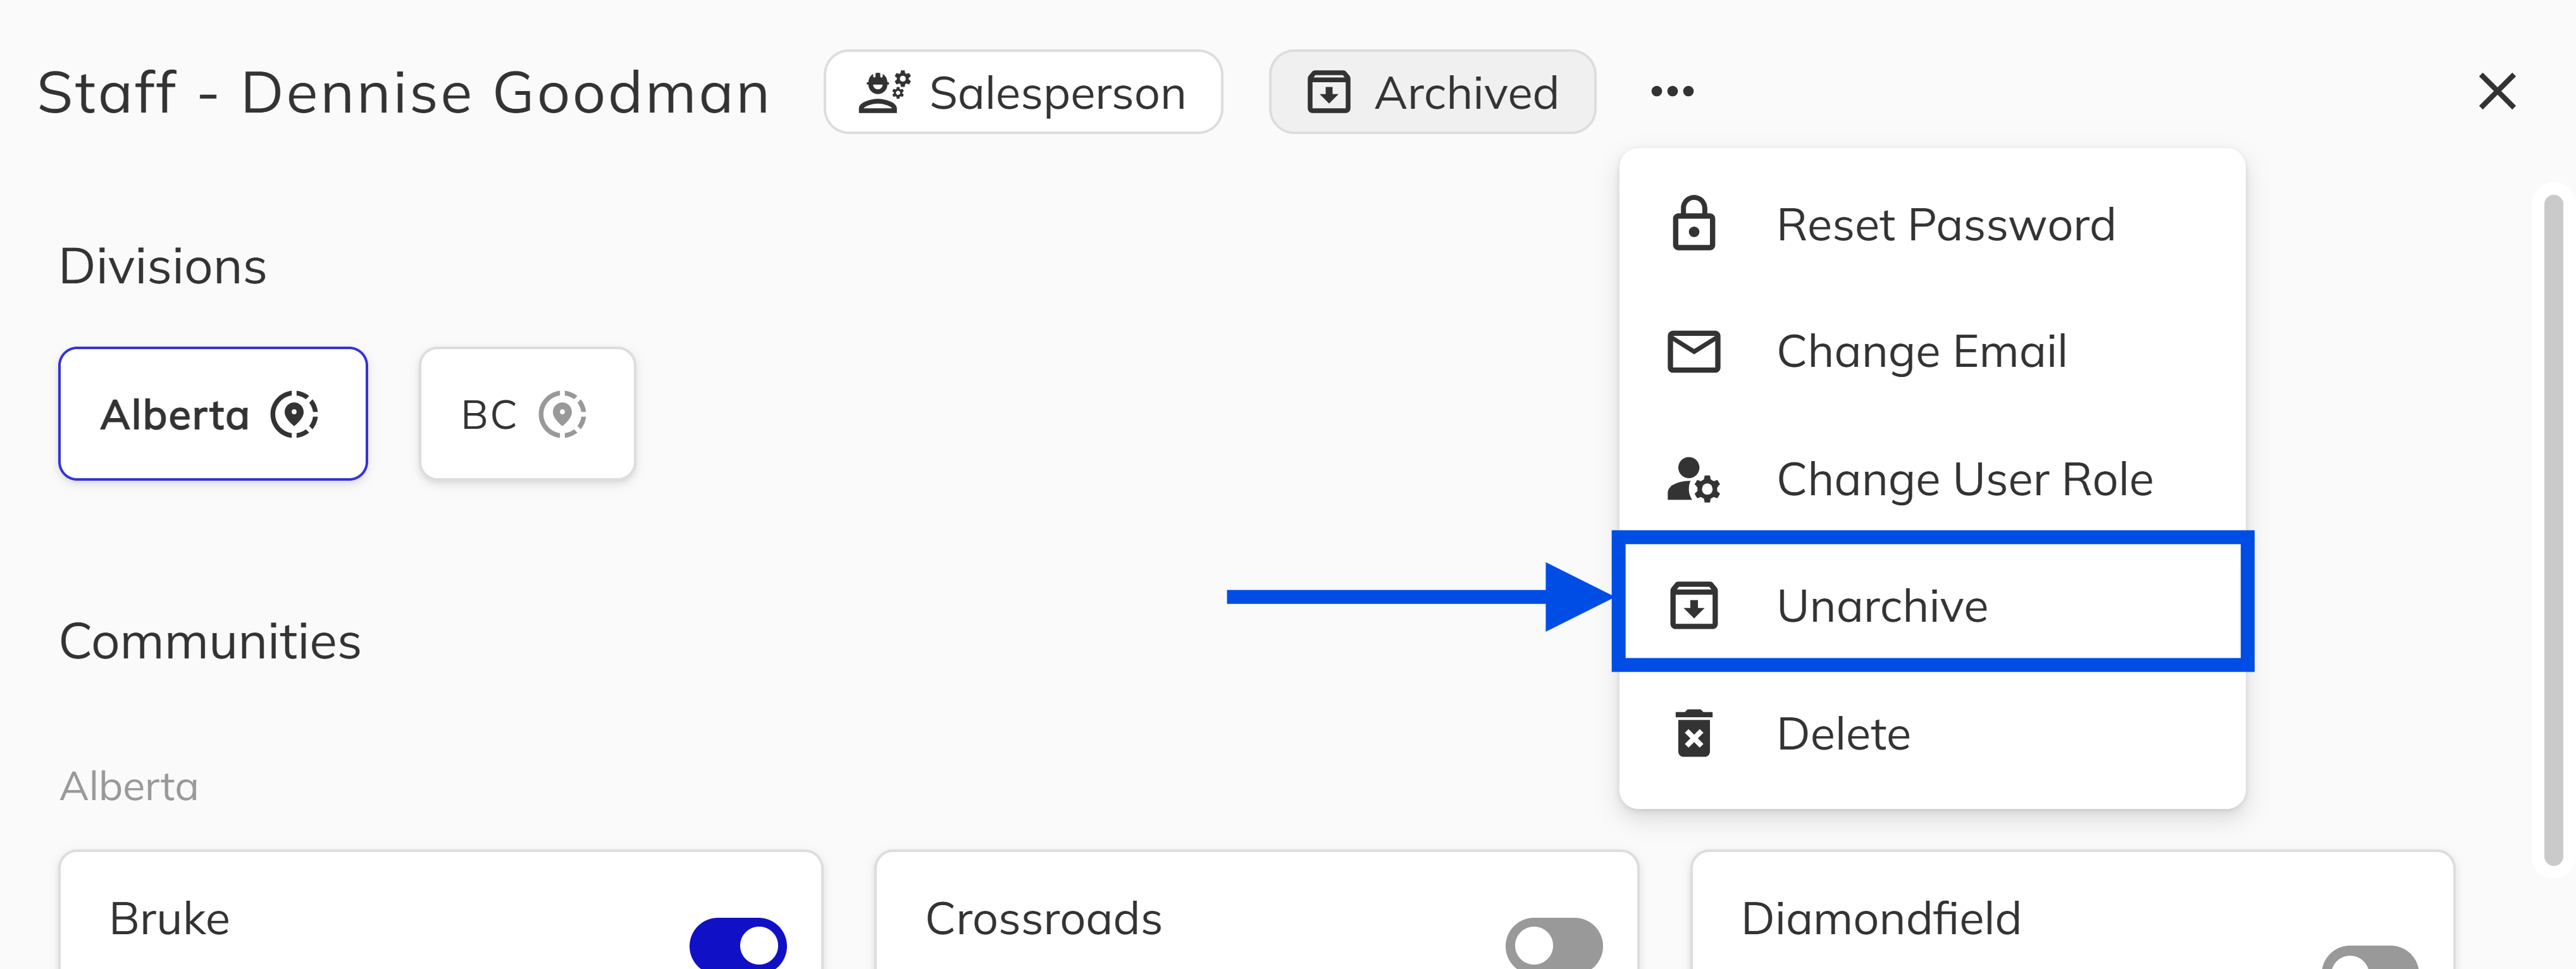
Once archived, the staff member's panel will display an Archived indicator. The staff member will no longer be able to log in and will be hidden from most views and reports throughout the application.
How to Unarchive a Staff Member
To restore an archived staff member, open their profile from the staff grid (you may need to filter for archived contacts), click the ... dropdown, and select Unarchive. The account will be immediately restored with all previous settings, permissions, and data intact.